This was the photo in the ad for a trailer that I could make better. We settled on a price without the boat loader.. I have no use for that. I’ve been looking for a wide, low flat deck trailer for a while …even considering building one from scratch. And this one is as close to perfect as I’m going to get..
My friend was going to Kelowna …so he picked it up for me. Tows great just the way it is..
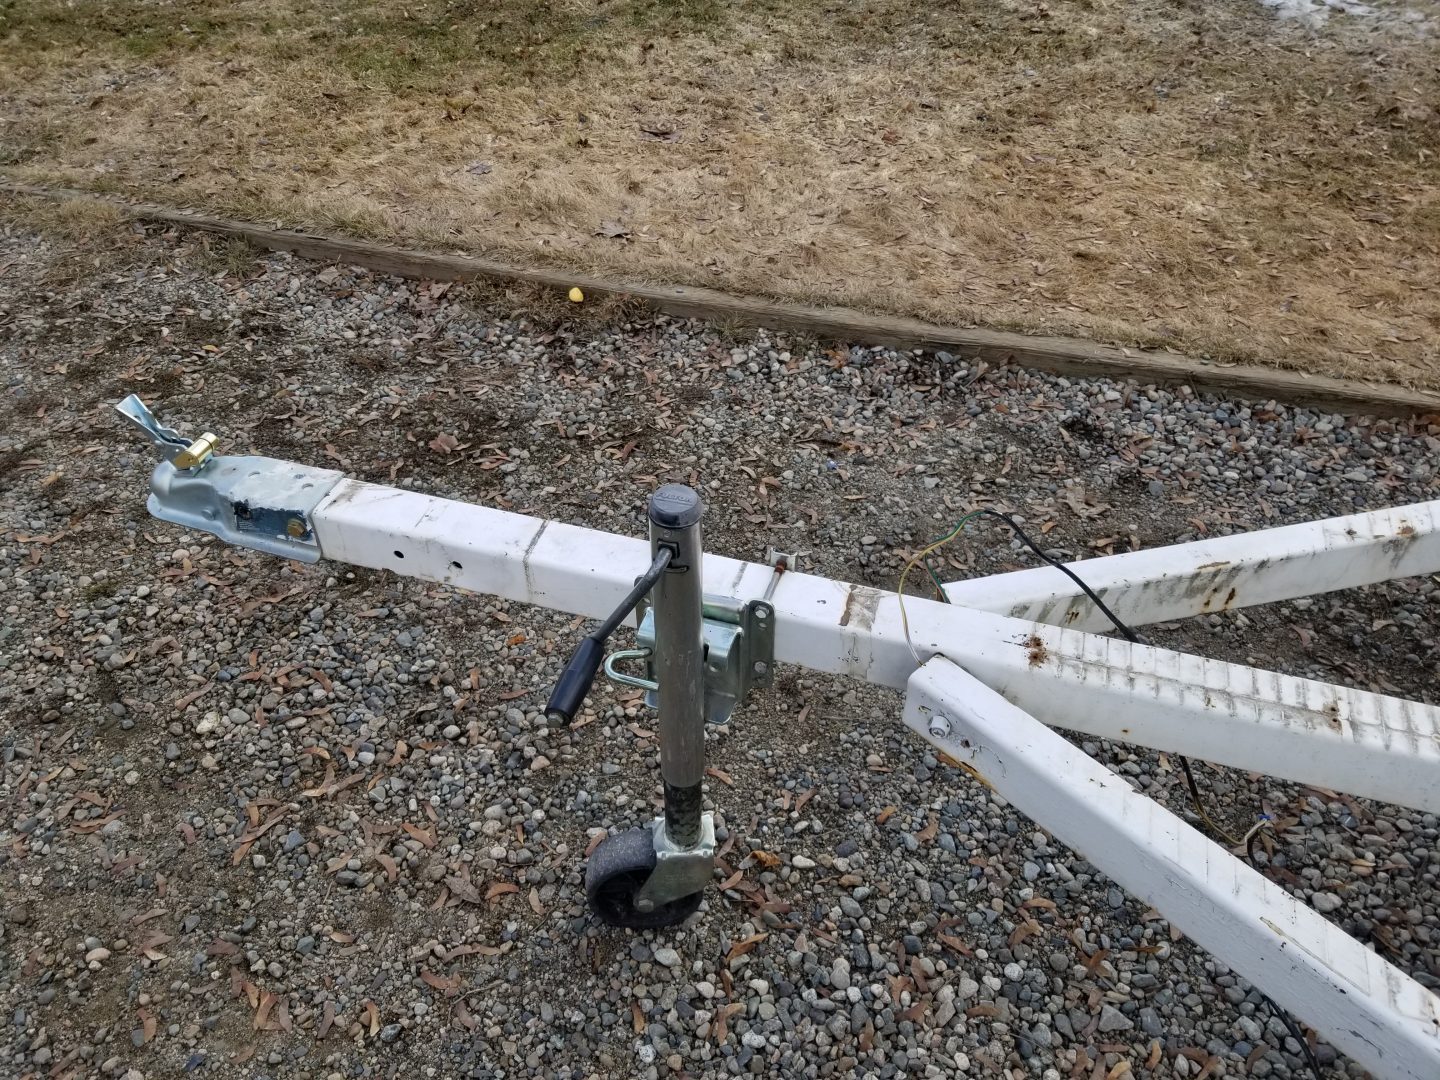
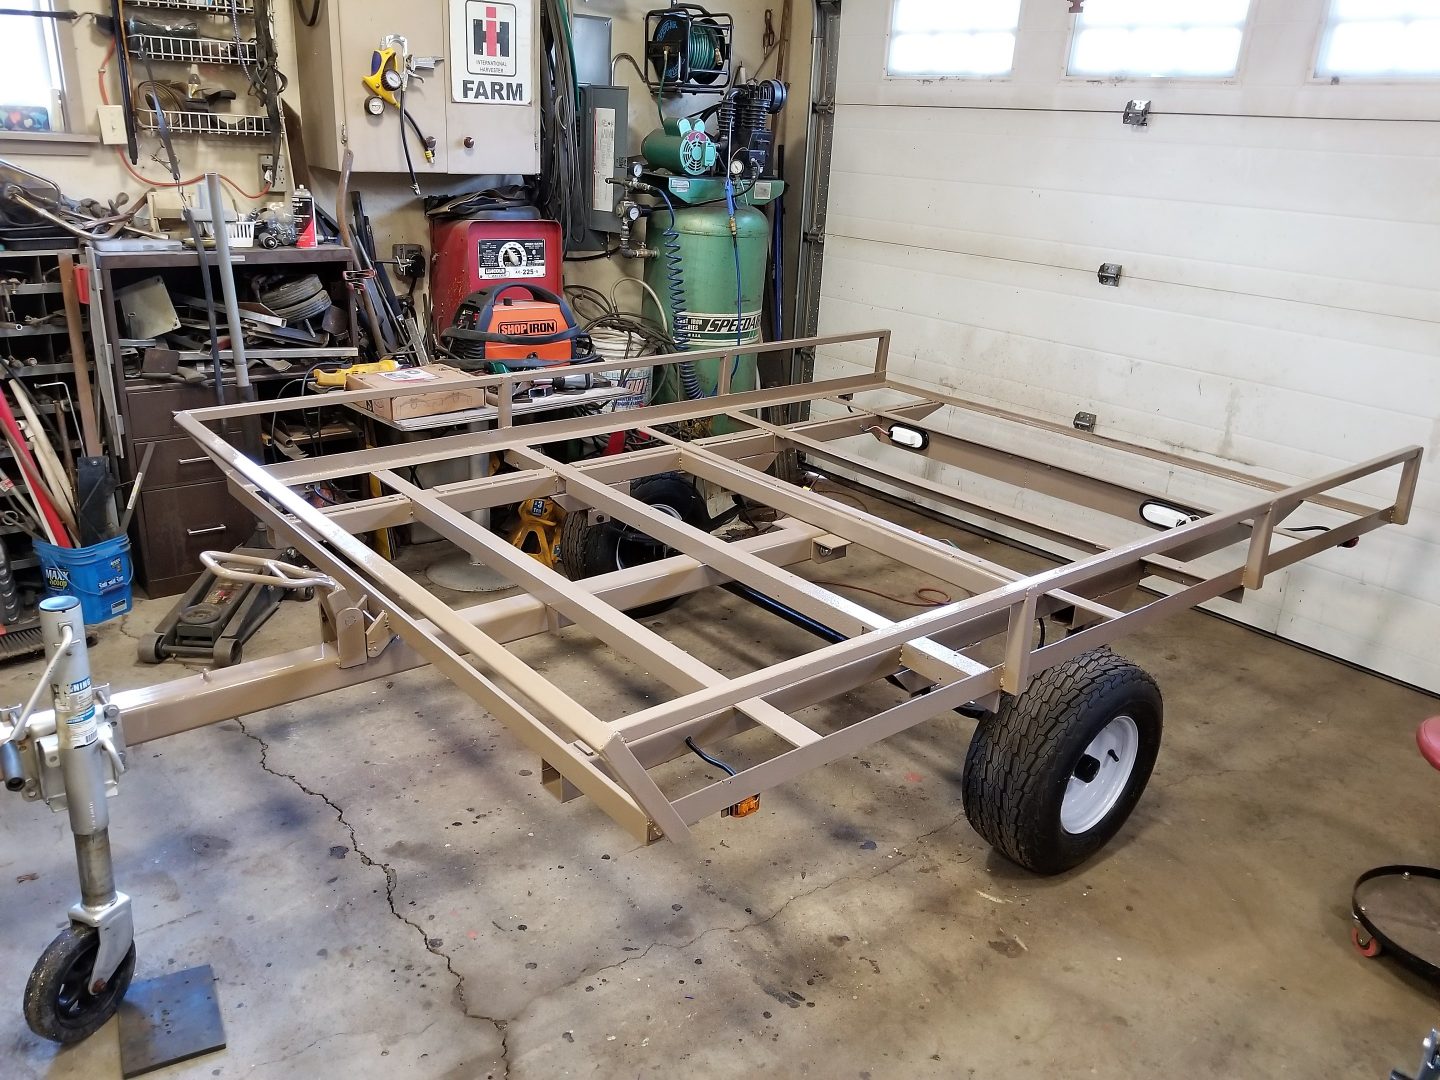
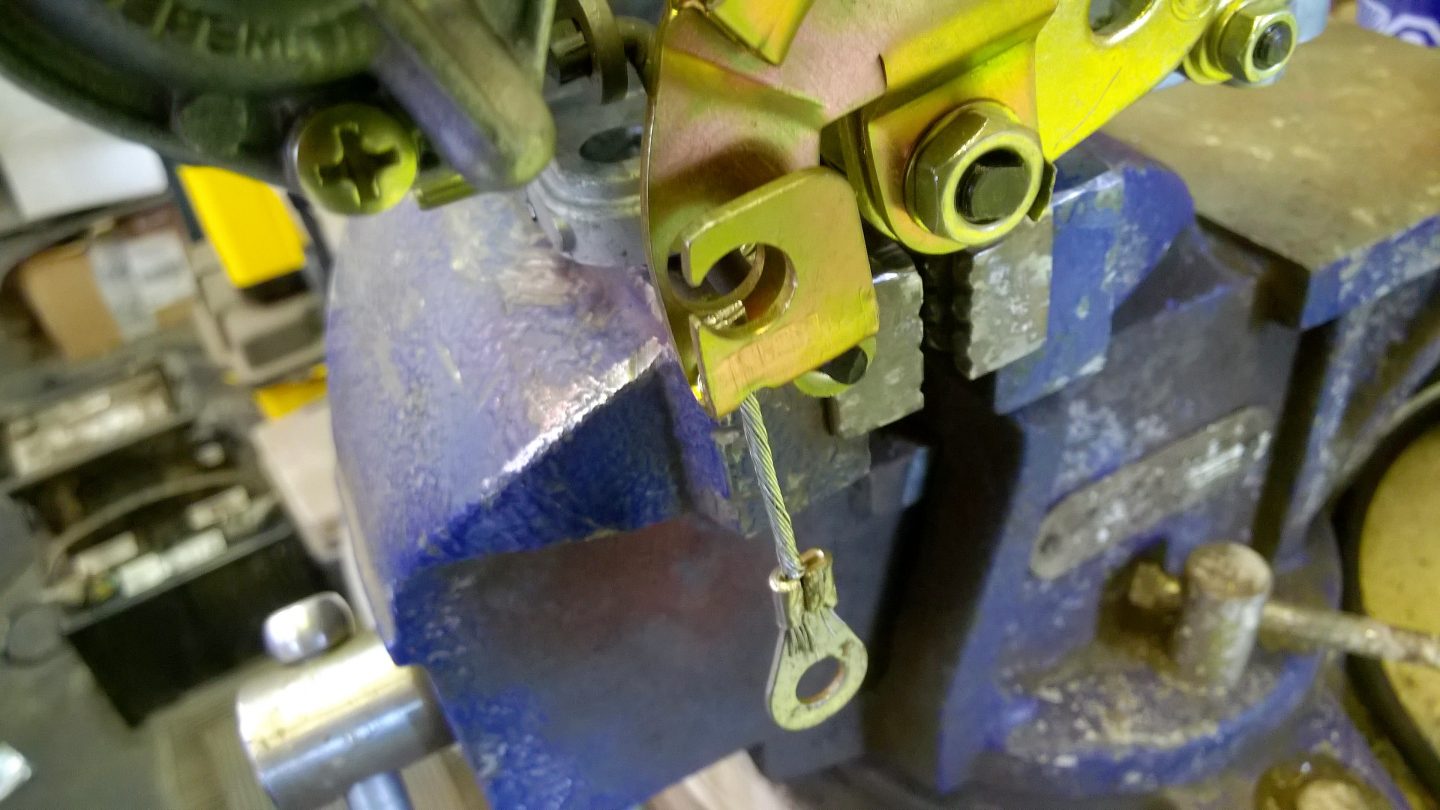
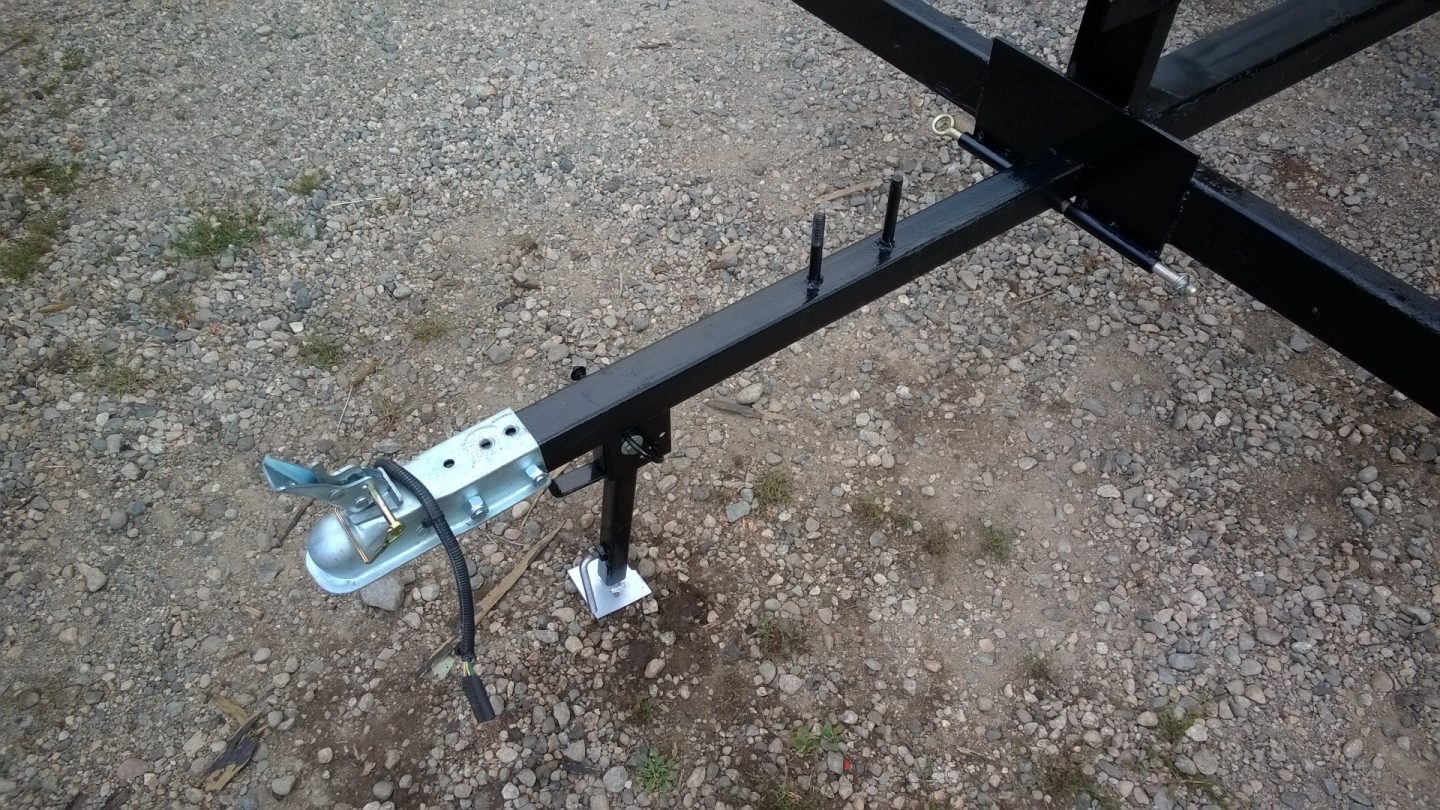
And here’s what I got.. 12 ” wheels, EZ lube hubs, LED tail lights, Swivel jack, new 2″ hitch and 2×6 treated wood deck.. All good stuff to start with. This trailer started life as a double jet ski trailer. I started by cleaning up the tongue.
I removed the step and the plastic grate . Don’t need those. Then I replaced the safety chain and re- routed the wires through the tongue tube.
Nice and tidy now… Oh and extra bolt in the coupler makes me feel better too. Next the wheels.
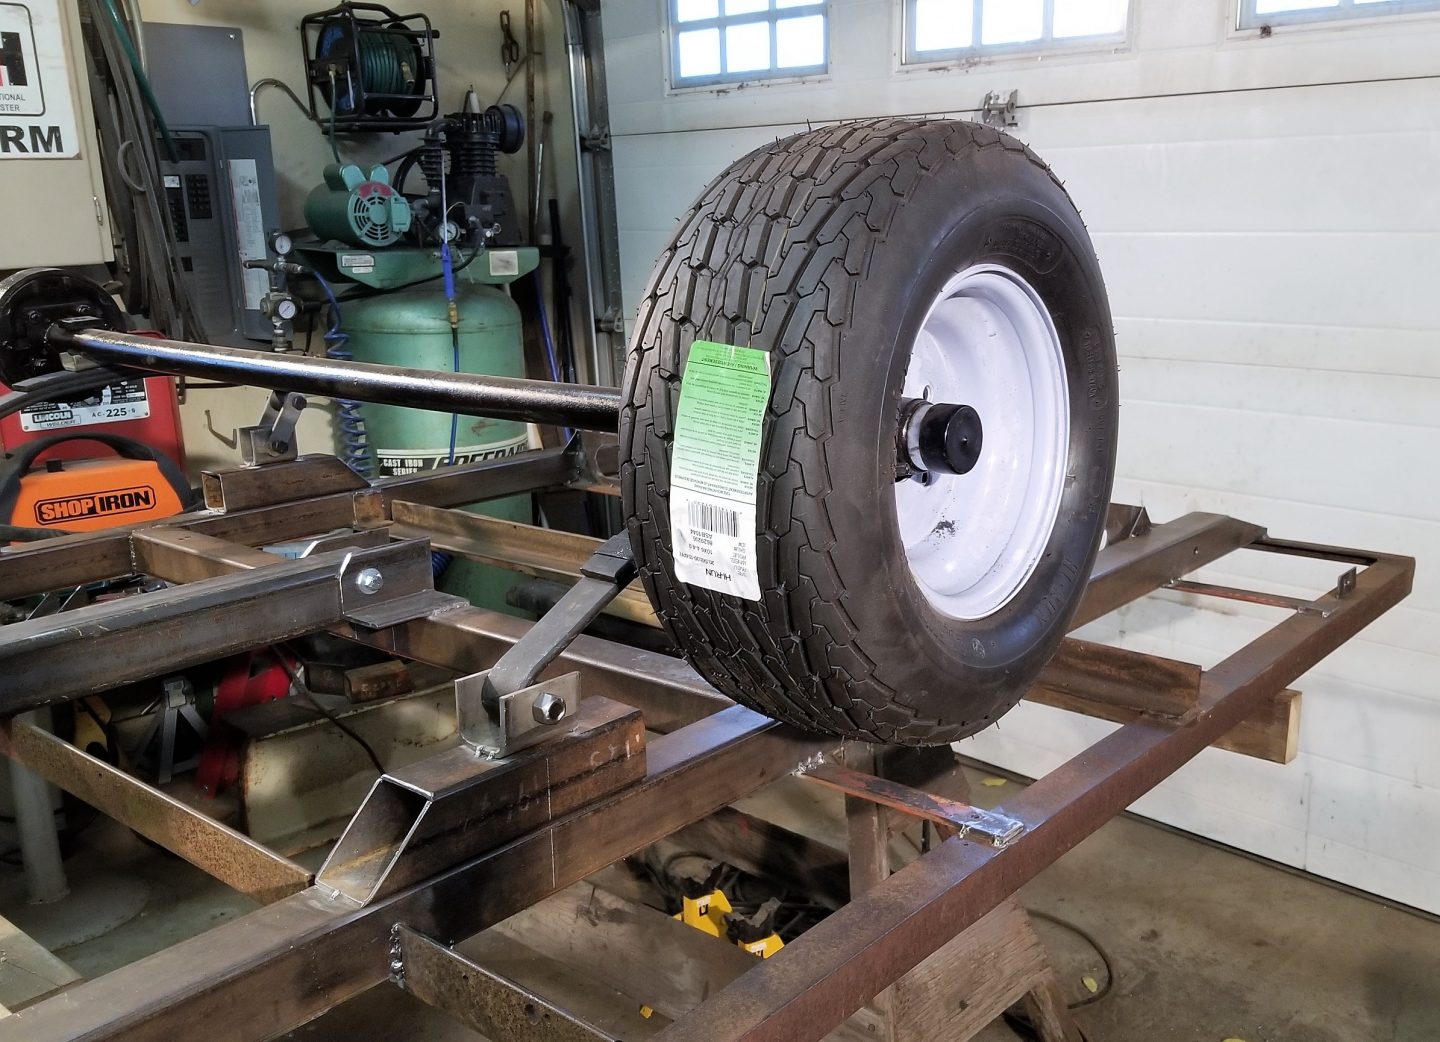
The white rims look good but the tires were only rated at 880 lbs each… too close for me.. These 12″ on black rims are more robust.. rated at 1200 lbs each.. And they are new !
I finally got the shop back .. Cleaned it out.. Now the trailer can be modified.
The first thing… remove the decking so I can add more framing for extra strength.
The next thing… add more length for the RZR.. this works great.. the front wheels park on this.
And then a support for the new mesh loading ramp.
Painted with the decking back on and the LED tail lights.. and we are good to go… I used the trailer like this before getting the ramp built.
And it works great.. And I got the mesh ramp built too !
Mesh ramp
Now no need for those other ramps.. And that’s a wrap…
And on we go… It was a delicate operation… but I used my Tractor to flip the trailer end for end..
Now you can see the angle of the tilt…. and the clearance the wheels have.
It’s a bit steeper that I would like .. but if you want the wheels tucked under than this is what you get.. And isn’t it interesting how it’s balanced ! Hopefully I can keep that after I add the side rails.
Except for a hole for the wires.. and clamping the wheel jack on.. the tongue is finished.. As soon as the paint is dry I’ll attach it to the trailer
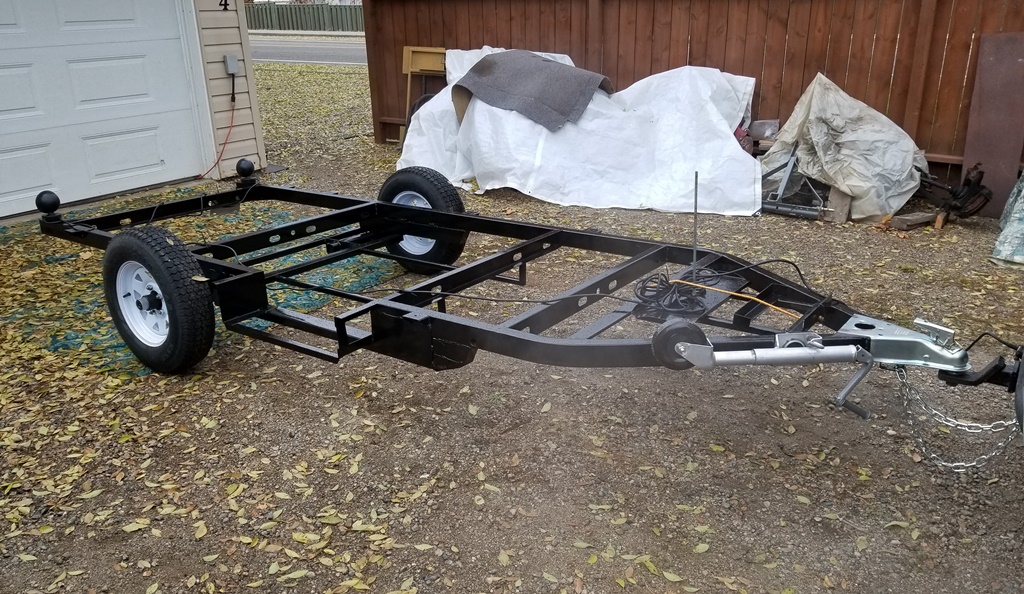
And there we have it ! And surprise ! I welded the side rails on too. The latch worked out great.. I now have the jack / wheel on the front.. so it a three wheeler.. And I’m happy with the weight.. I can push it around quite easily.
here’s a bit different view. The side rails are low… about 6 inches. And the front cross bar acts as a wheel chock.
The jack is on the drivers side… because it should be… Still need to finish the painting,
Done… All that’s needed now is the deck.
Not So Old Anymore !
All done except the road test … and getting registration.
Sold !
Right after I registered the trailer and took it for a test run.. Which proved I know how to build a trailer :)… I put it up for sale and sold it within the day.. Bye Bye.. On to the next project… Acorn Trailer
I’ve been wanting to build another one of these. AND now I’ll be needing one.. I’m planing to change my quad for a side by side. And the only way to carry it properly is on a wider .. lower … trailer. If it tilts for loading.. then better yet.
This old trailer was out on the farm.. it’s free.. BUT.. the only part that’s good is the 6 x 8 ft. deck frame and the tilting lock. The old rear end from a car is toast.. And the hitch part is just not the way I would like it to be..
But I love this lock for the tilt. so I carefully cut it off.. The small hitch frame I will use latter for a yard wagon. Hear is a chance to use the axle and new 10″ wheels I have from the Colman Tent Trailer I took apart a year ago. At 64″ hub face to hub face it’s perfect.
So I carefully rebuilt it. And painted it.. The 10 inch wheels will be lower to the ground. And I have 2 new never used wheels and two good spares. I will need new springs, but i have all the other new bits… so the running gear will be new… Put aside and ready to install .
So time for a new frame. I bought new 2-1/2 ” box steel. Then welded an H shape that’s a bit wider than what you see above. The old frame and the front piece of angle were cut out.. ( in red) . That old frame was all bent up..and too tall.. that added extra height, which I did not want. And the front piece was also bent..
After new notches were cut in the two cross pieces the old deck and the new frame fit together nicely. I should mention that the new frame where the springs will mount to is the same as the wheel base on a RZR side by side. That means the weight is held on the strongest part of the deck.
This cross piece is where the trailer tongue will attach with a hinge for tilting the trailer. But I need to add a few more bits… two more cross supports , and some shims so the decking is level. One of the issues with this kind of trailer is … where do you put lights? Well they need to be tucked under the deck. Same with the license plate.
So I’ll be using these pieces I cut out for a different trailer and did not use. But they will work nicely.
And there ya go.. As well you can see the shim pieces tacked on top of the frame to level off for the wood deck. Time to flip the whole thing over..
UpSideDown !
Several things are happening here.. The welding is finished on the underside… and I’m working on the tongue. The hinge , latch and hitch are all done.. Even a rest hoop that doubles as a safety chain mount.
The latching mechanism has been resized and should work great.. spring loaded so when the deck comes down…click! Not sure if I’ll be happy with this.. will see.
Spring is Here !
Not really… Today I went to Kelowna for some supplies.. includes two new 3 leaf springs. Now I will know how much clearance the 10 inch wheels will have under the deck..
Well look at that.. I’m needing to ad 2 1/2 inch tube to the frame to give the tire 3 inches of clearance under the deck… So we’ll have to see what the tilt angle ends up being.. Ends up to be 28 degrees.
I’ll need this left over piece cut in half… more welding.. Good thing I have the extra pieces.
I tacked them in place and attached the springs.. put the axle on top.. and the wheel.. and whadya know three inches of clearance.
Took it all apart and finished up the welds with the big welder.. got to be strong. Ready for the paint ! I randomly choose a brown.. witch turned out more like tan..
It’s like the base coat for a camo paint job.. good enough. And it took two days to dry ! The next step for me is to do the wiring while it’s easy.
All the wires are inside the main frame tubes as much as possible. The side marker lights are LED’s I’ve recessed them a bit to better protect them.
The taillights are not LED.. but they are bright.. and they too are recessed in a rubber grommet. In the past I and others have broken too many trailer lights.. So now I’m careful how and where I mount them.
I am now ready to flip the trailer over on to it’s wheels… and finish the top side.. Time for a new page.. cause there’s much more work to do…
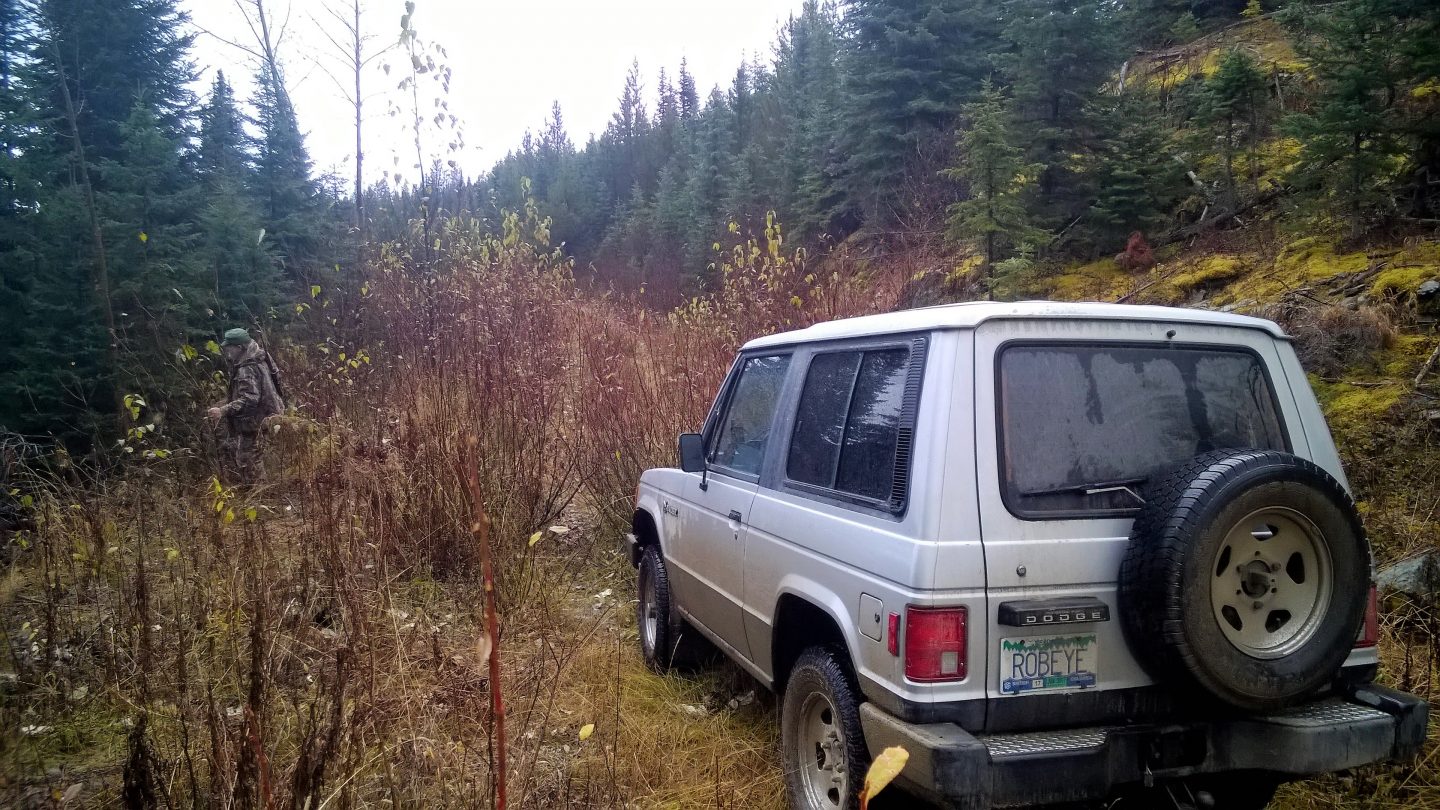
And I’m getting out lots ATV ing… It’s now a tradition to go camping 56 kms up the Granby Rd.. Hunting season ! I don’t hunt but the boys aren’t all that serious about it either. It’s a chance for camp fires … bad food.. and exploring on our ATV’s My camping rig worked out good..
I had my own cozy place… Unfortunately it rained more that we would have liked.. which dampened the fire and I got cold & wet every time I went for a ride. Then in the second week I got the chance to try a Side by side ATV.. A Polaris RZR 800.
And yes it has a roof and a windscreen ! Wish I had that the week before.. In trade for using this I fixed the bush guard seen above..
Here you can see that it’s bent down and it’s loose too.. I removed it for the rides I went on.. put on about 120 kms of mixed riding.. and I even took a friend along one of the rides.. I really like the protection and the safe feeling …. not to mention the dry / not cold feeling. It goes everywhere the quads went.. It’s only 4 inches wider.
You can see a bit of snow.. yup it’s cold. But I was warm.. and it’s comfy too.. In the spring my friend will be selling this RZR.. and I may just want it.. After all it’s got a new and improved bush guard !
Also lot’s of storage in the rear tray too..
I like it.. So we’ll see next spring if I make a deal… and ATVing will never be the same..
Jan 2019 : NOT Spring.
I did a lot of research on RZR’s since that ride. Looking at used ones.. The prices, the features and the condition. One of them got my attention since early December.. And it was at the dealer where I bought my 400 quad. So naturally they are willing to trade. This one is a 2014 Polaris RZR 570.. with all the goodies I want.. So without further ado… I’ll make another post… Oh and The 800 got sold to someone..
Yesterday I started the process of lifting the body off the frame.. Not too hard to do… I’m working alone. Just need a floor jack and beams.. After taking out the rusty screws. It started raining heavily so I had to quit. Today I’m back at it…
Had to remove the wheels so I could lower the frame more to clear the wheel wells. So I put two 12 ft 4×4’s under the frame and pulled it out with the tractor.. All went well till I bumped one of the jack stands and the body almost fell to the ground.. But I sorted that out and .. the frame came out and the new wheels went on. One of the old wheels had a leak..
And there you have it… one SAD boler frame. Yes it’s light.. but it’s very flimsy too. Never mind the rust.. it’s cracked behind the left wheel…
Apparently this is common.. and it’s only one of the reasons why you want a new frame. Usually the tongue has broken too and someone fixed that.. wow
Look at that ! they even jammed a piece of wood in there.. Let’s just say that this was not a “road worthy” frame.. and build a new one. However first thing I want to do is construct a cradle for the body so it won’t have to sit on those jack stands any more.
Done! I built it to hold the floor and the two ends.. My wheels are a bit wimpy but it’s all I got .. and they should help when I need to move it into the shop.. Now I stare at the frame and wonder where to start. Some have built the new frame on top of the old one.. so as to get things aligned properly. One thing I need to figure out is just how different the suspension will be. The factory axles are Dexter Torflex. And still available.. but costly to ship. I bought the ones from Princess Auto.. made by the same company but they say 22 degree angle.. and the boler axle should be 10 degrees up and pointing forward.. A strange thing for sure.. but successful. However the old axle IS the same as the new one at 22degrees. Soooo I will flip the new ones ( they don’t say you can’t) and I will mount them an inch lower.. not much of a gain in height.. but still something.
Here’s the old and new.. for comparison.. The mounts are different ..but then the whole frame will be anyway.
One thing for sure ..this sag won’t be there ! That’s the new frame tube on top.. I’m kicking the old frame outside .. and cleaning up the new pieces.. everything is measured and the plans are drawn. Here’s the first frame video…
Well I did kick the old frame out and made a jig on my saw horses to build the new frame..
The debate still goes on which way to mount the axles.. I’m tending to favor the rear configuration.. it will lift the trailer by 4 inches.. but I’m thinking that’s good.. cause I saw damage to the old frame from hitting things. There was about 8 inches of clearance under the trailer.
Oct 22 2018: I’ve decided to have the arms up and leading the axle. And for a bit of extra height I’m adding a 1- 1/2 ” block between the frame and the axle. I should be within 1 – 2 inches of the factory height. This makes the door sill proper height.. you won’t need a step. And that’s the way boler’s should be.
I now have my four cross pieces welded in place .. That’s four more than the old frame had. The frame has been squared and corner braces added
The C – channel I used is from the Tent Trailer frame… light but strong. I’m cutting the tubes to build up the 6 ” drop for the floor pan. but since I’m working upside down it’s up…
I will cut the door opening after I have the frame braced. Oh.. and the old frame is no more.. I cut it up to use some of the better pieces. Would have been nice to keep it intact so I could show a side by side comparison.. but I don’t want to buy metal.. ya I’m a bit cheep. Re-use and Re -cycle.. that’s the way I roll.
It’s coming along nicely.. There’s the door opening. Used some bits from the old frame for this too. Lot’s of welding going on here..
Got to have a place for the propane tanks.. And a battery in front of that. Plus all this helps brace the frame. The down side is the weight.. I plan on weighing it when I’m done.. and I expect a few hundred pounds more. The up side is that this frame won’t need the body for support.. So the body is simply carried.
Here’s my new rear bumper.. it’s a work of art using pieces from the old frame. Also it’s longer to protect the width of the trailer. still needs a spare tire mount and the rear stabilizer jacks will be mounted too. I will make this slide into the frame and bolt in place. If I welded it that would make it harder to roll the frame under the body.
Oct 30 th 2017: It’s looking like I’ll finish the frame earlier then I thought. I got all the welding done.. cleaned up … and painted the bottom of the frame today..
Here’s the axles on.. and the two supports for the floor..
And now most of it is shiny black. I turned the heat up to dry the paint better too. Then I thought of a way to estimate the weight of the old frame. .. by weighing the bits. I estimate it to be 230 lbs. + / – 30 lbs. But at least I will know how much heavier the new frame is.
Nov 1 2017: Well I rolled the frame out of the shop.. parked it next to the body.. I’m so nervous thinking I got the sizes wrong.. But it looks like a fit . I want to take it and weigh it to see just how much heavier it ended up being.
And off to the scales and the landfill. And wouldn’t you know it ! Lighter than expected ! 330 lbs on the nose. That’s approximately 100 lbs more than the old rusty frame. Right on target.. I’ve still working on the rear bumper.. but the frame will stay outside now.. Like any good trailer.. :).
Now that the carburetor is changed over and working good.. It’s time to address some of the other things. And the first and somewhat urgent fix is the exhaust leak at the bottom of the header, where it joins the two into one pipe . It’s never good to have a leak in the exhaust system. Plus it can be noisy.. this wasn’t too noisy but you could hear it. So I thought it was simply the gasket that goes there.. And while trying to get the very rusted nuts off we sheared the studs.. Oh boy now we got a can of worms.. But I looked at it as an opportunity to remove the exhaust manifold and remove some more of the not needed stuff . So we pulled the both pieces of the exhaust out. And this turned out to be a very good thing.. because the leak was not the gasket ..but a crack in the pipe.
The crack is right up against the weld.. That will not do so I welded the crack up and drilled and tapped out the studs… got new studs & nuts.. Also welded shut a hole where the pipe came off for the silly reed valve.. ( pollution control stuff). The new carb has no place to hook up that stuff.. so it’s doing nothing but taking up space. Plus it could be another exhaust leak down the road.. When all is done I should have a very quiet Raider.
Isn’t that pretty ! This is going to put the rest of the motor to shame.. You can see my plug for where the pipe was.. Oh and the heat shield will not go back on.. it’s only real purpose was to provide warm air to the air intake.. Again no place for that.
Well I’m all done that job.. and the exhaust is going out the back where it should.. That crosses a few things of the list.. It’s good to drive till the weather is warmer.
Nov 2017:
Well I did get the brakes done,, And used the Raider for most of the summer.. then I put it up[ for sale.. It’s sold now to someone I know and he wanted a good hunting buggy.. Prefect.. That chapter closed !
It’s February… Late February.. And the Carb kit is here !
And this is what I got.. A conversion kit. I would not say complete, because it’s not.. I’ve had to make some bits and buy some bits. So I made room in the shop for the Raider to sneak in.. And set to work removing all the crap that the Mikuni carb needed to work.. All the vacuum lines and electric sensors… gone.
This is after I installed the adapter plates for the Weber. And that was after I plugged some holes. The old carb had coolant flowing through.. so I had to plug those off. I got nice little nipples to plug the vacuum manifold. And I needed to deal with the return vent line from the fuel tank. I bought a new fuel filter that had the place for that vent line so problem solved. But there’s more things to figure out. Despite being told this kit worked for the auto transmission.. there was no way to hook up the kick down cable to the throttle. I had to invent something ..
A bicycle brake cable with a crimp on terminal.. hey it works! Took me an hour to figure it out.. But I was determined.
So here’s how it all looks .. that round thingy is a fuel pressure regulator.. adjustable too. The instructions don’t say much ..but they did say that fuel pressure needs to be 2.5 psi.. so that is the solution. One power wire to the choke and we are off and running…
Test Drive:
WOW.. I can’t believe the power now.. That old carb was a dog. The Raider is zippy.. and the shifts are good too.. initially the idle was too high. The spring was having trouble pulling the throttle back.. so I tweaked the cables a bit and got that to work. The motor idles at 800 rpm like it should now.. So back into the shop to tidy things up and check it all over.
And that is where we are at.. Here’s the finished install. I fixed a few other things while the Raider was warm and dry.. The wipers would never park properly. . So I pulled the motor out and repositioned the drive arm.. fixed ! I also installed the day time running lights that I’ve had for a bit.. last fall I wired the switch up and now we have lights too.
The replacement for the mini truck ! And the Rav 4 too.
It’s quite nice.. more room, automatic, goes faster, has more power. Could seat 4, and the steering wheel is on the proper side. This is a 1987 Dodge Raider.. or Mitsubishi Montero. 262657 kms. While not the prettiest girl in the room.. but maybe the most capable. As a 4×4 these are reportedly as good as a Jeep or Landrover. I’m not a fan of Mitsubishi motors. But this one runs great.. These 2.6 liter 4 cylinder motors were used in a few dodge vehicles from the eighties. So I’m quietly optimistic.
I like the full door on the back. Makes getting things in and out easy. And a trailer hitch is needed for what I do.. because this is not a pick-up I will have to tow a trailer for packing yard waste and mowers. Those are heavy steel bumpers too. The black paint is faded but not rusted. I’ve only driven the Raider a short distance. Today I will go get it and bring it home.. that’s about 40 kms on the highway. So we will see how that goes.
I put just a one day permit on the Raider.. mostly to get it home from Greenwood. It did ok on the highway.. not too fast. As expected it drove like a true short wheel base off road vehicle. The tires are old , so there’s some handling due to that. I drove it around town today.. and in town it’s great. In fact I went down a very rough road. That suspension seat is so cool.. Wow. great ride for the driver.
Check out the “inclinometer” in the middle… yes it tells you when you are going up hill.. down hill.. and tipped ! Jeep don’t got one!.
Now for the stuff this Raider needs. The first is New tires! I got a good deal on all weather / all terrain tires. So as soon as I get them mounted.. then that will not be an issue. The carb will need some tweaking .., the choke is staying on too long., Are the gauges telling the truth? if so then the oil pressure is a bit low. The coolant temperature shows low.. but the motor seams hot ? The transmission fluid should be changed.. as well as the diffs. It’s good to “reset ” these things so there is no worries. It looks like the wiper motor was replaced .. but the wipers don’t stop in the park position.. so that will be a little project.
So I suppose this was considered a good stereo 30 years ago ? But it sucks now. I don’t think I can find my old cassette tapes ! Do I want to .. ? Any way the speakers are tired.. and I would like to use my satellite radio. Maybe next year I’ll deal with this. It wouldn’t be hard to change. However the mechanical stuff is top on the list. I also need to make sure the Raider is good for the trip to Quesnel. That is where my good friend goes hunting.. and this I’m going too.
Oct 6 2016: The new tires are on and I’ve checked out the brakes, tie rods, suspension and bearings. We also adjusted the choke and idle.. As well I’ve installed a mount for my off road GPS. and I’ve set up my Sirus radio too.
Oct 8 2016: I got a bit carried away while cleaning up some things… and installed a winch, LED flood lights, a second power plug, a USB charging port, and while I was at it .. a switch and wiring for my daytime running lights. ( yet to come),.
This is temporary , till I build a nice mount and bush guard.
The center console was the perfect place for these new conveniences. I now know how to remove the lower dash. Handy when I change the stereo, install the keyless locking system…
Carry on:
I drove the Raider to Kelowna and back on Sunday.. that was a good test for long hauling.. Found out that the fuel gauge is not much help.. It goes rather quickly to a quarter tank.. and stays there for awhile. But I got to test fuel consumption. The 60 ltr tank should get me about 450 kms.. on a good day. so I’ll make sure to record the kms and reset the trip. The choke is still an issue ! I either have cold start ability and high idle… or low idle and no choke.. I’ll keep trying to get it right. I replaced the fan belt today.. and I checked out the hubs.. to make sure they work.. Good to go. In two days I leave for a 10 hr drive to were my friend is camped.. towing the small trailer with my quad.. we will see how that goes.
Oct 24 2016:
Well I’m back from the Caribou adventure. Despite the minor inconveniences, The Raider did very well. I was towing a trailer with my quad in it. Weighing at least 800 + lbs.. The Raider can pull that.. but it really slowed down on the hills. Also fuel consumption was high. And since the gauge is not a lot of help.. I stopped lots for gas . Also for cold starts I would manually move the choke on, and then back it off once the motor was running good. This works good.
Here’s a photo on the way to Quesnel.. and before I got it all muddy. We only spent a week there, I got to do some quading and some roaming around in the Raider too. Here’s the video I made….
And here’s the second one..
Most of the trails were badly over grown with willows.. Thank goodness for the skid pans ! The Raider can just push through. I’m impressed with it’s ruggedness. I drove through deep water.. up steep hills .. and over rocks.. no problem.
Things to Fix:
Fair enough.. you can’t buy a 30 year old vehicle and not expect to do some repairs. After driving the Raider for a long trip.. I find a few things.. So let’s start with the “much needed” and work down to the “just annoying”
The choke and vacuum lines: This should be working and it’s not.
Front brake rotors: Warped badly
Wipers won’t park: could be the relay.. or an adjustment .
Noisy exhaust system: Should be replaced.
A few rusty spots to fix ( holes) : Next spring
Stereo ! would be nice to swap that out.
Rear washer: you can hear the pump but nothing comes out.
hazard light switch: missing in action
Squeaking seat: needs to be removed and fixed.
Jan 2017:
After driving the Raider quite a bit since the trip up north, I’m getting used to the routine of setting the choke then backing it off. But it’s still annoying. Shouldn’t have to do that.. So I did some research and found a replacement carburetor kit for my 2.6 motor. It will cost me about $450. BUT it will simplify things tremendously. An electric choke.. not vacuum. And it comes with a new serviceable air cleaner. I can take all the electronic / vacuum crap and toss it. Money is tight so I’ll have to save up.. and that will fix the first and most important thing on the list.
I finally got the Raider into my Nephew’s shop.. He’s a mechanic with his own business. Normally any vehicle I get would have been in there way sooner.. But the Raider is driving fine .. even in the very cold winter we are having.. He wanted to clean the carbon out of the motor with the Motovac system.. Knowing that the Raider was driven with the choke on.. and dieseling a bit, he figured this would be a good place to start.. Well turns out there wasn’t much.. The dieseling is mostly caused by the high idle and the choke problems. We’ve got the plugs out so why not check the compression of the motor ? I was surprised to find 150 psi right across all four cylinders.. I think that’s good. The motor has 260,000 kms on it.. maybe it was rebuilt ? Well whatever .. this explains why it runs good.. no mater what the carb is doing. And not consuming lots of oil..
While there on the hoist .. it’s a great time to look things over.. The driveline is tight.. no bad rust.. no leaks.. I only found a few things:
Since it got cold the brake master cylinder is leaking.. So that needs to be replaced.
I’m missing the last foot of the tailpipe.. I knew this already. and it will get fixed too..
The exhaust seal between the header and the first pipe is leaking. That’s and easy fix..
The right side rear shock upper mount had been broken off.. and there is wire holding the shock on ! seams to have worked but I will fix..
That’s it ! well aside from the front brakes needing to be done.. And I would be sure to check the rears as well. I could start work on all this stuff if I finished up what’s in the shop now.. but It’s been cold and my ambition level is low.. Spring could be very busy !
Also of note: I’ve been collecting some of the bits and pieces I need to “pimp” out the Raider.. I have the keyless door lock system now.. and I bought a used but nice Kenwood stereo. AND I got some nice LED running lights . Once I get the carb kit.. I will start the fixing up.. and that will start a new page for this post..
I have the Weber Carb kit now.. so let’s start a new page… shall we.
This is a photo from the web.. Same yellow Rally.. just all together.
This is the one I bought. The foot well was taken of to better access the motor. A bunch of other bits are in a box too. But it’s all there, and this was a running quad before the valve decided to say hello to the piston. Tires are worn . .. but holding air. The plastics are great, the seat has some stitching coming apart on one side. Everything else seams to be in fine shape. So I’m thinking it’s worth fixing the motor..
2003 vs 2005
Bombardier made the Rally 200 for a few years only. Designed as an entry level quad with some big quad features. Water cooled 4 stroke Rotax motor, hydraulic disc brakes. CVT drive . These are good stuff to have. 2003 was the first year, and the design was pretty cool for then. Instead of racks they molded in trays front and back. I like that.. but they quickly went back to racks the next year ? also the 2003 has a manual disc brake on the transmission .. and the 2005 has a hydraulic disc on the rear axle. Some little changes like moving the key and indicator lights up on a handle bar pod. Later I will take some photos of the two side by side..
It’s later ! Here’s the two together. See the wheel size. Which changes the height a bit. The racks make the red one look much taller.
So there are no plans for this quad YET.. I parked it and covered it in a safe place for now…
February 26 2017:
It’s seams impossible to find the top motor parts to repair the motor.. They just don’t make that size motor anymore and no one has even a used motor.. It is said that these are a weak motor and easily drop a valve. SO I have another plan.
1994 Yamaha Timber Wolf 250 4×4
This sad quad has been hanging out in the yard waiting to see if it’s worth fixing.. And there is one big question ? Does the motor run ?
So we dragged in into the shop.. I removed all the wheels , plastics and racks. Today I’ll clean the carb, check the wiring and see if we have at least a motor..
Well it runs.. but not well enough to go through all the work to transplant the motor. so back to trying to get the motor parts.
Well this came up for sale .. at what I’m going to say was a very good price.. Seems not to much interest because it’s a two wheel drive Quad.
So what ! It runs great.. Has NO damage . Aside from 4 wheel drive .. it has all the good stuff. 4 stroke 200 cc water cooled motor. CVT drive. three hydraulic disc brakes. newish tires. Above is the photo in my yard before I even cleaned it.. It’s not perfect.. there are things to do. The battery needed to be charged.. the racks need new paint. and they have by-passed the starter solenoid with a big button ? So I’m going to take a few days and go over the Rally and adjust … fix … and add a few goodies.
Into the shop and start removing bits and pieces.. So far I’ve got a list of things that need fixing and things that bug me. And one thing that I did not see at first.. :
The front brake reservoir window is missing. Therefore no fluid .. no front brakes !
That hokey start button.. it’s wired directly to the starter, bypassing the solenoid. Why ?
The foam air filter is shot.. I’ll make a new one.
The front clip on the seat is loose. You can lift the seat there.
Battery could be bad..
The chain needs to be adjusted.
The rear wheels .. they have been mounted backwards to make the wheels wider ? not needed… Kids !
It’s not that big considering the price we paid. The first thing I did was cosmetic.. I removed the racks .. sanded them and welded a hook on each end.
There’s no plans to put a winch on this quad. And the paint was all scratched of the front and back bars.. so I installed these hooks to use for pulling on.
Then the four pieces got a new gray paint job. I removed even more parts from the Rally so I can get to some of the cleaning and wiring. Because first on my mind was the hard wired start button. I needed to know what was wrong with the factory start button. So I took it apart and found a broken solder connection. Simple fix. Meanwhile I’ve had the battery on charge .. three times and it tests out just on the verge of bad.. so a new battery was bought.. something we thought was going to happen anyway. Ok a little “pimpin” while things are apart.
What to do with that hole where the start button was ? A horn button of coarse.. And why not a power plug too. !
Routing the wires is easy when this much of the quad was apart.
And lets not forget the all important LED running light.
I’ve got the quad all back together now.. Replaced the window in the brake reservoir, Found out the chain has been adjusted to the limit.. so maybe a new chain. The rear wheels have to stay as they are .. the rims are not the original ones.. so the offset is too much inward if you turn them around. New battery installed. New foam air filter. I even replaced the gas line. I don’t like those clear hoses. It’s running good.
And Mo is liking the new ride.. just the right fit for her.. Remember the chain had a lot of play.. I bought a new chain.. made it the proper size and it fits perfect .. with the adjustment set back. So it will be easy to take up any slack. We now have a 100% working quad. Time to take it out for a run..
While I was looking for parts for the 2005 Rally, I came across a 2003 Rally being sold very cheap. The motor had a broken valve which also wrecked the piston. It looks fixable.. so I bought it and brought it home… See the new post HERE.
Sept 28 2016… and we finally got to take out the two quads.. mostly to see if Mo likes this as a activity.. we had NO troubles.. BUT she feels that this is not her “thing”… so she want’s to sell it .. no need for two..
Realizing that ramps were not working good for lawn tractors.. I needed a small tilt deck trailer that could be towed by the Carry.
I bought this off a fella for $100. a few months back. It’s an old tent trailer frame. Which does not tilt, the tongue is a little bent, but the wheels and springs are like new..
And it has new lights ! BUT it’s seven feet wide.. I want the trailer to be only five feet wide. So time for some mods.
Here’s the frame after removing the wood. There is jack stands on all four corners.. Some are bent up, but all of them haft to go. I can use the bits I cut off to make the frame a bit stronger. I need the rear to be tapered and slim so it comes close to the ground when tilted. So I’m cutting off the rear bumper. The main frame is four feet wide. The wheels are another eight inches on both sides. So I will need narrow fenders.. and the lights will have to move forward so they don’t hit the ground.
Cut Cut Cut .. Weld Weld Weld…
I plan as I go. And so far it looks good.. I fear I’m adding more weight with all the extra metal.. But I don’t want a flimsy trailer.
I moved the axle to the top of the springs.. and that lowered the trailer by 4 or 5 inches. Now I’m concerned that the deck will hit the wheels.. Once I flip it back over I will see.
This took awhile to figure out.. and a few trips to the metal stash to find the right bits. But I got it.. very “over built ” tilt system for the hitch tongue. Then I flipped the trailer back on it’s wheels and could see two things.. The wheels are close to the deck.. So maybe small shallow fenders? And the deck is just a touch heavier on the front so it won’t stay in the tilt position. I was thinking of all kinds of ways to fix this.. adding weight to the rear.. no.. Finally I thought to tighten the hinge bolt ! Now it stays wherever you put it.
Here’s a view of the hinge. I purposely located it forward of the axle so the deck would drop down.. DUH.. the real hinge point is the wheels. So with the bolt tight things work fine.
Here’s the right side up view of my pin and pocket for the tongue. Very sturdy.. There’s a few more things to do before the deck wood goes back on.. Like these…
Tail light holders ! And a mount for the hand winch…
Yes a hand winch will sit atop this platform. Keep it simple and light .. I’ve got the tongue all fixed up with a spare tire mount a hoop for the safety chain.. And I used the best jack stand and welded it on the bottom of the tongue .. CAUSE I CAN.
Looks like this now.. The jack stand is adjustable for height and folds up to the tongue. The wiring is done too.
So now we have lights.. Oh and here’s what the winch looks like.
Just needs bolts and the strap… simple. So I’m ready for the plywood to go back on..
It’s a perfect 5 ft x 8 ft. and I had enough of the plywood . I also mounted the tie down rails that were in the box of the Carry. So it’s all done !
It’s sits level hooked up to the little truck. Good
And tilts nicely to the ground with only a 3/4 ” lip
A winch for the dead tractors & spare.. We are styln… I have the registration now and a new plate.
That makes the little guy mine.. OR.. Rob’s creative corner.. where I “pimp” my ride. I’ve already done some “pimpin” like the keyless locks, the new stereo. But.. I’ve got all the supplies to build a covered canopy for the back. Also I’ve got a new winch, the wiring and the metal for building a plug-in winch / bush bar.
Here’s is some of the stuff for the winch set up. The winch will be mounted to a hitch extension. This allows for a snow plow to still be plugged in.. or whatever ? This winch could be used on any vehicle with a 2 ” receiver. It will be operated by wireless remote, and just needs power.
And this is what I’ve come up with. looks a bit strange, but it’s designed to …. 1 – not hide the front license plate. 2- not sick out from the truck any further that necessary. 3- bush bar side extensions are plug-in and can be removed. The roller fair head mounts to the front, and of coarse you can still plug in a hitch.
Aug 2016:
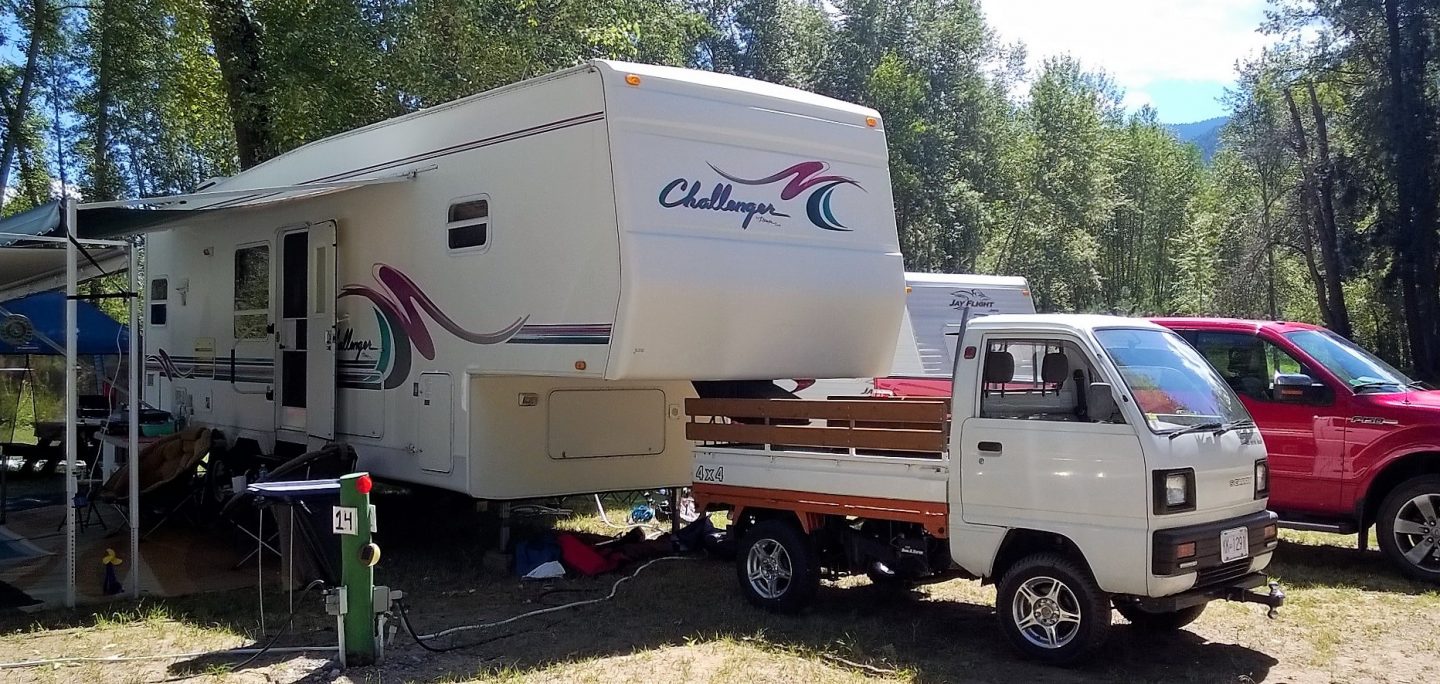
Well I’ve put about 100 or more kms on the little bugger.. and there is a tiny oil leak .. I think from the oil filter.. Everything was on hold while we had our Camping / family reunion.. And the Carry was there..
But not pulling the fifth wheel.. Before I get back to finishing the Carry up.. I need my little trailer built so I can fetch tractors with the Carry.. So I’m pausing to do that … Tilt Trailer Bolg
So I’m in no hurry to do those extras like the winch.. I’m using the truck every day for work.. I’ve done a new oil change and that fixed the little leak. Checked the timing , the hoses.. everything is good. And it’s running good too. This weekend my little truck will be in the car show at the City Park..
Here it is.. no prizes.. However someone saw it that wanted to buy it from me.. And a month later I have sold my little truck to a very happy guy. So on Sept 27 th 2016 I watched it drive away.. Going to miss it for sure.. was really handy. But time to move on..
Well here it is.. with the tie – down rails removed. First thing.. weld the many holes up.
Color Scheme:
On the first page I had a mock-up of what I would like to see.. Since then I worked on the plan a bit more. And of coarse the frame ended up black. But I still would like some gray too. So the head rack, hitches, winch mount and stake pockets will be grey. The bottom of the truck will be Orange as planed. Like this….
The plan is to build a removable winch for the front that incorporates a bush guard. It could be moved to the rear as well if needed there. The winch will be wireless remote. Better get back to working on the box..
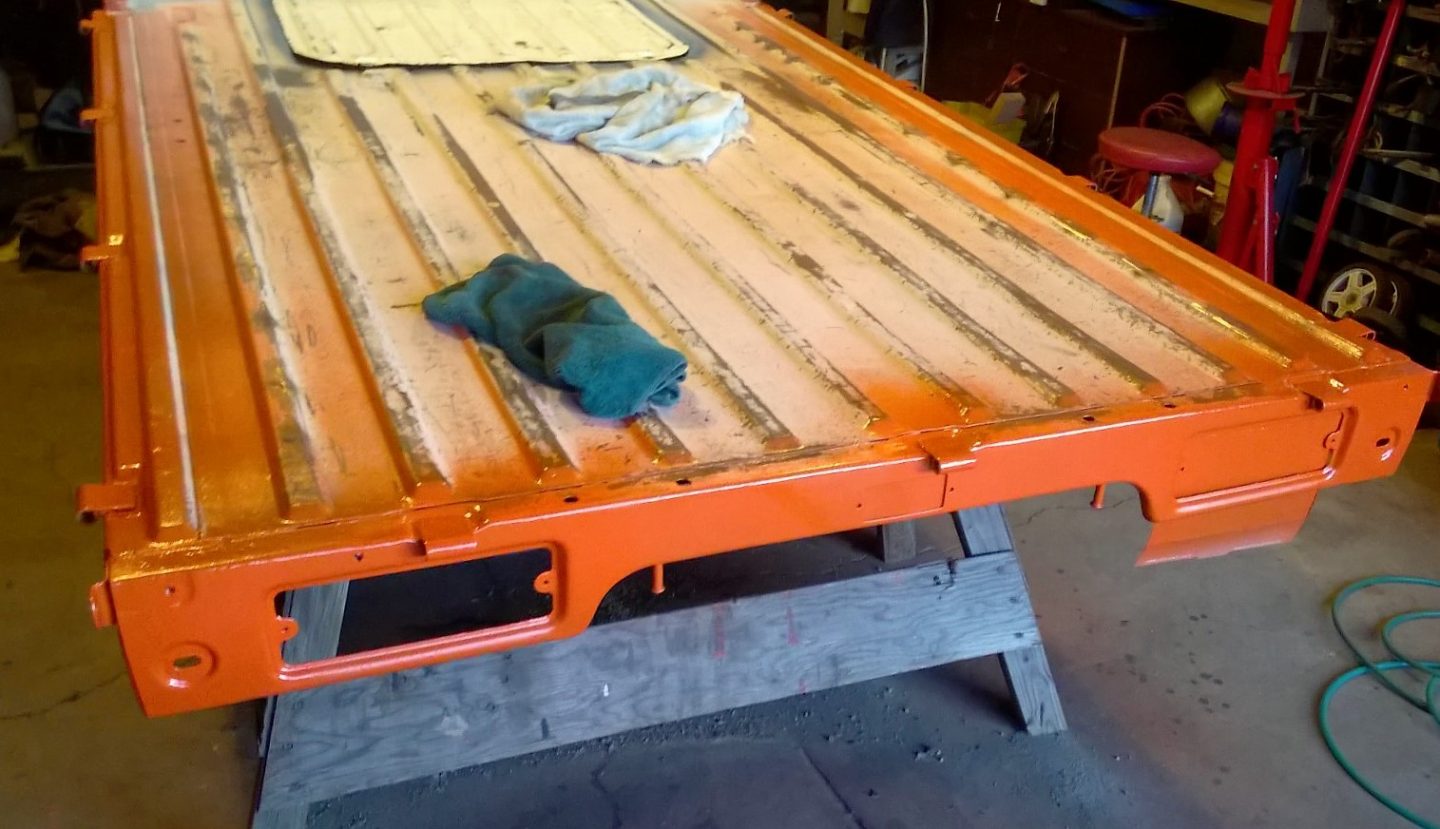
Using a combination of Por 15 and undercoating, I sealed up the underside. In the photo you can see I have primed the parts that get the orange paint.
And this is the first coat of orange. I will flip the bed over to second coat. The weather was not cooperating , It was cool and the paint took forever to cure. so it’s an overnight job now. also the paint is very thin for covering.. even after 4 coats you can see through it. Very frustrating.
So I fought with the paint.. wasted a bunch.. got a fifth coat on there.. but it’s not smooth.. I said enough and will leave it like this.. It’s a truck.. I like the color of this Orange.. so I’ll buy more and carry on.
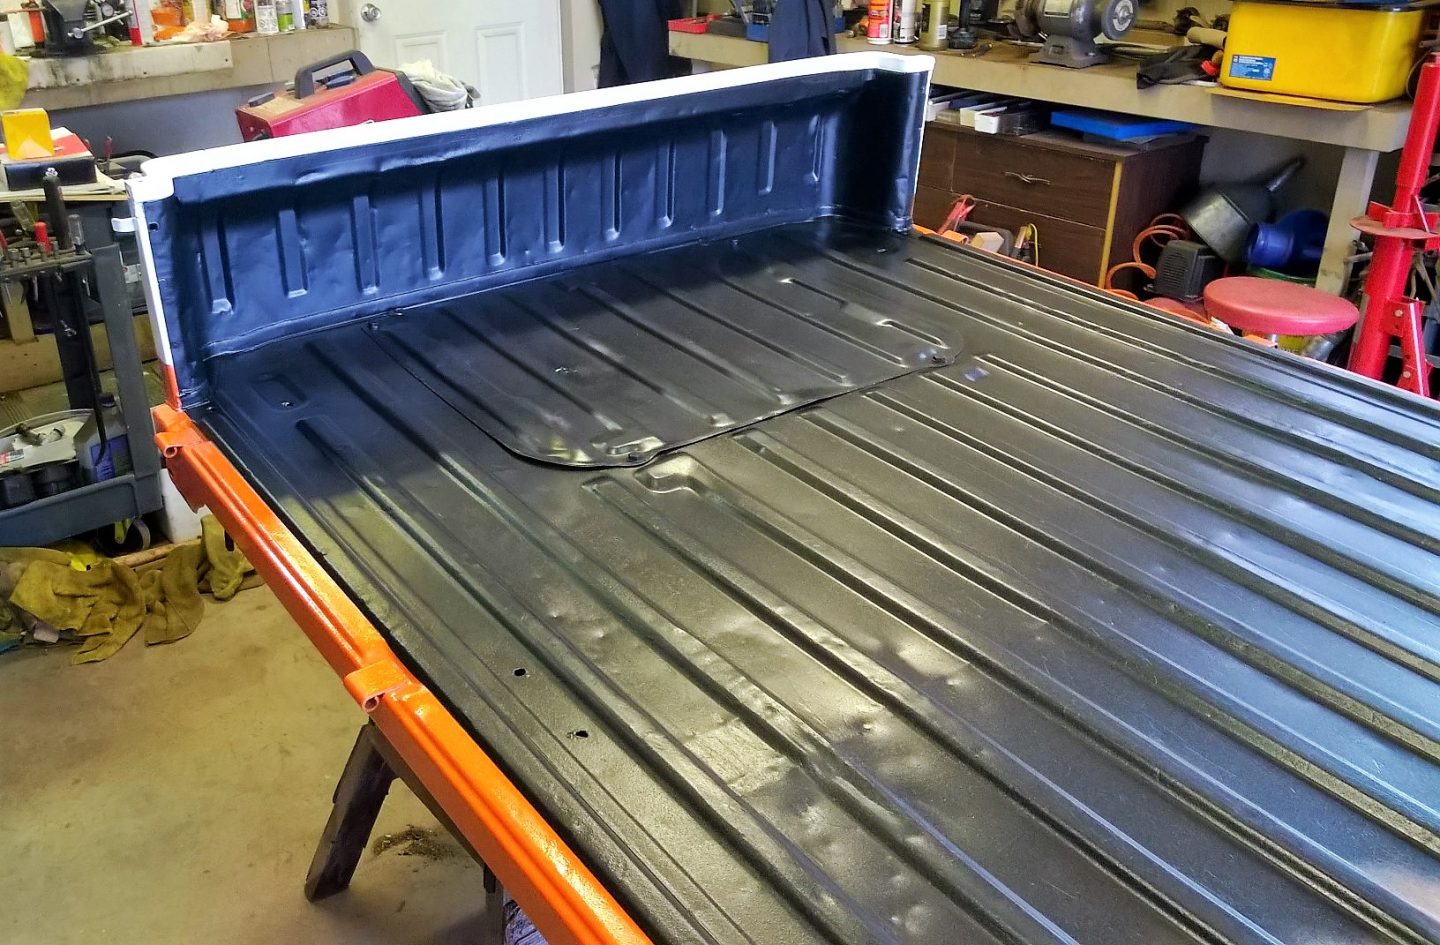
I’m using spray on box liner that comes in a spray can.. it’s great stuff, and I can do the job quickly. I did run out with only a small patch left to go.. GRRR. Off to get another can.
With the bed of the box done.. we got busy and put it back on the truck. The wiring was all improved and a new trailer harness was installed. I’ve drove it around a bit and it seams the smoke has cleared. Once the rings and other bits get seated in this should be the case. I still hate the orange paint job on the side of the bed. I’m switching over to good old enamel paint. And I’m taking the time to brush it on carefully. Same for the orange.. I had a quart mixed to a bit lighter orange, and that’s what is going on the truck… by brush… carefully..
Here’s the tailgate with the first coat of orange. The white is done, three coats. I have also taken most of the dents out.. so it’s looking good. I’m thinking a black pin stripe dividing the orange and white.
Ok the box sides are done the stake sides are done..
The black pin stripe on the line between orange & white looks great. The spare tire is back in the proper place. Both batteries are hooked up. Still some little things to do.. but it’s useable now.
In fact there goes two bags of garbage… I can hardly wait to get going on the canopy.. But first there is more details.
The rear trailer hitch has been reworked. Lowered so the spare can be accessed, painted grey and mounted with heavier metal. Six bolts instead of Four. There’s my handy bumper / step plugged back in. Today I also got the aluminum plate cut and mounted to the tailgate.
Nice eh ! easier to load and unload over the tailgate now.
At this point the truck is done.. drives… got it’s bits and pieces back.. So everything now is fluff.. just stuff I would like to do but not really necessary. Like: tarp canopy, winch, I plan to finish the orange paint next month. I’m starting to build the winch mount.. We will CARRY on.. to a new page for this “extra” stuff.
Well not quite the same as the other projects. I have the good paint for the frame.. And it’s black. yup decided to keep it simple.. If I was to change to grey I would have to do a lot more painting. And the black undercoating that is all over could be a problem. As for the box.. need to fix the dents , paint the bottom orange, paint box liner inside, install stake pockets. I have also purchased new rims and tires for my little friend..
With a new motor and these.. we will be stylin.
Update on Motor:
So as it turns out it’s not easy getting parts for the motor in this truck. Apparently several of the internal parts were changed over the years …so.. the pistons I have take a longer connecting rod, narrow rings and a pressed in pin. The ring set that came with the truck are the wider / newer type. So I ordered a new set of pistons that the rings fit.. BUT the rods I have won’t work with the new pistons. Solution ! Get my old pistons machined to fit the new rings. And that only took an hour and $30. Wow ! Now it’s going back together.. So a new plan is to get the motor ready for install .. then do the frame. and today we got quite far.
Here’s the motor so far.. Still more bits to go on.. but it coming together quickly.
June 26 2016:
It really is time to get this truck back on the road.. So I’ve backed it into the shop and I’ve removed the fuel tank …getting ready for painting the frame. I’m using Por15 paint.. it’s the best at sealing the rust. Plus it’s a hard finish..
Here’s just the first coat. And with that I concentrated on the rusty parts. The important thing is to get the motor & trans back in.
Here’s the new battery box for the right side. This will hold another tractor battery and give me extra power for the winch. I’m installing a tube across the frame after the trans is back to hold the cables. No more attaching them to the underside of the box.
All painted now.. with the new wheels on the back. And the fuel tank back home , ( with four bolts instead of three). Ready for the motor… and the motor….
Is ready for the truck.. Tomorrows job ! The transmission is back on and most things ready..
The motor is in and running ! Ya hoo. Took a bit of fussing with the timing to get it running , but it’s all good now. Will it smoke ? Will it leak ? we will see. Here’s a new video..
Now there’s a few vent lines to hook up and some electrical stuff to do.
Electrical Stuff:
I had to remove the dash… which was a good thing.. Not only easier to get the wiring proper.. but the nut had come off the washer nozzle and very hard to reach. So that is fixed. I’ve installed a new stereo, a switch for the running lights , and new 12 volt power outlet.. and my favorite “keyless” locking.
I still need the find speakers that will work. I’m thinking motorcycle / ATV speakers would be a good choice. Because the space in the cab is tight.. And I decided not to put them on the door. So they have to be found. But for now everything is back in working order.. We even improved the battery hook -up wires. And better ground. So the box is next… New page for that… Here PAGE 4
Now that the motor is out and in the work stand.. time to talk about that..
Wow that’s a huge motor ! And.. it was very easy to pull the motor out the rear.. onto a piece of plywood.. once you remember to disconnect all the hoses. In fact it was faster than I thought.. Took longer to get it mounted to the work stand. And so I did a lot of careful removing of the bits..
Here’s a short Video on the progress…
So the motor sat there on the stand for a week… maybe a bit longer.. Seems I’m busier than I want to be..
June 7 th 2016:
Finally got at the motor.. Dave came and in a few hours we had nothing but a naked engine block. Everything is laid out carefully on a table. It’s sure hard to tell there is anything wrong with the motor.. The cylinders are perfect. All we did was a quick honing to take the shine off. Dave’s gone away for the week, so the plan is when he comes back I will have all the parts clean and painted.. ready for re-assembly. All new gaskets / seals/ rings and main bearings. The top of the motor was done so not touching that.
As you can see I’ve cleaned and painted the block. Yup Orange. ! That’s part of the color theme for the truck.
Here’s my table full of goodies.. And …
Here’s the new & improved oil pan.. Grey.. once again following the color scheme. A lot of cleaning , polishing and painting.. but look at the bits & pieces !
As before the whole motor block is orange. The exhaust is completely painted with extreme high heat silver ( better than rust) . I decided not to paint the transmission.. It’s aluminum.. but I did paint the rusty steel parts. I am ready for re- assembly on Monday.
Monday June 13 2016:
We got the crank back in with the new bearings and seals.. But when we were changing the rings we ran into problems. The new rings do not fit the pistons. ! So I did some phoning and will have to wait now for genuine Suzuki rings to come. So The motor will have to wait once more .. But if I’ve gone this far I only want it done properly. I’ll switch gears on the truck and fix up the frame and box.