Category Archives: Other Projects

Stuff that does not fit any catagory

79 Scamp / Acorn Restore page 4 : Glassing the floor

Well it’s December… it’s cold and time to get to work on the Acorn…

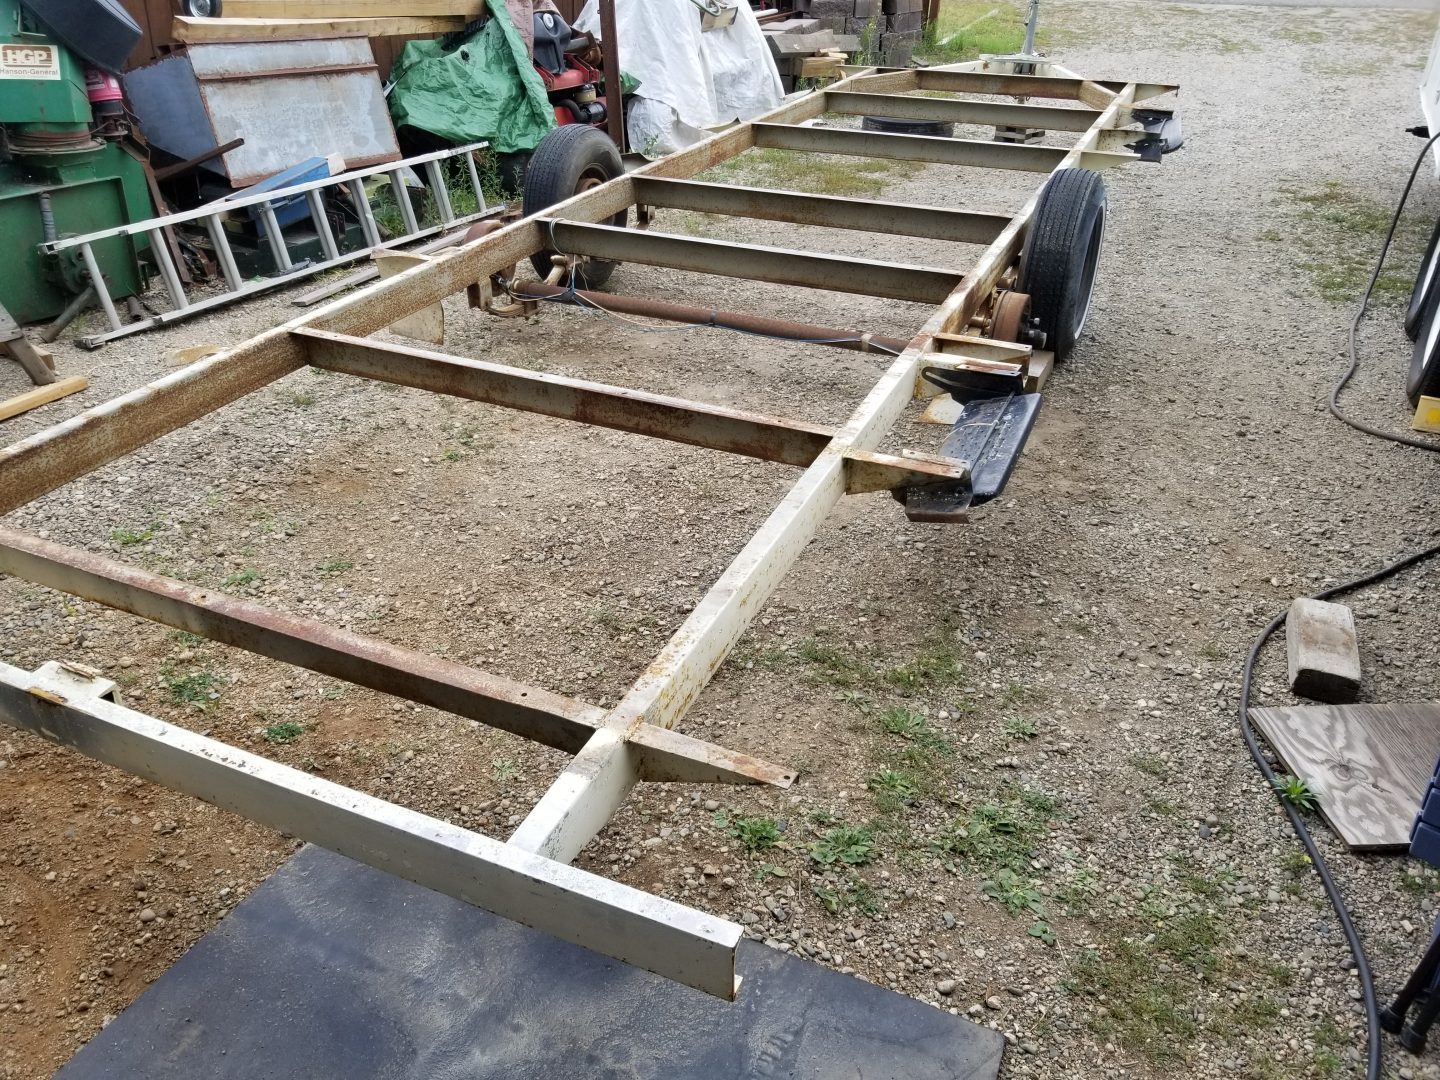
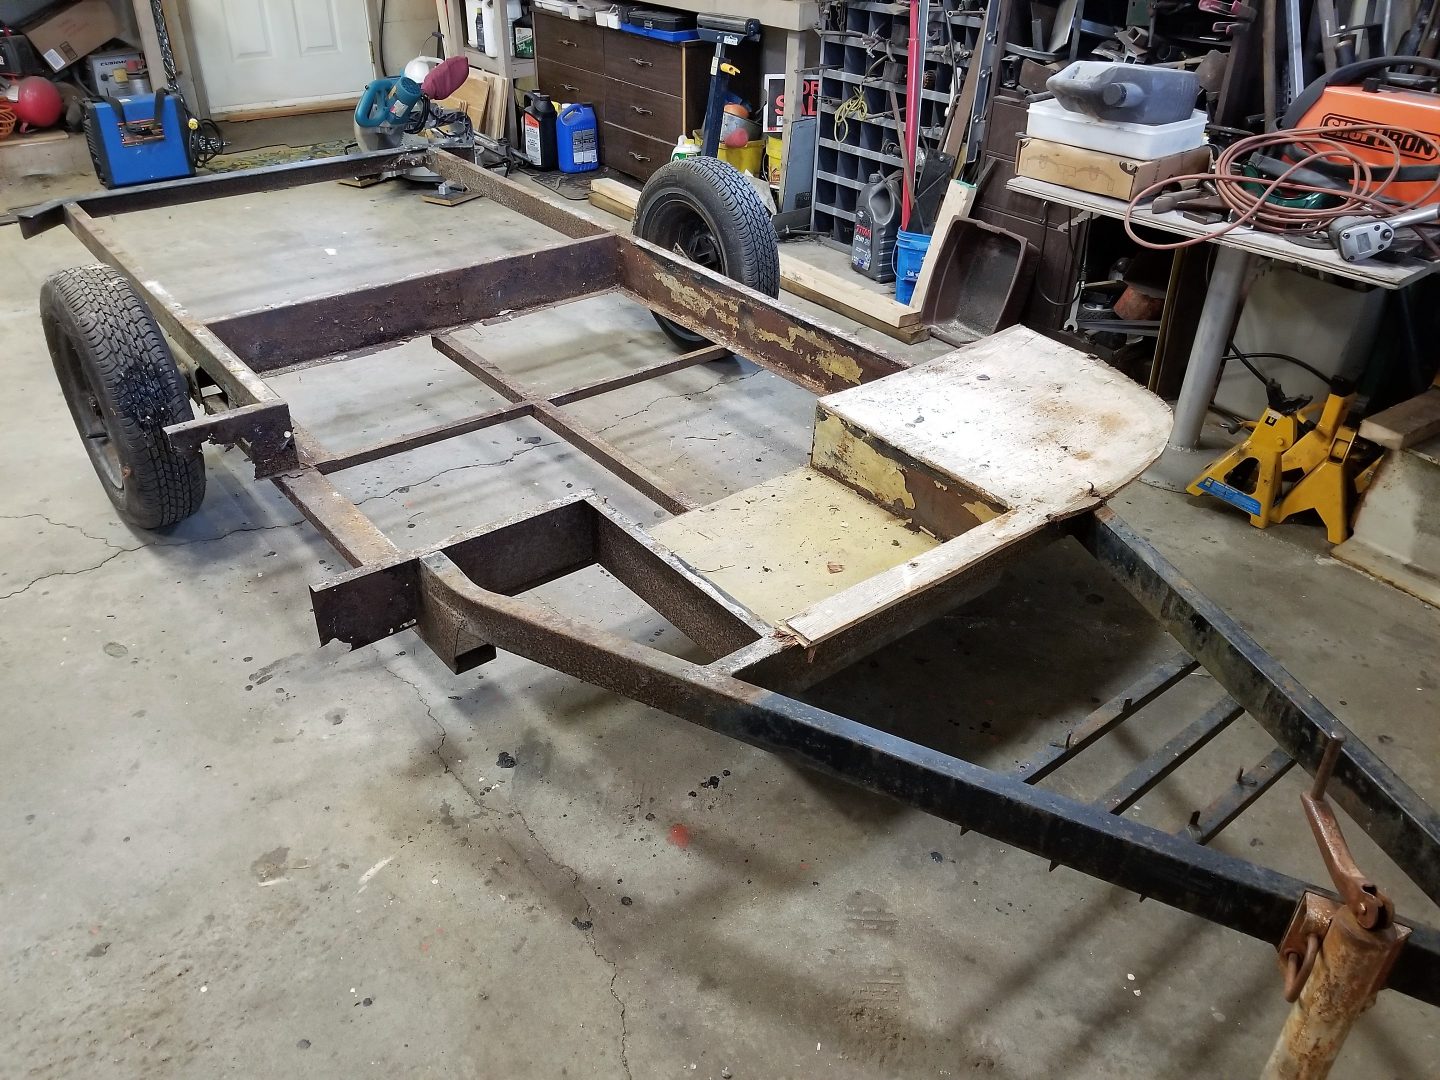
Just like “Scrat” here the Acorn trailer is a lot of work…  And replacing the floor was no easy task.  The body is held up by the floor and the floor sits on the frame…  All three must be strong, it’s the integrity between the floor and the body that is key to the trailer’s life expectancy.  The floor completes the “egg shell” .   Now that the floor is installed and glassed to the body on the top side…  I need to do the same under the trailer too.  Only one way I see to do this is to lift the body / floor off the frame and roll it on it’s left side to have access to the whole bottom.  Without the windows and no door the body is light..  but i will need to install some braces inside to keep away any sagging .  First thing to do is build a dolly that will cradle the body on it’s side.  With wheels so I can roll it into the shop.

So I built this dolly…  We lifted the Acorn from the frame ….rolled it over… and!!  It was too tall to fit through the Shop door !  Fine… Got a piece of carpet and we slid the Acorn off the dolly and into the shop.  Good thing it’s not too heavy..

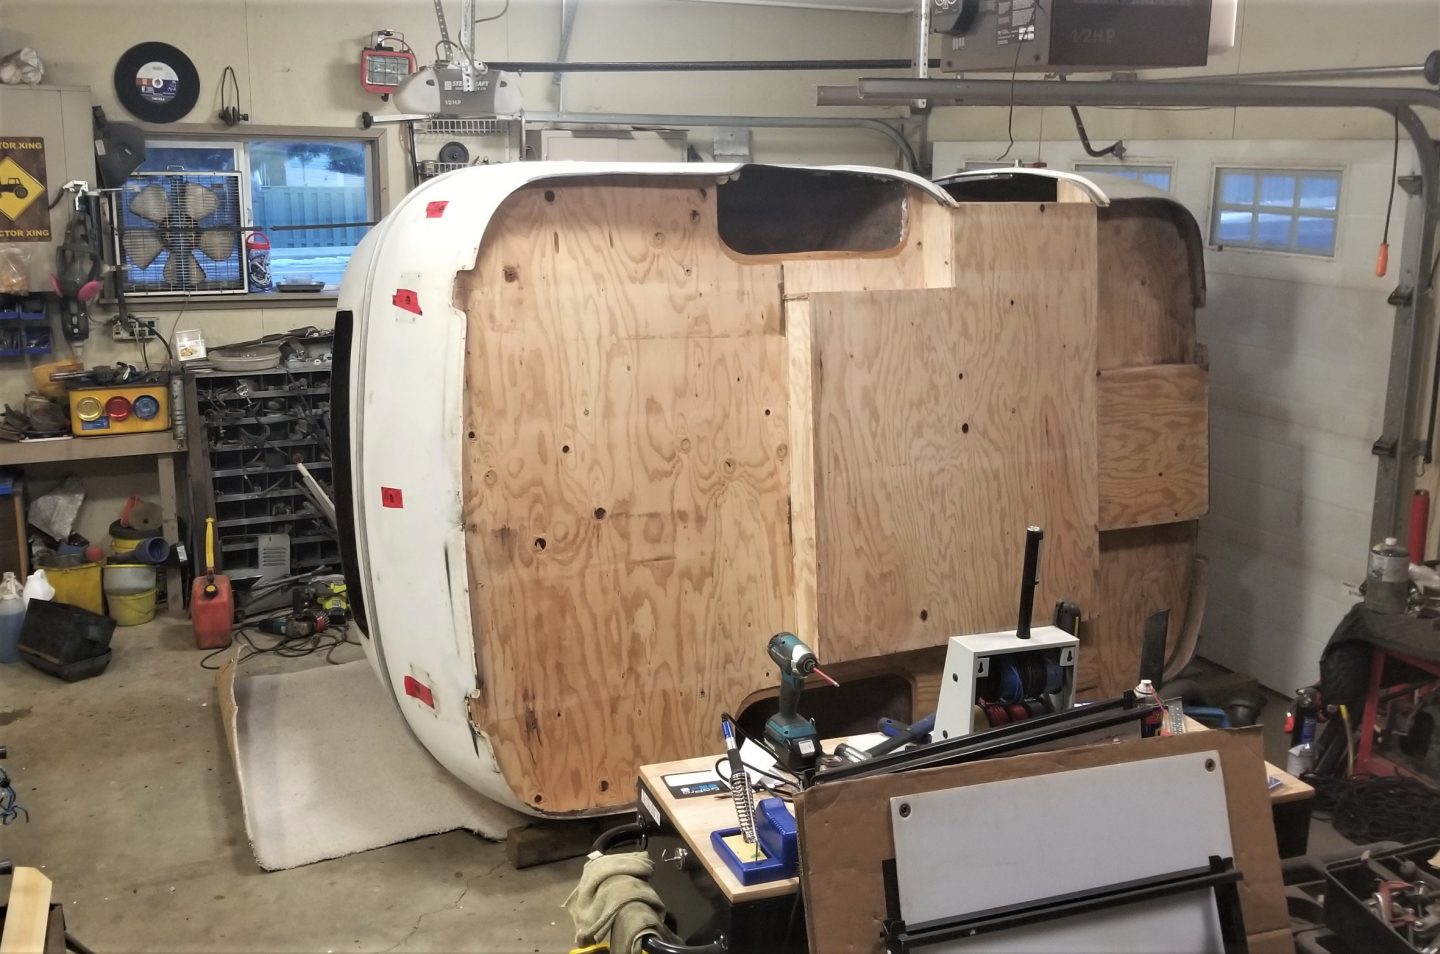
And there we have it..  Looks like it fell over and died..  Nope all is good..  Easy to work on the underside now.

Got up this morning and SNOW…  boy did we get the Acorn inside on the right day !  Not a lot of snow …just an inch..but makes it hard to lay on the ground and jack the body off the frame.  Going to leave it in the shop for a few days to warm up and dry out ..  Seems the tarp was leaking a little but no damage done..

Here’s a small video I made…

I don’t seem to have a lot of ambition around this time of year.. but the Acorn is there when I do…

It’s into February now and I’m doing my best to get this bottom all done…

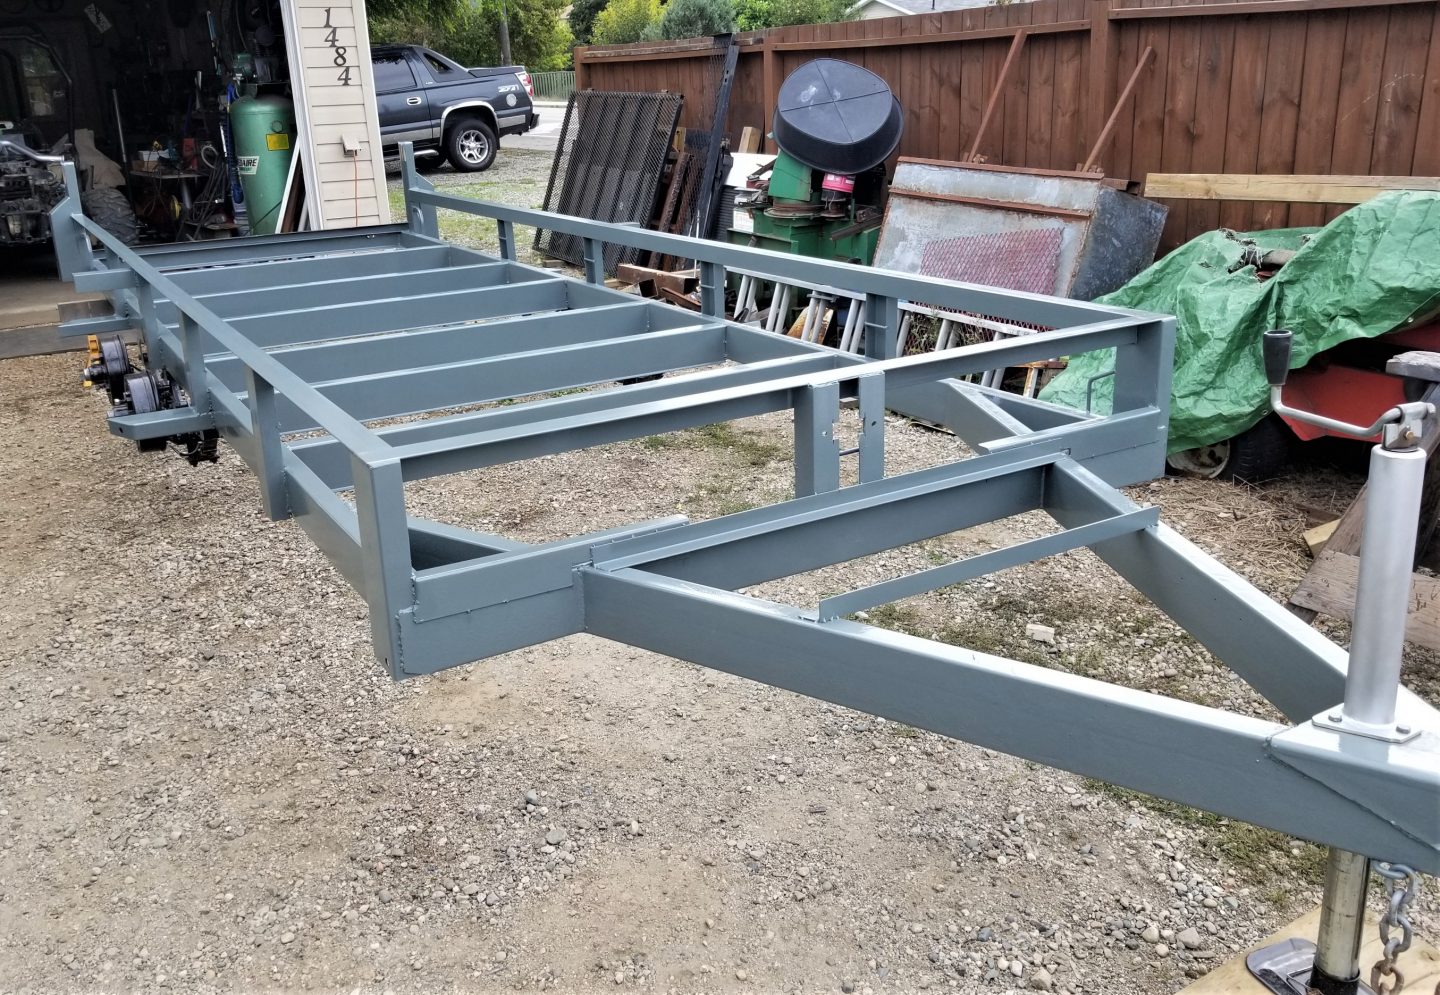
Here I have all the glassing done.. It’s taken weeks and a lot of resin..  But I got R done…  And then came the decision of what to cover this with…  I want it black..  And i want it to further protect the underside of the floor.  I thought about epoxy truck box liner..  But the price was very high..  This is more area than a truck box..  So it takes two kits..  I settled on good old enamel..  same as the frame.  and it was easy and quick to roll that on..  Two coats and we are done.

Next is to attach a dolly to the underside ..  and  while the roof is easy to get at I want to enlarge the vent to a 14 x 14 normal vent size.  And I want to glass a wood frame on the roof so the vent is raised and some stiffener added.

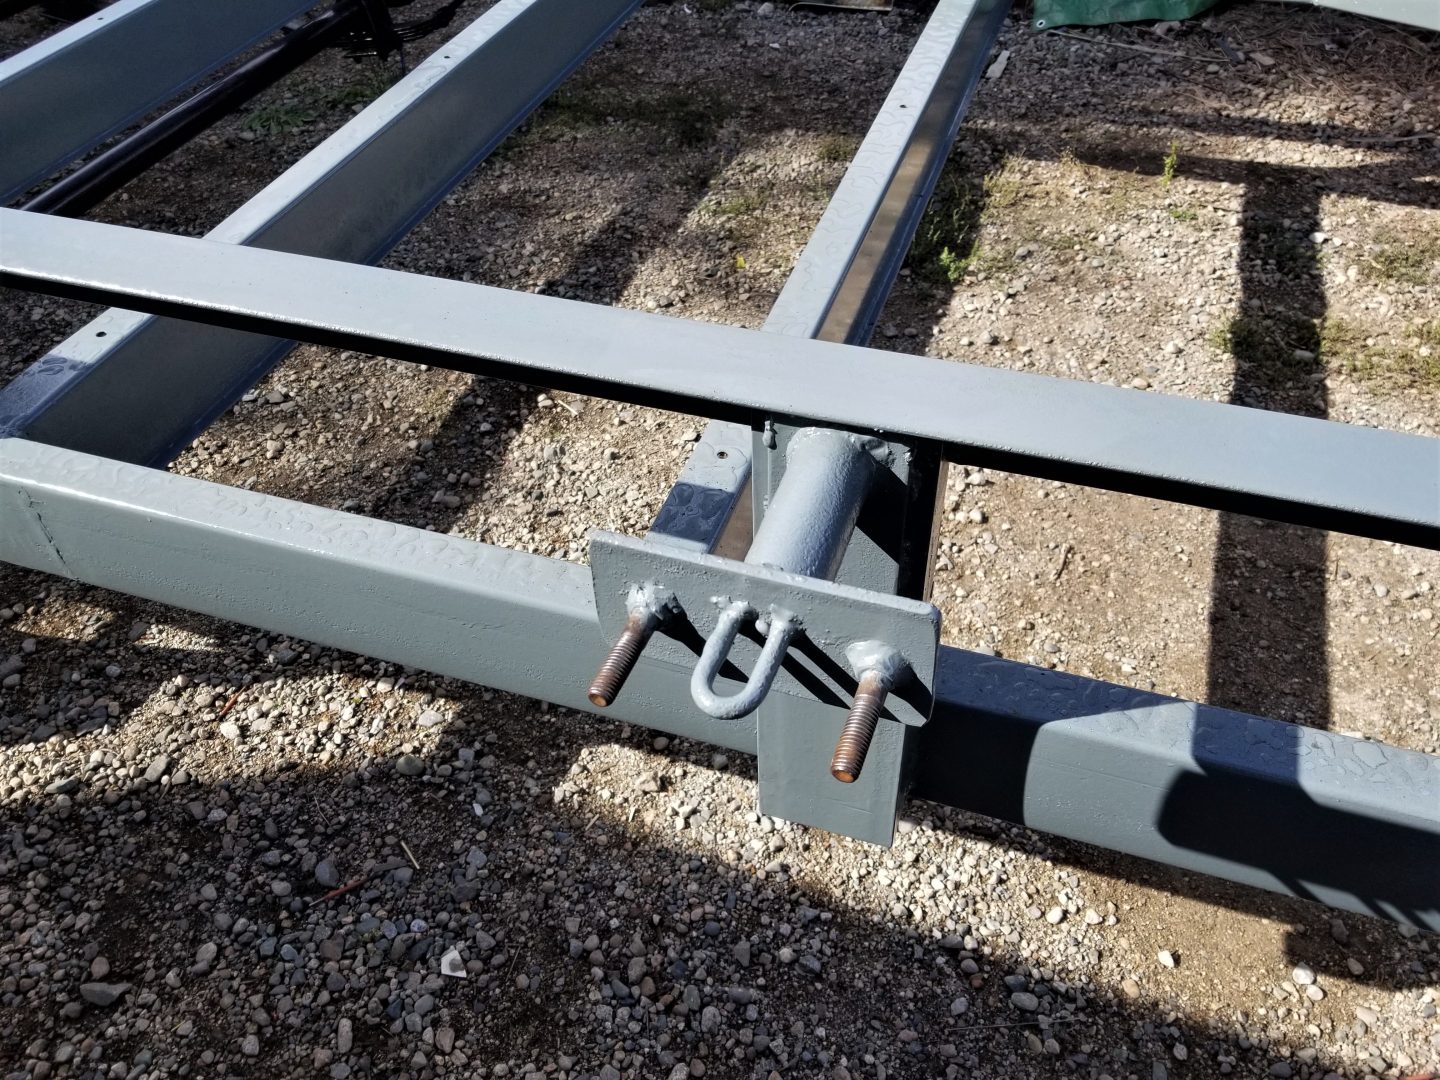
Here I have the dolly..  taken apart and mounted to the underside..  Mounted only through the holes for bolting the frame.. NO new holes !  When it’s time to put the body back on the frame. I just lift it and remove the four lag bolts and the wheels will fall away..

Now for the body work…   Onward to PAGE 5

1982 Chevy Frontier Class B

1982 frontier Class B Wide body

Frontier Class B Wide Body Van Conversion, Model XL820

Here it is!  It’s not new.. and could use a bit of love.  I’ve only had it for a day or two..  The love will have to come next spring, it’s getting late in the season..  And please remember we are 38 years old..  A senior citizen in the world of RV’s. So you have to excuse the rust.. and the retro decals.

Frontier Van

Where do I start…..  Not expensive  I bought it with cash.. And yes this will mean we have two RV’s..  But this one has a hitch and I can tow my ATV… or a boat… or anything..  It’s very compact for all the stuff it has… 21 ft from the front of that cow catcher to the back of the bumper.  It’s like a LeSharo that you can actually use / drive..   With a real motor !  In fact we had a heart transplant 30,000 kms ago..  With lot’s of new parts..  It now has new tires too.  and drives great

And here’s the door !  Different !  but it’s a design that works… I like it. The Frontier was made in the Vanguard factory Winfield, BC..  And you will see more of the Vanguard version on the roads ..   Rare yes..  They only made these for a few years before the recession hit the RV industry.  It’s hard to find any info on the web for these…  That will all change with this post.

Here’s the interior.. very typical color scheme for the year BROWN !  The fridge has been replaced..  and the lino is newer..  but the rest is original..  And all in working order..  Just needs a good cleaning..

The floor steps a bit lower in the rear of the camper.. and that’s where you find a small kitchen and a wet bath on the drivers side. There’s a extra counter top you can lift up if you need it.  No oven .. no microwave..   Who uses those things when camping anyway ?  We cook outside.  BUT you do make coffee inside in the morning.

Here’s the biffy..  Works for me.. I’m not likely to use anything but the toilet. But you never say never. It’s very clean ..so nothing to do but change the light to LED.

So lets talk about the Van part of this camper.

That’s typical motor home fair ….  except !!  just a 350 motor.  Yup it’s the tried and true good old 350…  but this is duely  ..so heavy duty trans…  and stuff.  And like I said earlier… new motor 30,000 kms ago.. Work done  in Ontario !  It’s been places for sure… This summer it drove out to Sask and back with no issues.  And it just passed a BC inspection.

Look at the interior … it’s almost perfect..  I have not cleaned any of it..   Power locks , power windows, A/C that works..  cruise control, new stereo..  You know I’ll add to that list..  I’m thinking remote locks.. more power plugs…  back up camera…a digital volt meter for battery condition.. just to start..

Nov 17 th 2019:

Today I gathered up some ambition and plugged the Camper in to my 30 amp.  Everything works as it should..  But the extra furnace is  a bus heater that works from the motor heat. And I think works using the wall thermostat.  For sure it powers up when the van is running.    The RV propane furnace works great..  As expected the new 2 way fridge works..  I found the pump and water tank under the sofa..  Tank is empty and there is antifreeze in the water lines…  But just to be sure I ran another jug through…. No problems.  No leaks ! It’s all good and it’s time to put the Frontier away for the winter.

The tarp is extra insurance.  Not really needed but what the hey..  I feel better with it on cause I did not install the vent covers..  One or both of the vents will be replaced in the spring with better quality ones.. The current ones have plastic frames. And I’m thinking a power vent will be a good thing to install.   The Frontier (like most) is wired for a rooftop A/C unit..  I have one, but I don’t think it’s needed.  Going to find out this coming summer.

I’m going through all my collection of stuff for RV’s, And making a war chest for the Frontier for next spring..  Here’s some of the stuff:

What do ya know I have the remote locking stuff…  with two fobs!  I have lots of LED lights , switches, USB charge ports, and a host of other goodies to make life easier while camping.

I’ve had the motor antifreeze beefed up and checked..  Last thing I want is for that to freeze over the winter.  As soon as I get my new GoPro camera I’ll be posting some videos… if we are not buried in snow.  But first one made with the old camera….

And it looks good..  I expect the new GoPro to be even better.  There’s a screen on the back so stuff won’t be missing from the shot.

We were thinking about the sleeping arrangements ..  So I went out and pulled the sofa into the bed.  Not big enough for two.. so the dinette will be used as well.. and what do you know!  There’s room to walk between.. nice  The spare tire was blown… really bad..  So I have a new tire coming.. and because the other six are new this year too.. it will be a perfect match.

Now I have a rim with no tire… And you betcha I got to paint it..  One hubcap is missing …and I’m not crazy about them.. Kinda feel like I would loose more over time…  So I’ll paint the rims instead.

And NOT RV white !  This is my concoction I mixed up..  Half Aluminum half grey… and a dash of black.  Nice!  This is the only wheel I can paint this year..  The others will get this treatment next spring… And here it is with the new tire installed.

And that’s all till spring when the time is right for fixin up…

1982 Frontier Class B+  Page 2


Chevy Avalanche’s 6 and counting

My Two Cents…

I believe anyone who is into vehicles has favorites… or maybe one model / make that they liked so much that they buy them again and again.  For me it’s an Avalanche…  Not a new one but the years 2002 to 2006.   The best years…  now GM has long since stopped production of these hybrid trucks.. In 2013 the last of them were made.  I mistake I think…  But GM has made many of those.  Diehard trucks folks thought them to be (not a truck) I disagree !  Today  1/2 ton trucks are mostly crew cabs with short boxes.  Wow.. that’s what an Avalanche is too !  BUT  with a very big difference..  I can drop the back wall (midgate) in seconds and I now have a long box truck..   Recently I carried home some 20 ft pieces of steel…   I can easily carry 16 ft lumber..  Try those things in your short box truck !  Here’s some other things for my argument …   Box covers are an option for most trucks…  Avalanche comes with them…  three piece hard and lockable.  Handling …  Because the Avalanche is built on the Suburban chassis it handles like a SUV..  smoother.. turns sharper.  But they share so much in common with a regular Chevy 1/2 ton..

Now let’s talk about my history with these (trucks).  It was my good friend Dave ( diehard GM guy) that started tooting the Avalanche horn… saying how they are great and that he was thinking of one…and that I should too.  Later he did..  a 2006..  and he had it for longer than I had… well anything.  But I was first.. In 2005 I bought a 2003 Avy

#1  2003 Avalanche base:

With the cladding..   Loved it like I loved them all.  Yep I pimped it a bit..  This was the very base model..   So not much fanciness.

No Bose sound or climate control..   But I added a back up camera.. and a new stereo… This is the Avy that towed our Award trailer..

And packed Kayaks on a rack I made… ( and still have)  .

Yes I kept that rack… good thing !   However when I was lossing my job at the mill we had to down size and the 2003 Avy was one of the things to go..  I sold it in 2008.

#2  2005 Avalanche  LT :

It wasn’t long before I bought another one… I got a new job… making good money so I couldn’t resist when this one showed up at the lot..

Loved the color..  it changed in the sunlight..  This was the first deluxe Avy..  leather seats,  Bose sound with center console.  No cladding.  Sunroof too !  And yes I pimped it out..

Added a Pioneer stereo and burl wood trim..  classy !.   I had this Avy

the longest..  4 years..   I sold it in 2012.

#3 2002 Avalanche :

I missed the 2005 Avy..  so I was actively looking for a replacement..   I was working at the car lot where I had bought the other two..  and I saw one next door having some repairs done..

I asked if it was for sale and yup it was..  So I bought it. 8 months after selling the 2005.  Came with a second set of wheels..  This is the first gen Avy..  and the interior is slightly different..  Not fond of black..  But that could change.

So I haad the darn cladding again and it needed some good cleaning .. and I installed the new wheels…  Looked good after that.

The black paint was not good.. The Avy had spent some time in Trail.. and the acid rain had pitted the paint..  In Feb 2014 a new body shop opened and they gave me a great deal on a paint job..  So i changed the color to a dark red…  Nice !

I was flipping vehicles that year.. And I never considered this Avy a keeper… So I sold it in the Spring of 2014..  I still see it driving around by the same fella..   When I retired from the lot in 2015 I had a 2004 Rare Chevy 2400HD  Rv hauler..  And I drove that till this spring 2019…  It was a great truck but not so good on fuel… so didn’t drive it much.. That’s when the newest Avy came along..

#4  2003 Avalanche  LSC special edition:

I was back working at the lot..  when this one came in on trade..   WOW..  blingged out !

Chrome everything …  4:10 towing grears..  air bags . Bose sound ..  In fantastic condition !   But I still found a few things to add.

Like factory roof racks..   and a killer Pioneer stereo ..  with blue tooth, back up camera and satellite radio…

And yes even had climate control , power folding mirrors and power adjusting pedals.  Love it…  So much we used the Avy on our trip out to Alberta this August…  got great fuel mileage and a very comfy ride.. And I want to keep this one..

Never say never..  4 now grows to 6.

A second 2005

I thought this (center) would be the one for my daugther -inlaw.  But then I found the 2009…

2009 Avalanche

But let’s keep in mind that the 4 th  2003 Avalanche did the moving to Alberta.  4 trips..  It’s now going to stay in the family.. Dee loves it.. and it will serve them well.  As for the 2009.. I will return it to it’s former glory.  I already love it like the others..  Use the link above to follow that process.

Summer Changes & Camping

I would like to go on record as saying this was a great summer… even though I had to work through part of it..  The weather was great.. there was enough rain to keep the fire thing under control..  There was little to no bugs.  And it really did not get too hot.

Plus we could have a real campfire .. and that’s been many years without.  Our group site has gone through a few changes in the past few years…  For the better!  we now have 30 amp power for eight .. A new shelter ..  But on the down side we have neighbors in Group site 2..   Can’t have in all.

As for our little chunk of the site…  We get our usual set up… with some big differences in the form of RV’s  Dave & Judy have a new trailer, a bit smaller.. but very nice.   Plus this spring we decided to sell our big Fifth wheel and I found an older ( 1999) but very nice 26 ft trailer..  ( Wanderer on the right) .  worked great.. very comfy.

And earlier this summer I sold my big white Chevy and bought this 2003 Avalanche ..  Love these and this one is in awesome condition.  This is the 4 th Avalanche I’ve owned..  And maybe the best one yet..  Pulls the trailer and is friendly enough to use around town..  We even took it on our trip to Alberta in August…  was so nice.  So those are some big changes..  but we actually  spent less on these … so money in the bank.  I’m only working one day a week now.. so we’ll say I’m mostly retired again.  Good thing cause I’ve lots to do this fall.   Projects … like a new trailer.. long enough to hold two Side by Sides.  Custom built by me from an old travel trailer.  It will be handy for when we go Hunting / Camping this October.

2008 polaris RZR800

First I’ll show you a photo of a nice looking one off the web..  could be any ones..  Then I show you a photo I took of the one I have..

Ah come on it’s close..   Never mind the taped on light bar on the roof..  Or the fact that you can’t see through the half windscreen.  Ok I’ll stop slamming it..   It does run / drive..   and has some cool ad-ons.

So  why would I have a second one ?  Good question..  but easy answer..  it was cheap…  don’t ask  .. you know I don’t talk money on here.  Let’s suffice to say that I can make some cash by making it all good again.

These photos were before it had a bath…  but it needs more than that..   But let’s point out the positive stuff first.   It’s a RZR 800.  And that’s good..  I think this was the first year they made RZR’s  It has a roof, windscreen, winch, doors, bush bar, rear trunk, rear led lights,  And a 2 inch lift with wheel spacers to give it a strong stance…   It HAD ( cuz I took them off) a 32 inch LED light bar..  and a stereo that was not working very well.

That’s a lot of stuff / accessories ..   Makes up for it’s issues..  It’s LOUD… needs some exhaust work.  It scratched and scuffed and there is a few cracks in the plastic… not many… I’ve seen worse..  And i know how to fix them.  The seats need re- covering. the dash needs a make over..  there is a hole where the stereo controller was.  There’s a few missing fasteners..  And the winch has rope not cable…

Cool factory box..   DIRTY !   All this stuff I can fix… clean…  or repair.  So let’s see how I do…

Well it was raining  and that put a damper on the trailer cuz I have to work outside.  So I brought my 570RZR in and did a service and fixed a few things.  That prompted me to bring the 800 in the shop and see what I can do..  Right away I removed the doors , the roof and the rear body.

And this is what I was left with.  Now it’s easy to work on the motor and mostly the exhaust system.  AND I found out why all the noise..

One of the two springs was missing and so was the lead gasket.  Geez.. no wonder..  I’m going to give the whole exhaust a make over..  And install a new valve cover gasket too.  Also I removed the battery.

And cleaned up the rats nest of unused wires.  There is still lots to do.  I figured I better start with the exhaust pipes and muffler.

When I pulled the Y pipe off the motor and cleaned it this is what I found.  A crack that goes around to both sides.  Good thing this is steel..  and I have a welder.  

After a good cleaning I painted all the parts with High Temp paint…  With all new seals and no cracks things should be noticeably quieter.  I also repainted the roll bar..   lots of scuffs and some rust..

Today I had only a bit of time to work on the 800… And I got the prefect soldering iron for plastic welding…  So I repaired the two rear side panels.. One had a good size crack… the other just a small crack.

This is the repaired crack.. the messy stuff in on the back of the panel.  You can still see the crack but it is strong again. I’m thinking I will have to sand the whole panel and apply clear coat to get the shine back.  And also today some goodies arrived for the 800.

Just some of the stuff I’ve ordered for the 800.  Another 12 inch LED light bar, Another mirror, some winch stoppers (enough for all the winches I have going) and 100 of the body clips… handy to have.  If the weather is good outside I work on the 18 ft trailer..   But I have spent some time on the RZR..   The roof is now all fixed… no more holes where they should not be..   The missing bolt in the valve cover is fixed… And the exhaust is back together.  I went to the Polaris dealer and picked up a few parts..  So I now have all that I need ..

Rainy so getting a few more things done..  The only thing I don’t have yet is the Dash panel..   I got the roof back on all sturdy once again.

And the exhaust system is all done.. maybe I’ll put the battery back in and see how quiet it is..

This is how it should be with ALL the springs and new gaskets.. Oh and not rusty !  Much less noise than before..   Lot’s has been done now because the rain has forced me to work indoors.  The seat bottoms are done.

Just like new again…..  I’ve been putting things back together as I recondition them..   Plus Dave & I removed the wheels to make sure things there are ok..  Had to tighten one bearing up a bit.. BUt the brake pads are toast!  So a new set has been ordered.  I have installed a horn, the new LED light bar and painted the bush bar.

Things are looking up for this sad RZR.  When we looked at the wheels we realized they are 14″ and not the factory 12″  and the tires are 28″ outside not 25″  so as well as the 2″ lift this machine has another inch or two.  Can’t wait to give it a try…  in a week I’ll be taking it up to the hunting camp and do just that.  But first I change the oil & filter, and hopefully the brake pads come Cuz don’t want to not have brakes!  Took it for a burn around the yard..  Lots of power.. there is a ticking noise coming from the rear left drive when you turn hard..  thinking it could be the fact that there is NO pad left on those brakes… metal to metal.  OR a bad drive shaft..  After the new pads we’ll see.  Also we replaced the winch line with new cable and hook.. even a rubber stopper.  And I got the dash sorted out..

The RZR now has a horn (left side) , a new dash panel with a volt meter in the middle, the front and rear LED lights.  And where the stereo controls were a power plug and USB charge ports.  Everything you need and nothing you don’t !  With the brakes done and everything ship shape..  I put the RZR up for sale … SOLD

New 18 ft Flat Deck Trailer

This story starts with having to dispose of an old damaged Travel trailer..  It was obviously in the flood from 2018.   It was a mess, and needed to go to the landfill.   We moved it into my second driveway and salvaged what we could..  not much !

However the frame and axles were good…  The tires held air and the brakes were still working..  The frame is a good 5 x 2  box steel  with only surface rust.  So why not keep the frame like we did last year with the other two free trailers.  This was a big trailer… the body was 28 ft long.  So we cut the bolts holding the body to the frame and lifted and blocked the body..   At the landfill they used the big loader to push the body off ( flattening two tires in the process) So we were left with just the frame.   No cost because it was a flood trailer.

And here we have a very long but nice frame.  First off… remove all the extra bits ..  like steps and those side pieces and the propane tank holder..   Then I cut 7 ft off the rear and removed the axles.

I spent weeks cleaning and painting the axles.  They were in great shape.  The brakes were like new…  Bearings to needed only to be re greased.  These are 3500 lb drop axles made in Edmonton..  with good Dexter electric brakes.

I adjusted the brakes .. very handy working up here…  and replaced all 14 nylon bushings.   The frame was flipped over and the spring hangers were moved forward to the proper position for a 18 ft trailer.

Now the axles are back on..   Also bought new 8 ply tires .. load range D.  heavy duty…

Cleaned and painted the rims.. of coarse !  And we can now mount the wheels back on as well…  but first I need to clean up the frame .

Here is a cleaned up… but unpainted frame.  ( because there is more to add ) I put the wheels on so I could move it to the other driveway… making room for the other old trailer frame.  Needing some of the steel from the rear end.

So I cut the whole back end off just behind the wheels.  This frame is C-channel  not box like the one I’m building.  And that C -channel is perfect for the uprights on the sides.

Here I have one side done.  The tall upright at the back is that way to hold the mesh ramp in the closed position.  As I progress it will all make sense..  to me at least.

Also important was the re – attaching of the rear bumper…  this makes the trailer 18 ft long on the deck.  Perfect !  There is a gusset plate  on the inside of the joint.   And I will have more to add outside too.. I’m getting better at anticipating useful stuff.. like tie down points. 

Here I’ve added a rod across the upright channels because this trailer is for carrying things that need to be lashed down.

Today was sunny again so I got to the welding..  Top rails are on.

So are the taillight pods.  One more day of welding should do it.

And so I’m done the welding.. it  was a very nice day.. and I put in long hours to get it done..  This is what I did…

Rear tie down points..   These are important ones and the same for the front tie downs…

Great place to easily hook straps to.   Why not weld them in place now.. Then they get painted..

The holder for the box and the winch mount..  In the plans for sure.. I have a steel locking box and it will keep the winch and battery safe and dry..

And last of all the hinges for the windgate / ramp.  And after a test I had to move them a bit..  They can now be welded in place.

Today was a nice day so I did as much painting as I could…

All but the very back where the ramp needs some adjustments..

After welding a few bits on the rear..  and a spare tire holder …we are good to finish the painting.

And there in the pile of bits I had removed from the trailer frame was the spare tire holder..  Originally on the back bumper.. but now works great on the right side in front of the fender.  and speaking of fenders….

I got to work on those too.  Next is the wiring..

I got a start on that today..

Installed all the penny LED marker lights..   These are tiny but bright !  Supposed to rain tomorrow..  So I would change gears and  work on the RZR 800…  Yes I have two projects on the go…. one in the shop and one outside..   Depends on the weather..\

Rainy today.. so working on the RZR…

Here’s a photo of where we are at..  It’s on it’s wheels.  Just missing a few things..  but I got a break in the weather and all the wiring , the winch and box are done now.

And yesterday we got the decking and installed it..

Looks great !  I’ve taken the trailer for a spin… and it tows as well as it looks.

The winch and battery are in the box with room for storing other stuff.  Just the windgate / ramp left to install.

Spring 2020….  Used the trailer last fall the take two ATV’s up hunting … rough roads..  and some of my welds broke.  So this spring I fixed those and made new mounts for the ends of the fenders.  Good to go again.


ATV Trailer

Spring 2019.


This was the photo in the ad for a trailer that I could make better.   We settled on a price without the boat loader.. I have no use for that.  I’ve been looking for a wide, low flat deck trailer for a while …even considering building one from scratch.  And this one is as close to perfect as I’m going to get..

My friend was going to Kelowna …so he picked it up for me.   Tows great just the way it is..

And here’s what I got..   12 ” wheels, EZ lube hubs, LED tail lights, Swivel jack, new 2″ hitch and 2×6 treated wood deck..   All good stuff to start with.   This trailer started life as a double jet ski trailer.  I started by cleaning up the tongue.

I removed the step and the plastic grate . Don’t need those.  Then I replaced the safety chain and re- routed the wires through the tongue tube.

Nice and tidy now…   Oh and extra bolt in the coupler makes me feel better too.  Next the wheels.

The white rims look good but the tires were only rated at 880 lbs each…  too close for me.. These 12″ on black rims are more robust.. rated at 1200 lbs each..  And they are new !

I finally got the shop back .. Cleaned it out..   Now the trailer can be modified.

The first thing… remove the decking so I can add more framing for extra strength.

The next thing… add more length for the RZR..  this works great.. the front wheels park on this.

And then a support for the new mesh loading ramp.

Painted with the decking back on and the LED tail lights..  and we are good to go…  I used the trailer like this before getting the ramp built.

And it works great..  And I got the mesh ramp built too !

Mesh ramp

Now no need for those other ramps..  And that’s a wrap…


2014 Polaris RZR 570

I did it !

Traded in my much loved 400 quad for a side by side of the same vintage.   A 2014 Polaris RZR 570 trail !   Perfect..  even the nice blue I liked and choose when I bought my Quad.

Nice looking !  I’m very happy to put this in my garage..  The 570 is the perfect size..  Plenty of power but still good on fuel..  AND this is the trail version.. which is only 50 inches wide..  2 inches more that the quad.  That means the it fits on ALL the trails I ride on AND carries a second person.  AND more stuff.

I plan to make a custom box for the back.. with a lid to keep all that stuff dry and secure.  But before I get too much into plans for Pimping this ride..  let’s talk about what I don’t have to change..

This is the loaded RZR 570..  called the LE model.  And it comes with options like power steering, engine braking and nice alloy wheels.  All things I like and would choose.  NOW let’s thank the previous owner for adding the other things I like..  a roof , a windshield,  bush bar, 3500 lb winch, a horn..  and Turn signals?  yup LED turn signals.  The dealer added new tires , belt and a clutch kit … and we are good to go!.   So what else could I possibly add ?   Well lots !  Let’s start with a rear view mirror.  A must have.  and a bag that fits between the seats and holds your lunch…and other goodies where you can get to them.  Then I need my GPS mount and a second 12 power outlet for that.

What about more lights !  I like to have daytime running lights…  safety first !   And below them are the rear lights I will install..  Just in case.  I ordered a nice switch for those..  ( haven’t used the running lights yet )

And once again … just in case.. you never know..  Although highly unlikely…  A Sasquatch light ..

Ok..  it could come in handy as just a very bright light for tunnels and other dark places.  Most people call them a light bar.. LED of coarse.

There’s a nice place on the bush bar for it..   OK that should do it.. Can’t think of anything else right now..  NO I don’t want a stereo in my ATV.. I want to hear the animals as they run screaming..  Actually the motor makes enough noise and I value my hearing.  I will post more in the spring when I install all these goodies..

It’s spring !   And I’m really wanting to get out and put this wonderful machine through it’s paces.  I can carry it in my truck..  I got some nice aluminum ramps for that.   But I really want a trailer to pack it around..  Found the “almost” perfect one..   And here’s a post I started for it..   ATV Trailer.

So I’ve been for several rides now…  I have all the goodies installed and love this ATV..

This is my LED light bar…  and boy does it work well.. already used it on a late night ride.

This is my LED back up light…

Trunk box

And here’s the trunk..  excellent at keeping things clean and safe.

The new dash looks like this now..  moved the horn button… and two new 12v plugs one one the top of the dash for the GPS and the one you see here with a volt meter plugged in..

On one of the many rides.


79 Scamp / Acorn Restore Page 3 The new Floor

I’ve been thinking of how to do this big job.  Good thing I saved the old floor pieces.   I’m going to use 5/8 GIS ply to build the floor.  And the frame will be the template for the lower floor pieces.  But the first step is to wheel it in the shop…

So I installed the wheels on the cradle and two of us pushed in in easily.  And as you can see the windows disappeared quickly !   Aluminum rivets are easy to drill out..  Still a few bits to remove.

On the cradle it’s a tight fit.. but it must remain that way until the floor is secure.   However I’m going to push it back out to the driveway and see if the pressure washer will remove whats left of the Thinsulate from the interior.

That’s about as much as I could clean off..  not bad.  That glue is tough stuff.  Which is ok..  whatever I stick on there will stay.

I carefully removed the upper fiberglass lip from where the floor WAS ..  So now I can drop the new floor in and it will rest on what’s left of the bottom lip.  Then the top of the floor gets glassed in..

I also very carefully cut out the new front and back floors.  The body came back in the shop..  And with a wire wheel I finished what the wash didn’t..  Real messy so it’s better without the floor.  Then I glued the floors in with PL 9000.

Glue is good.. But next I will glass in the top.  Only then do I think the floor will support the body.

This is working out very good..  After I got two good coats of resin and cloth on the seams… and I repaired the crack over the door… it was time to set the body back on the frame.

And that’s exactly what I did.. Plus I could take the cradle away.  Because now there’s enough floor to support the body.  The fit is very good.  Wow.. that doesn’t happen every day.

Even the “front to back” alignment is good.  This will be a great way to accurately build the lower floor.

You can see I used the 12″ naked rims to roll the frame back under the body..  Lower is better !  Plus this fits under the garage door when I want to move it in or out for more room.  It’s TIGHT in the shop..

But less tight then when the cradle was on the body.  It’s nice to see the trailer straight , supported and back on the frame..  even if it’s temporary.

Jan 15 2019…. A new year !

And I’m back to work on the Acorn after a bit of a break..

Carefully piecing the floor back…  Lot’s of gluing and fitting .   As well I got the fenders back in and glassed in place.  I was going back to work for the spring so I bundled up the Acorn and parked it in the RV carport …  with plans to carry on in the late fall .

Acorn Restore page 4 : Glassing the floor


79 Scamp / Acorn Restore Page 2 The Frame

Well this one made it into the shop…

And wont be cut up..

Over all..  it’s not bad.  The main frame is good, only some of the thin metal is rusted through.  And other than a different bumper , there has been no repairs or modifications.  I still don’t like how flimsy the frame is…  definitely relying on the floor for strength.   So that is what has to change.

This is an interesting thing..  It could be ( and most likely was) a space for a porta potty.   But it could be a front table for two.  Instead of the bunk.   Something to think about.   Now’s time to have a careful look at the frame. And make some plans…   This is my plans:

The Plan:

First..  This floor space.. without any support needs more added.   And the longer I looked at the bumper… the more I think it’s fine.  It’s strong.. and that’s important.

This is the rear of the lower floor.. no good like this.. I’ll cut it out and use two angle pieces.

The support for the entrance is..  well gone.   So I’ll build it back with more angle.

Surprisingly the axle is still good.. looks bad but it works as it should.  But I’m still going to use the new 2000 lb axles.  They have the hubs I need for the new wheels.  I will copy what I did for the Boler frame. This will add 2.5 inches in height to the trailer .   These trailers are  much too low in my opinion.

Lastly..   A new  2 inch coupler..  and a jack that fits the hole.  The holders for the propane tank need to be reworked to fit a battery in that space to.

Let’s Get Started:

Cutting and cleaning is the order of the day..  Getting rid of the bad pieces.   The place to buy metal is closed for a few days…  so I’m taking my time to remove the axle..  not easy when they put a weld in a tight place.

But I got it !  The axle and all the bad metal is gone..  Now I’ll do some grinding and cleaning to prepare for the new metal.  and I stoped to make a video…

Well the order in which I do all those mods doesn’t really matter.  So long as they get done..

So I started at the front of the trailer..   Here I’m seeing how things fit.  Yup this works..  Because the jack is tall the battery box can be in front of the propane tank..  Sooo

I made a battery holder !   I also made the seven ears for the body hold down bolts.

And now I have welded in the added rear frame floor supports.  Then we flip the frame over to work on the axles.  Pretty much following the same design as the Boler..  The axles are the same.

One difference …  This time I gave the axles a little camber.  And since the upward angle is 22.5 deg.  instead of the factory 10 deg.  even with the added 3 ” blocking..  we end up lifting the trailer 2 ”

There’s a 2 ” receiver under the bumper..  this will be used for the spare tire.  OR  a bike carrier.

The body hold down ears are done.  Seven of them just like the Boler.

The propane tank and battery holders are done too.

Once I’ve finished the door floor support..   I’ll flip it back over and time for painting.

There… underside is done.. and….

The whole frame is done..  just the wheels , hubs and stabilizer  jacks to clean and paint.   When the frame was dry I kicked it outside so I had more room to clean the wheels & stabilizer jacks.

All done..  took the wheels down to bare metal..  nice !

t

Here’s the finished frame..  with it’s new tires.  This brings the height to it’s full and proper place.  A perfect  15 inches of hitch height.  8 inches of overall clearance under the trailer..  and a 10 ” entrance  height.  That in my mind is as near perfect as it gets.

The final touch arrived …. baby moon hub caps.  Can’t wait to see them on..

One last photo…  This is what the hub caps look like on the wheels..


On to the floor…    Page 3  The New Floor


Old Tilt Trailer Page 2

And on we go…    It was a delicate operation…  but I used my Tractor to flip the trailer end for end..

Now you can see the angle of the tilt…. and the clearance the wheels have.

It’s a bit steeper that I would like ..  but if you want the wheels tucked under than this is what you get..  And isn’t it interesting how it’s balanced !  Hopefully I can keep that after I add the side rails.

Except for a hole for the wires..  and clamping the wheel jack on..  the tongue is finished..  As soon as the paint is dry I’ll attach it to the trailer

And there we have it !  And surprise !  I welded the side rails on too.   The latch worked out great..  I now have the jack / wheel on the front..  so it a three wheeler..  And I’m happy with the weight..   I can push it around quite easily.

here’s a bit different view.  The side rails are low… about 6 inches.  And the front cross bar acts as a wheel chock.

The jack is on the drivers side…  because it should be…  Still need to finish the painting,

Done…  All that’s needed now is the deck.

Not So Old Anymore !

All done except the road test … and getting registration.

Sold !

Right after I registered the trailer and took it for a test run..  Which proved I know how to build a trailer :)…   I put it up for sale and sold it within the day..   Bye Bye..   On to the next project…    Acorn Trailer

Old Tilt trailer

Made New Again !

I’ve been wanting to build another one of these.  AND now I’ll be needing one..  I’m planing to change my quad for a side by side.  And the only way to carry it properly is on a wider .. lower … trailer.  If it tilts for loading.. then better yet.

This old trailer was out on the farm.. it’s free..  BUT.. the only part that’s good is the 6 x 8 ft. deck frame and the tilting lock.  The old rear end from a car is toast..  And the hitch part is just not the way I would like it to be..

But I love this lock for the tilt.   so I carefully cut it off..   The small hitch frame I will use latter for a yard wagon.   Hear is a chance to use the axle and new 10″ wheels I have from the Colman Tent Trailer I took apart a year ago.  At 64″ hub face to hub face it’s perfect.

So I carefully rebuilt it.   And painted it..  The 10 inch wheels will be lower to the ground.  And I have 2 new never used wheels and two good spares.  I will need new springs, but i have all the other new bits…  so the running gear will be new… Put aside and ready to install .

So time for a new frame.  I bought new  2-1/2 ”  box steel.  Then welded an H shape that’s a bit wider than what you see above.  The old frame and the front piece of angle were cut out.. ( in red) .  That old frame was all bent up..and too tall..   that added extra height, which I did not want.  And the front piece was also bent..

After new notches were cut in the two cross pieces the old deck and the new frame fit together nicely.   I should mention that the new frame where the springs will mount to is the same as the wheel base on a RZR side by side.  That means the weight is held on the strongest part of the deck.

This cross piece is where the trailer tongue will attach with a hinge for tilting the trailer. But I need to add a few more bits…  two more cross supports , and some shims so the decking is level.  One of the issues with this kind of trailer is … where do you put lights?  Well they need to be tucked under the deck.  Same with the license plate.

So I’ll be using these pieces I cut out for a different trailer and did not use.   But they will work nicely.

And there ya go..   As well you can see the shim pieces tacked on top of the frame to level off for the wood deck.  Time to flip the whole thing over..

UpSideDown !

Several things are happening here..  The welding is finished on the underside…  and I’m working on the tongue.  The hinge , latch and hitch are all done..  Even a rest hoop that doubles as a safety chain mount.

The latching mechanism has been resized and should work great..  spring loaded so when the deck comes down…click!  Not sure if I’ll be happy with this.. will see.

Spring is Here !

Not really…  Today I went to Kelowna for some supplies..  includes two new 3 leaf springs.   Now I will know how much clearance the 10 inch wheels will have under the deck..

Well look at that.. I’m needing to ad 2 1/2 inch tube to the frame to give the tire 3 inches of clearance under the deck…   So we’ll have to see what the tilt angle ends up being..    Ends up to be 28 degrees.

I’ll need this left over piece cut in half…   more welding..  Good thing I have the extra pieces.

I tacked them in place and attached the springs..  put the axle on top.. and the wheel.. and whadya know three inches of clearance.

Took it all apart and finished up the welds with the big welder..  got to be strong.   Ready for the paint !   I randomly choose a brown..  witch turned out more like tan..

It’s like the base coat for a camo paint job.. good enough.   And it took two days to dry !   The next step for me is to do the wiring while it’s easy.

All the wires are inside the main frame tubes as much as possible.  The side marker lights are LED’s  I’ve recessed them a bit to better protect them.

The taillights are not LED..  but they are bright.. and they too are recessed in a rubber grommet.   In the past I and others have broken too many trailer lights..  So now I’m careful how and where I mount them.

I am now ready to flip the trailer over on to it’s wheels…  and finish the top side..   Time for a new page..  cause there’s much more work to do…

ON TO PAGE  2:

Frontier Camper Page 2

Frontier Camper becomes the new Scooby !

Sept 2018:

The trailer frame is almost finished..  The decking is on !

And today I was working on the cradle for the camper.   The decking is 2×8 treated wood bolted to the frame with galvanized bolts.   Very strong and should out last me.

Here’s the cradle for the camper to sit on..  Also 2×8 treated wood.

This morning I got the brakes adjusted and wired up.. and the wheels back on..   Then Dave & I rolled the trailer under the camper..   PERFECT  FIT..

Wow..  I’m getting better with the tape measure.   The balance is spot on too..  About 300 ibs tongue weight.  So it should tow really nice…   And look at the room up front for a quad.

Still a bit more work to do..  but the new Scooby will be ready for Hunting this October.

Update : Sept 11.  2018

I have built the folding  stairs  and installed a hand rail too.

They turned out very nice..  Fold up nice too….

Perfect !   But I didn’t like the way the bottom step flexed…  sooo I installed threaded feet to the under side and ..  no more flex.. nice and solid.

They are very adjustable ..  I will cut a couple of wood squares to place under the feet..

It’s a simple thing .. but it’s sturdy.. and can be removed if the camper was taken off the trailer.   Amazing how it gives you comfort when entering and exiting the camper.

The roof is all sealed up and vent covers are installed.  Ready for what ever weather comes our way.

October 2018:

I will be taking the Frontier (scooby) up the valley on the annual hunting trip..  So I’ve outfitted it all up ..  tested out the front deck..

A full size ATV fits perfectly.   And I remembered I’ve never looked at the canopy…

Well … it’s in perfect condition..  I expect that since it’s stored in the zippered bag.  This will be handy for any bad weather..

1979 Scamp / Acorn Trailer Restore Page 1


June 2018:

Not mine

I know I’ve said this before.. at some point.. but this one fell into my lap..   not literally that would hurt..  but I was looking but not very hard for another Boler style trailer to restore.  I so enjoyed the 73 Boler project that I said (loudly) that I would love to do another..  Well the little trailer god was listening.   The ad for this one popped up on my phone while I was in Vancouver..  Someone had gotten in over their head trying to fix the leaks in their Acorn trailer.. and just wanted it gone  BUT  to someone who would love it and fix it …and that understood these little trailers.   Hey THAT’S ME.  and he agreed..   So I had to plan a long drive .. to get it .. the next week.  7 hrs to Vancouver then a ferry ride.. then another hour up the coast .  But most fortunately the Acorn was just down the road from my Bother’s place..  So he went and had a look for me.  Big job to fix this one he said..   Don’t care I said.   So here it is home with me ..  intact.. and with BC registration too !

Yes I did remember to take a photo just after loading it on the trailer.  The fella behind the trailer is / was the owner.  It’s making the trip home on a trailer because ….  the body is barely attached to the frame..  and there is no lights ..  AND it’s a long trip.  Funny the other project Boler had to be ferried home too..  but it was the frame that was toast..  this frame looks good.

Interior ! not so much.  This is where the work will happen..   So… the story as I understand it ..   This trailer came from Arizona.. dry climate.  When brought back to the BC coast .. wet climate.  All the rivets leaked and damaged the Thinsulate wall covering.. and the plywood floor.  A good argument for using bolts not rivets to attach the cabinets to the walls.   Too bad about the wall finish.. now I will have to glue carpet.  And build a new floor.

The first thing I did was to pull all the parts out from inside .. so I could see what I had.  It’s all there ! and in good condition.. And as a bonus the cupboard doors are oak !  Perfect !  So i put things back.. sorta in the places where they go.

Because the body is loose from the floor.. there is nothing holding the door up.  so it’s sagging ..  and it cracked the fiberglass over the door..

The boler had a similar crack over the rear window  because the frame had sagged.   So aside from that the body is great.

I’ve tarped the trailer now to keep the rain out..  and this will be a great project to start in the fall.

IT’S TIME !

Now it’s November..   And I need to get started on the Acorn.  I’ve been thinking and planning how to fix the floor.   How do I support the trailer and make everything true and level.   IT’s ROUND !  Then it came to me..  The one thing that’s level is the joint between the top and bottom…  and the aluminum trim the covers it.  So I build a cradle that supports the whole trailer on that rim.  As a bonus we can lift the body off of the frame,

Here you can see we are doing just that..  and have the frame half way out the front.  This was also made easy by the fact that there is NO floor..  no wheel wells..   The body was attached to the left front corner by a few feet of floor..  That was all..   Sooo  looks like I’m building a whole new floor.  I sorta knew that from the start.

Meet the frame !   A lot like the 73’s frame.. but without the repairs.  And there’s a bump out up front for a potty..  Interesting..   There is still a very slight sag in the left rear frame tube.  We are going to see if we can tweak it with chains and a porta power ram.  I’m going to clean the frame good and check for rust holes and cracks..  but it looks ok.   So maybe just a few extra pieces of steel and new axles.

It’s time to divide the post up into the different stages of work.  This trailer will have 6 more pages..

Page 2 The Frame
Page 3 The Floor
Page 4 Glassing the Floor
Page 5 The Exterior
Page 6 The Re-Assembly

1973 Boler Page #6 The Interior Cabinets

Well it’s late March.. and I’ve done the house reno’s .  The snow is gone..  So it’s time to get the Boler done..

I emptied the trailer out …everything back in the shop.  These are the yucky cushions..   Off the landfill.  But I have to keep the plywood base for the upper bunk.

In good condition too !   New upholstery is being made as I write here..   The table …  apparently  it will remain red for now.  So I don’t need to work on that..

Update:    It’s taken awhile to rework the cabinets..  So the stove fits..  The fridge fits..  And I managed to get a drawer to fit in there too.   New wood glued inside for strength as well.   They are all filled and primed now..

The interior ( that’s visible)  is painted grey..  I had to make two new hatch covers.. and two more door fronts too..

Here’s the door fronts..  We decided to go with the harvest gold to match the sink and stove.  I like it.   And I got the color SOOOO close.

The stove top is two tone..  so we went to the DARK SIDE..   With the wood floor and the blue cushions..  this trailer will look sweet !

Here is the primed kitchen with it’s new features.  Extra shelf on the left.. and a drawer under the stove.   Also extra wood added to make it more ridgit.   I’m painting the high gloss off white tonight..

May 1 st  week…   Last push.

Before the Boler goes home to Edomonton.    The Cabinets are all ready ..  And I’ve installed them back in the trailer..  The water tank and lines and the hand pump is in and working good.

I’ve got the wiring all done too..  The Coleman Power panel is working good.. It couldn’t go where I wanted.. so it’s below where you sit.

But that’s ok..   I could not get the speakers working good for the stereo..  so I’m leaving that for Dallas to fix..

Still to do this week is the fridge,  Bunk supports,  a drawer for under the stove..  Today we install the hitch on the Rav4  and take the boler for a run..

YES !  took it for a highway run and it’s perfect..  tows great..  Lot’s to do this week..   but I got it all done by Saturday morning..

Here’s the finished closet..

And the finished Kitchen..    And here’s a short video..


I’ve had a few reports back from the first road trip ..  The spare tire mount bent down and clearly the old metal I used on the bumper was not strong enough for all the bouncing..

This will need to be fixed in the summer when the Boler comes back for camp..

Here’s the latest photo of the boler with the new cushions…

But this brings to a close the Boler project..   It gone to it’s new home now..   But did come for a visit to our group camp this year.

Here it is after a long trip to the Yukon and then back here..  They love it..

But Wait ! there’s more !

I have found another Boler  (type) trailer for sale cheap..   A US made version of the Boler called an Acorn / Scamp.   So I’m starting a new post ( of coarse)    1979 Acorn Trailer