All posts by Rob

1991 GMC Tracker Page 7

 PAGE 7  Putting it all back together:

Back to page 6 HERE

Everything worked it’s way up to the painting…  Now that’s done.  So time to reassemble the Tracker.  I made sure to let the paint cure for a day or so before messing with it.  Now we need the door handles back.. And some of the other bits..  Oh did I forget to mention that blue is my favorite color !  This is “techno blue” from late 90’s VWs.  The more I look at it the more I really like it.

WP_20160109_001

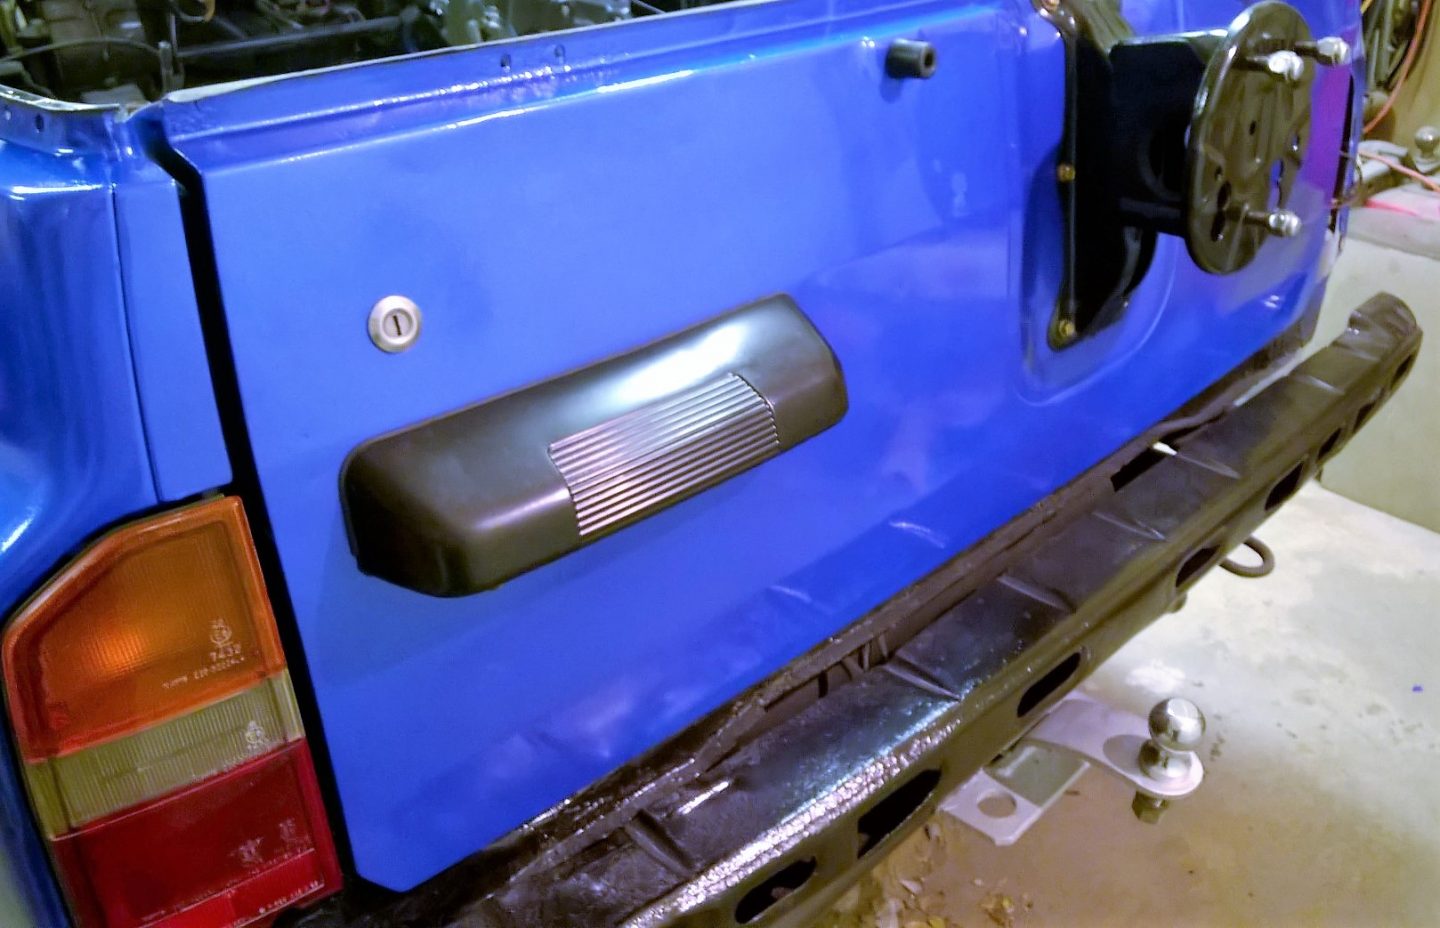
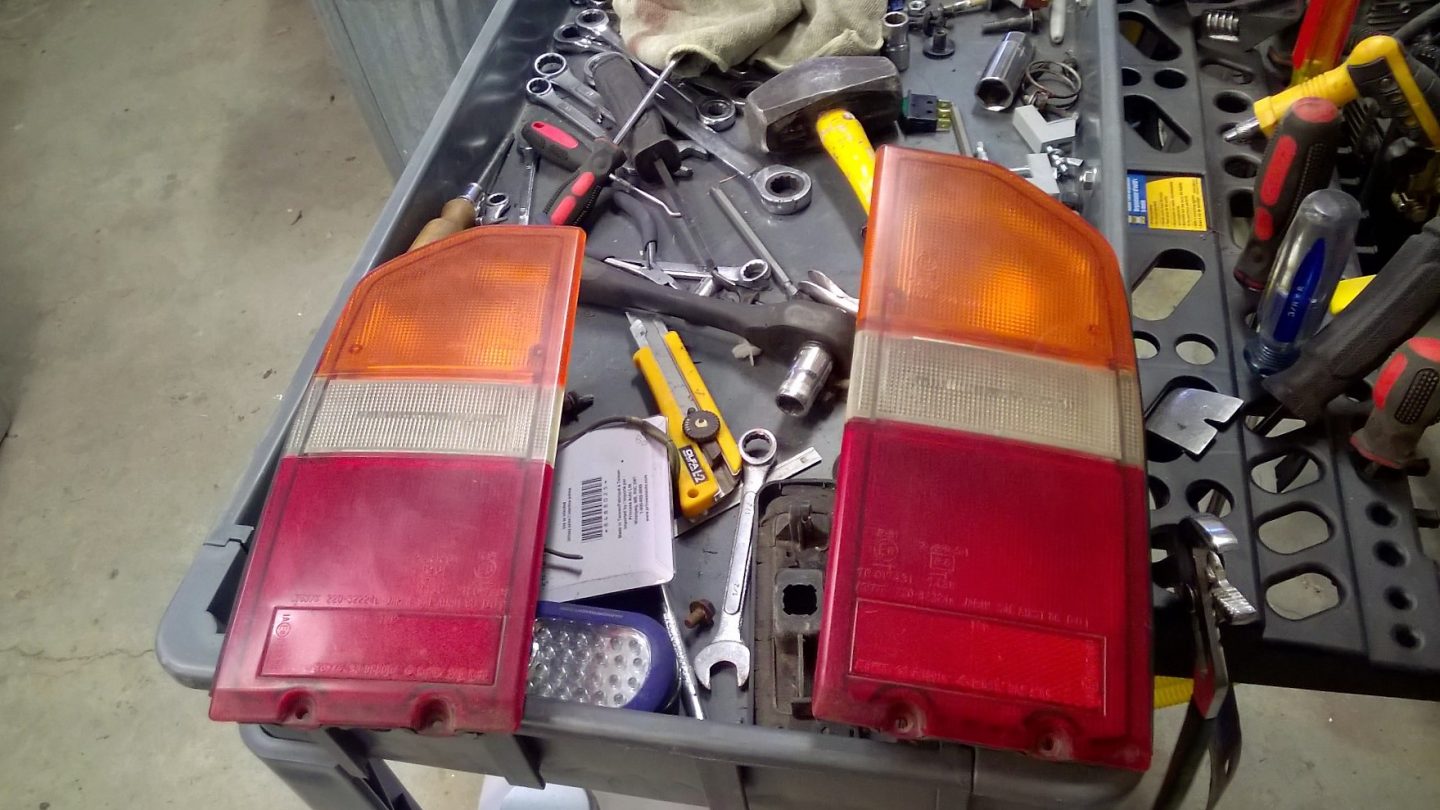
The Blue & Black color scheme I’ve gone with looks very good. You can start to see that once I put stuff back on.. Like the tail light and spare holder.  And don’t forget that nice handle..  So this almost completes the tailgate.

WP_20160109_002

Once the inner panel was installed..  with the proper push pins that I sourced out of China.. we are done.

Check one thing now off the list.  The weather stripping and door gaskets are done.  The sill covers are on.  And the door switches are in and tested.. Working!  and I bet that’s the first time they worked for a long time.

Jan 12 2016:

A bit of a snag.. the carpet … of which I spent a few hours vacuuming.  Still has crap coming out and stinks.  I’m at the point where I need to install the carpet or do exterior stuff.  At one point I thought of buying new carpet.  But it is over $300.  And it’s still has to be cut and fitted.   I’m trying to keep costs down.  So I’m going to pressure wash the carpet and strip all the stinky old padding off the back.  That means I would have to go get some underlay for carpet to replace the padding.. but at least it all would be clean.  Soooo while the carpet dries I’ll turn my attention to the bumpers, grill and the  bush guard.  I can flip back and forth.. and Git R Done.

WP_20160116_001

While I was washing the carpet , I gave the seats a shampoo. Here they are back in the basement drying out.  Notice the seat bolsters are black and the uppers are grey.  We could not match that grey.  So had to use black.  I could not afford to change the backs too, so that’s a compromise.

I removed the front  plastic from the bumper.  And found that the metal was in great shape.

WP_20160116_002

It makes it easier to design and modify the bush guard I have from a big truck to fit the tiny Tracker.   I also want strong steel ears coming off the frame for attaching a tow bar..  or maybe even a plow.  Got to think it over..  In the meantime I painted the rear bumper cover and mounted it back in place.

WP_20160117_001

The back of the Tracker is now finished.  That roll you see is the under felt for the interior. Yet to do is cutting and fitting it into place.

Done !  Got the carpet back in today.  And the dash, center consoles and seats.

WP_20160118_003

Left the horn cover off.. cause I may have to adjust the wheel.

The Bush Guard:

WP_20160121_001

If you look back you will see that whom ever installed the winch just cut away enough of the bumper cover to bolt the winch to the steel part.  That worked ok..   just ok.  I had this bush guard from a full size truck.   Fairly fancy one too.

grill guard light guards 005

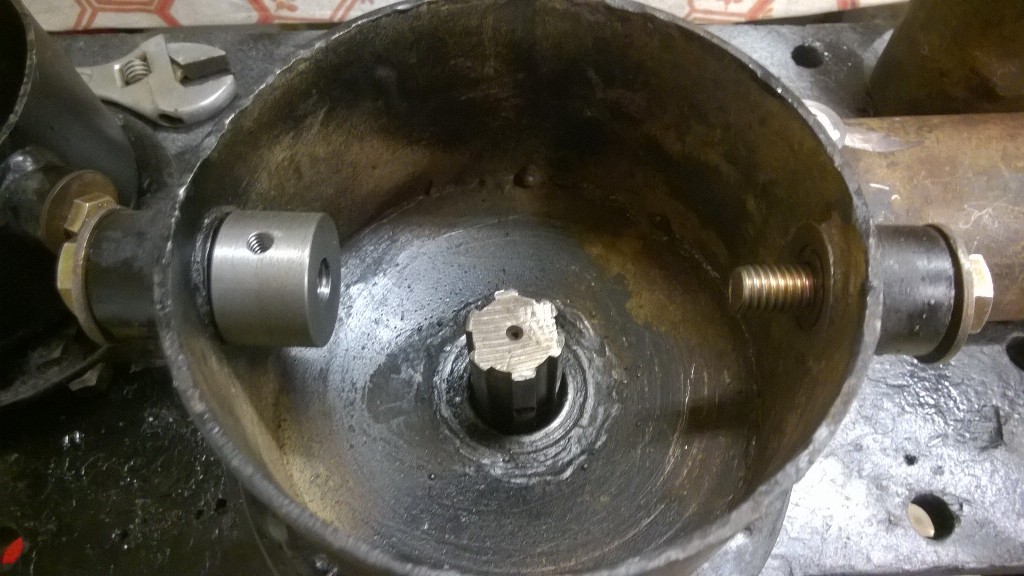
Way too heavy for the little Tracker though.  So I’ve removed the headlight guards,  trimmed 6 inches out of the middle and shortened the height by 8 inches.  That removed the bottom tube and about half the weight.  Now I have a great flat surface for the new winch. (mounting plate in photo).  Brackets to hold the guard and winch are welded to the bumper.

WP_20160122_001

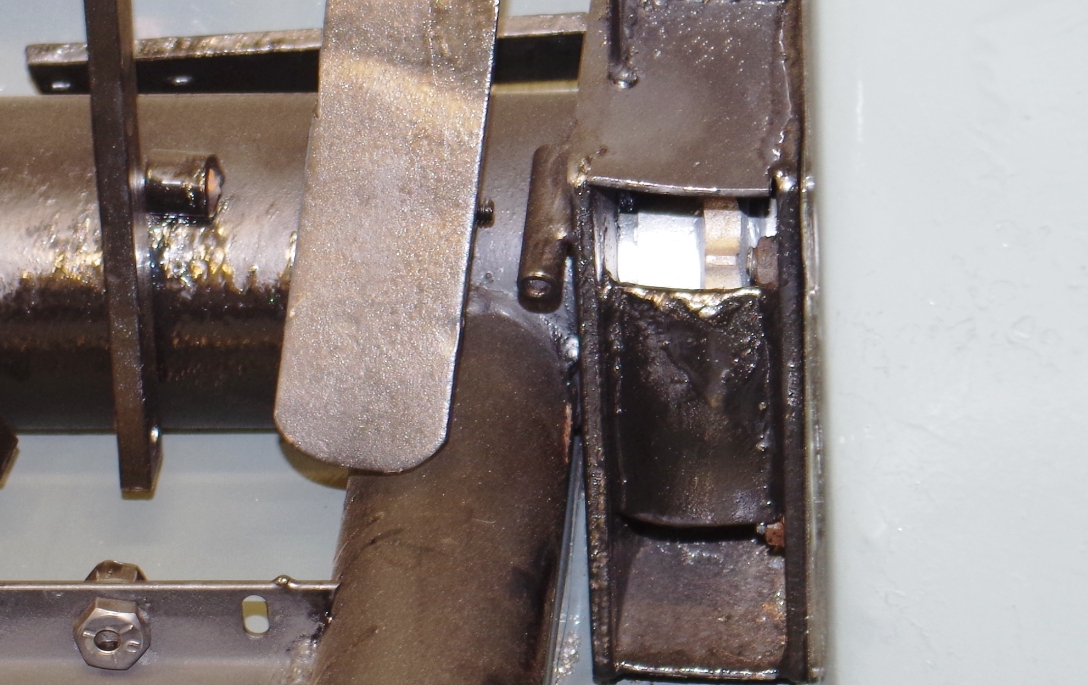
The bumper is quite strong, so this will work good.  I’ve painted the guard and set it aside.  Also today I set to work welding and fabricating the ears for attachments.

WP_20160122_002

These are 3/4 solid steel , welded to the frame and braced.  I moved the tow hook to the center to free up the end of the left side frame.  And of coarse everything got a satin black paint job.   Time now to cut and fit the bumper cover..

WP_20160123_002

There !  The covers come right up to the bush guard.  looks great.  And as my very special added bonus..  LED running lights. !

WP_20160123_001

Fitted right into the bumper !  These even light up orange with the turn lights.   Cool !  Now for the paint and install.

Jan 24 2016:

Yesterday I painted all the front grill / bumper parts…  Today I got everything installed and the wiring done.

WP_20160124_001

I love it when a plan comes together…  Everything fit and worked out great.  The winch loves it’s new home.. the wires are neatly run .. I couldn’t be more pleased.

WP_20160124_002

The control box is under this plate.. hiding.  There is two wireless remotes for the winch.. all working great.

Time for another page..  most likely the last..  Cause there’s not much left to do.

Page 8


1991 GMC Tracker Page 6

Page 6 The Exterior Body Work:

Back to page 5 HERE.

WP_20151228_001

Things are going to get dusty.  As I start to work my way around.  Lots of sanding and filling and grinding.  I started with the rear quarter panels and working my way forward..  Can’t avoid those rocker panels any more..

WP_20151230_001

So I made up my mind to use 3 inch pipe. It works !  Very well .  Once I cut out all the rusty stuff there’s not much left..  Pipe was the answer.  It’s very strong too..  And it will take a lot of abuse.  Any one who goes off road will tell you that stuff you drive over flips up and smacks this part of and 4×4..  Quad or buggy.

I’ve been busy for a few days , and I’m happy that the pipe thing worked so well..  Filling and sanding till it looks good.

WP_20160105_001

Nice transition.. I won’t have to hide this..  And look the holes for the interior light button are there..  Plus I managed to rebuild both buttons so I have it all original.  Need to paint the inner door frames and clean up ALOT.

WP_20160106_001

Alright..  Dave & I got the hood and doors installed. Even adjusted them to close nice.  I also got the seats back from the upholsterer.  They look great.   I spent the day cutting the cardboard to fit over the rear and the sun roof..  getting ready for painting.. Still got a few touch ups so I’ll be a few days.

Or maybe just one.  Jan 7 2016..  And I’m ready for paint

WP_20160107_002

The whole body has been sanded and all the boo boo’s fixed.

WP_20160107_003

Everything is masked off.  Hey that’s a cool way to do a top..  I’ve seen a newer Tracker around with a top like that.   Don’t need a back seat !  Also good is the weather.  It’s warmed up to above freezing.. That means I can vent without sucking in -10 air.

Painting Day: 

WP_20160108_001

I thought I’d take a photo between the color and the clear coat.   Other than the color swatch and taking the lid off the can.. This is my first time seeing the color I chose.  Works for me.   As close to my quad as I could get.  It has silver metallic in it .. If it had green metallic it would be a perfect match.

WP_20160108_002

I waited an hour then stripped the masking off.  Never leave the tape on longer than a few days.  All sorts of dents and other imperfections can be seen now that it’s shiny.  Oh well it’s not a show car.  I already spent a lot of time on the body.  So it’s time to put things back together..  I like this part  🙂

Here’s a list of the things I’ve yet to do:

Or need to do..  Let’s see if I get R done..

  • Install the power lock control
  • wire in the two new power plugs
  • Install all the weather stripping
  • Clean the seats
  • Put the carpet and interior back
  • Paint the grill and bumpers
  • Modify the bush guard

There is lots of little details as well..  but that’s the big stuff.

Time to start a new page with all this putting back together..

PAGE 7 HERE


1991 GMC Tracker Page 5

Page 5 : The Body Work  ..  Interior

Links to the previous pages:

Page 1   Page 2 Page 3  Page 4

Well as planned I need to remove the dash AGAIN, the seats and carpet.  One of the reasons for not driving the Tracker more was the heater.  The fan was not blowing much air, therefore my defrost was lame at best. It’s winter I need the heater.  It is suspected that the heater core is plugged, and that would not be a surprise given the amount of dust I’ve found.  So out comes the heater..  I’m still deciding how to fix the seats up.  But they will be out and easy to do something with once I’ve made a decision.  I’m really hoping the eight seat bolts come out easily.  Doing the interior will be easier without the doors in the way.. and no top to make it dark.

Dec 9 2015:

I took just the blower half of the heater out.  That allowed good access to the heater core.  There was crap in there for sure.. So I took the shop vac and the air gun to it and cleaned the crap out.  In fact all the air passages are clean now.  The heater fan blows lots of air through the core now too.  Just like new !   Now for those holes in the floor.  Once the seats and carpet were out we can assess the extent of the patching.

WP_20151209_002

The worst hole is the drivers side . The piece of heavy gauge metal I cut and laid in there earlier is not quite big enough.  I have lots of good new metal to make up the rest.

WP_20151209_001 1

I will have to rebuild these rear foot wells.   This is a bit of structure here..  so welding is a must.  Don’t have to be pretty cause the carpet covers all this.

Dec 10 2015:

WP_20151210_001

Here’s the front floor all fixed.  Heavy gauge metal  glued and riveted in.  Very strong fix.   No more wearing out shoes on the road !

Today I took the two front seats to the upholstery shop.  I decided to have both the seats redone… seats only , not the backs.  I brought the  drivers bottom frame back to my shop.

WP_20151210_002

It needed a little fixing.  So I lubed the sliders and gave it a quick paint job.  I’ll take it back tomorrow.

Dec 12 2015:

Got a lot done today ..  Despite wanting to just be lazy.

WP_20151210_003

I cut out all the bad rust and made a plan.  One of the eight body mounts is right there not holding much.  So I first made and installed a new floor piece that would cover and weld to the mount.  I glued and screwed the new floor to the existing floor.

WP_20151211_001

Then I made a new wall that welds to the floor making it all strong again.  Now the body mount is doing something once again.  Holding up the corner of the rear foot well.

WP_20151211_002

Then I did the same thing on the passenger side.  Just not as extensive.   Now to clean and spray with primer.  That’s all the interior repairs done.  The rest is just cleaning , painting and replacing.  I’m not putting the interior back together till all the body work is done because of the dust..  Some of the exterior body work requires access from the inside as well.  I’ve cleaned out the body cavities of all the mud and dust.  Now I’m turning my attention to the rear of the Tracker.

The Exterior:

WP_20151219_001

One thing leads to another..  I don’t want to do all this rust repair and leave a rusty bumper hiding under the plastic cover. So I removed the cover and the metal bumper under for a cleaning and paint job.  Also some of the metal is GONE under the tail lights and the lower rear of the fenders.  And there’s holes in the sill under the tailgate.  It’s all hidden under the plastic bumper cover, but I need to treat and paint this so it does not get worse.

WP_20151219_002

This whole panel is missing on both sides.  I need to replace it cause the bumper is held in place here.  How fortunate that the lower bumper frames on both sides are still intact.  Usually they are the first to rust away.  And other then one side a little bent up, the metal bumper is in good shape.

WP_20151219_003

Here it is after an acid wash.  I then took the big wire wheel to it and sprayed it with rust converter.  All painted up and ready to install… But need a good place to install it..  And without the bumper in the way it’s easier for me to fix the missing metal under the tail lights.  I’ve not the tools or the skill to shape metal like the factory.. or even a good body shop.   But I will do my best.  The metal I have is twice the thickness of the body panels, which makes it a bit harder too.

WP_20151223_003

So here’s my new piece.  Welded in place with extra braces.  Then I use expanding foam to fill all behind and give it the proper shape.  And it all gets fiberglassed over with resin and cloth.  It’s not perfect but it’s strong, seals the holes and mostly replaces what was gone.

WP_20151223_002

Before the whole bottom of the tail light socket was gone with no place for the screws that hold the light in.  Now I have good mounting and a re-shape of what’s visible above the bumper cover.

WP_20151223_001

Looks good to me..  I’ll install the metal bumper and the tail gate, but not the cover till after painting.

WP_20151227_001

Putting some things back together,  The bumper and the tail gate.  I’m happy with the fit. You don’t have to slam it.  The power lock is installed, and that’s why the key hole and handle is too.   Normally I would leave those two things off till after the painting.  But the hook up required them installed.

WP_20151227_002

Here’s the inner side with the sound proofing .   I now need to turn my attention to the rocker panels…  moochoo work to do there… So let’s start a new page.

Page 6 Exterior Body Work:


1991 GMC Tracker Page 4

Page 4  The Body Work:

In case you need to go back..  Page 1Page 2 , Page 3.  Links.

Well not quite sure when to start this part of the Tracker.  There’s a part of me that is really wanting to get at this..  and there is the little voice that says drive it around a bit more.  But lets talk about the plans anyway.

WP_20151130_001

The Interior…  The top half is perfect..  floor not so good..  so most of the interior says untouched.  On the 89 Tracker (years back) I had to strip the whole interior in order to paint it black.  That was the color scheme ( green & black) and all the metal was white.  Lucky me ! This one is black already.  However the doors I’ll be using are not..  But they will be pre-painted on the bench.  I will have to remove the rear side panels to get at the wiring and install new speakers.  I have repaired the rear floor already, so that’s done.   I will have to remove the dash again to wire in the power locks & remote transmitter.  The seats need to come out, and the carpet too.  There’s a bit of patching to do.  All the center console bits need to come out.  They need to be painted to match the dash..  and the light fixed in the PRNDL.  Also I’m very fortunate to have good carpet with no holes..  So clean it while it’s out and back in it goes.   Thus is the interior plan.

WP_20151024_006

The Exterior is another matter.  The rocker panels on both sides need fixing.. and there is big holes on the drivers side.  This will require some tricky reconstruction.   But I like that challenge.  I’m thinking of pipe for new rockers..  stronger.   As far as removing stuff.. that’s a big list.  I would rather remove than mask around stuff.   The paint scheme is simple , SEMI GLOSS BLACK for the bumpers, grill, door handles, mirrors and around the windows of the doors.

Tracker 012

Very much like what you see in the photo of the 89.   But instead of green I want blue.  And the blue I would like to match closely is the color on my Quad..

WP_000768

It’s called BLUE FIRE METALLIC.. and I think it’s nice and bright.  And contrasts good with the black.  And clear coat will make it pop.

Can’t wait…   I’m going to get the hood and doors and bring them into the shop.. December looks like a good month for doing body work.

WP_20151201_001

This is the hood from the 89 parts Sidekick..  It’s in very good condition.  Only three dings needed filler..  all the rest ( mostly rock chips) sanded out.  I’m only going to medium sand the hood, and spot prime.  the finishing will be done when it’s on the Tracker.  My real goal right now is to clean and paint the underside BLACK.  But get it ready to install.  Same with the doors.

WP_20151201_002

The inner and outer parts of the hood are glued together !  And the middle had come apart.  So I’m using the urethane body glue to fix that..  Here I have some weight on to hold it.   Once the glue was dry (overnight) I painted the ribs gloss black.  Why so much attention to the hood ?  It’s the largest horizontal surface that’s seen.  And the prep work and paint job here reflects on the whole vehicle.

WP_20151202_002

Those labels will not be covered.  There is good info on them.  I need to find something to glue into the inner panels for sound deadening.  It’s my goal to make the tracker quieter and not so “tin can” like.

I set aside the hood and started on the doors.

WP_20151202_003

This is what I’m faced with.  Glued on trim & chrome door bottoms.  The last of the stink bugs where hiding under the chrome.  And I had a lot of glue to remove..  yuk.

WP_20151203_001

Here’s the two doors.  It’s great that I can work on these parts while still driving the Tracker with its original bits still intact.  It’s also amazing that these parts ( off the 89 Sidekick)  are in such good shape. The rest of the body sure wasn’t.  The filler is just a skim to level out the rusty places.  And some scratches need a bit of help too.  I had to spot weld the bottom of the passenger door where the skin was loose from the inner door.  Both doors got new body caulking along the bottom as well as rust converter spray inside and out.  If you are going to fix it …fix it good.   I’m moving right along..  Got the doors all prepped and painted with the gloss black.

WP_20151203_002

And I want to let them cure for a day or so.  Then it’s time to re- assemble them with the power locks and sound deadening.

WP_20151203_003

Not bad for an amateur body guy..   The doors turned out good..

Dec 5 2015:

WP_20151205_001

This morning I really cleaned up the shop..  The plan was to make more room for the Tracker.  So I can work all around it.   The weather warmed up a bit and It was the perfect time to bring the little guy in.  Got right to work removing the doors, hood and top.  Going to take days just to strip the Tracker down for the work.   First I should transfer the door stuff over to the newly prepared doors.  Then the old doors & hood can go for scrap.

WP_20151206_001

Here I’m building a new door.  you can see the sound deadening.  Makes a huge difference to the feel of the door.  And should help with road noise as well.  It’s self adhesive foil backed foam.  Also the power lock actuator is installed.  The windows are tested as well as the power lock.  Doors are ready to install.

Mix & Match

WP_20151206_002

The parts Sidekick had a dark charcoal color to the interior.  Whereas the Tracker is grey.  So I’m mixing things up a bit ..  little of this ..little of that.  The door pockets are Sidekick.  The panels are the Trackers.

WP_20151207_001

Oh I almost forgot .. the new headlight came, and it’s installed.  Looks better than the right side one !  I also decided not to change the park lights for the Suzuki orange yet.  Those screws holding them in place are hard to get out..

One more thing to do before moving to the inside..  Tailgate Time !

WP_20151207_002

The plan was to keep the Tracker’s black tailgate..  Because this one has a rust hole..  But after having a good look at the black one it’s just a bit worse.  So another part of the Sidekick goes on the Tracker.

WP_20151209_003

Now that’s better .. only the holes that are needed ..  the rest are gone.

WP_20151209_004

And the black paint for the inside and we are done for now.

Time to get going on the interior…  New Page HERE


1991 GMC Tracker Page 3

Page 3  Driving & Tweaking:

Here’s the link to:  Page 1 Page 2  in case you need to start from the beginning.

WP_20151125_001

Drive … fix … drive …fix…. fix … drive

Well the purpose of driving the Tracker is to find other things “mechanical”  that need fixing.  There’s a few!  It’s interesting to drive something that hasn’t seen the road for an unknown time.  And you don’t get much for what I paid… So it’s expected.   The first thing was the auto trans.. not shifting into the higher gears.  Then that settled down and started to do things properly.  The weather out was cold,  -2 c  and the streets had icy bumps and lumps.  I forgot just how rough the suspension on a Tracker was..  Or maybe some new shocks are needed.  And then the brakes made a lot of noise.. and it felt like something came apart on the left front ?  And the brake light came on, and that shows low fluid..  which I just filled ?  Not wanting to drive much further I was close to Peter’s shop so I parked the Tracker there.. thinking that in a few days I would use the hoist to fix up stuff.  The temperature outside fell to minus 15 c  overnight.  and the Tracker had mostly water with a little antifreeze in the rad.  So I’m freaked out thinking I may have done damage.  not wanting to start it last night we pushed it into the shop to Hopefully thaw out.   Yup it was frozen..

Nov 28 2015:   Driving temporary  halted…

After a night in Peter’s shop I drove the Tracker back to my shop..  Need to fix a few things before more test driving.  Not sure if there is any leaks or damage done to the cooling system.. will find out when I go for another drive.. But first I need to drain the water out of the cooling system.  And pull the left front wheel off to see what’s making all the noise.  Just as I suspected one of the brake pads has broken and is resting at the bottom between the brake rotor and the dust cover.  That means when you use the brakes the brake piston comes way out and hits the rotor.   Not Good!  If I’m taking things apart I might as well install new rotors and pads, grease the bearings and replace the CV boots on the right side axle.  These are all things I have never done.  So learning curve here is a day or so.

WP_20151128_002

Everything is apart and cleaned up.   Not easy when stuff is rusted in place.  Tracker should be happier with all this love..

WP_20151128_001

I took the greasy messed up axle over to Peter’s and brought back a clean re- greased, re- booted axle.  Plus all the new brake parts came..  So it’s time to put things back together.

WP_20151128_004

And we are done..   So it’s nice to have brakes again 🙂 .  Took the Tracker for another drive over to Peter’s and topped up the transmission fluid.  Now it shifts even better.  Also put some premium gas in the tank to add some octane to the stale gas that was in there..  No leaks from the cooling system !  That’s a big relief.  And it runs good..  Still some things to do though..  Now we need to pull the rear wheels and have a look at those brakes.

Thoughts:

It seems I’m building a new Tracker !  And this is just the mechanical stuff.  But this is for me to drive..  So I want it to be reliable and safe.   After that I want it to look good with the body work and new paint.  There are Trackers and Sidekicks out there for sale that perhaps don’t need this much work.  Most of those are standard shifts, and most would still need the body work done.   I believe I have a rare one.  With the auto trans , power steering ( which works great) and the removable hard top.  When I’m done I’ll have a great run-around buggy that can also go explore the back roads..  all using less gas.  Very appealing INDEED.

Fix , Fix , Fix..

Today I took the Tracker over to Peters shop and changed the oil.   And fixed the rattle in the muffler, installed the new tail pipe.  We also inspected the rear brakes and bled them as well.  The rear brakes still have lots left on the shoes.  But that darn brake light is still on.  So there must be something wrong with the switch.  Tracker is totally safe to drive now..   Turns out the wire is broken off the anti lock  speed sensor on the rear axle.  And that’s why the light is on.

WP_20151129_001

Here it is in the shop.. I keep it there cause I want to tinker.. Fixing things like rattles..  loose stuff,  The horn not working… and on.  but now I’m starting to think about making the Tracker look good… I did not drive it as long as I planed to..  but enough to know it’s good to go.

On to Page 4 The Body Work..


1991 GMC Tracker Page 2

Page 2  Almost Free Parts:

The project continues…

Back to Page one Here:

The 91 is waiting for space at Linde Auto to continue.  While waiting I’m stripping down this 1989 parts Sidekick in my shop. As well as  studying those wiring diagrams so I know what to look at when I resume. My Sister’s friend Rich found this 89 Sidekick in a field in Proctor, BC.  He just wanted the extra wheels for his Tracker. The rest he said I could have.

1989 Parts Sidekick :

12045242_10207259450665991_8738719319195683204_o

Very sad looking indeed.. but the motor was reported to run and was intact.  And even though it looks bad there is lots of good parts.  So It was worth the 2 hour trip to go and bring this one back.  If you consider the other 89 Tracker I rebuilt back in 2008. I traveled further and paid good money for those body parts .  The doors off this 89 are in fairly good shape.  Especially the drivers door.  The passenger door needs a bit of welding on the very bottom edge.  But that’s better than patching a big rust hole.  Both these doors are better than the ones on the 91.  So I put them aside for later.  The same goes for the dash, hood and a few other bits.. way better shape.

WP_20151030_002

At one time this was a fancy little guy.  Wired for towing ..so it was a “Dingy”   Now it’s trashed in too many ways to be put back on the road..  And a thousand stink bugs and a few dozen wasps came along with this little guy .. Everything I took apart I found more.. So I had the shop vac at the ready to suck them up.   All worth it because  it’s donating good parts for Rich & I.   This is a Sidekick so it has the orange turn signals which I like..

WP_20151107_001

These are in perfect condition..  Once I polish them up they will look like new.

WP_20151123_004

Check out the difference between polished and not.

WP_20151123_005

Even bigger difference in the park / turn lights from the front.  They get sand blasted in the winter..

WP_20151107_003

The other important part..  for me.. is the dash..  again the 89 had a much better one,  seen here.  And if you look on the left side I tried some restore treatment  wow just like new.

WP_20151107_002

So another day or so and I’ll be cutting the body off the frame.  I want to keep the rolling frame and see if I can sell that.   So here’s what’s left..

WP_20151111_001

Not much..  The window goes for recycle..  and so does the body metal.  It’s a lot of work when all you got is a cutoff disc and a saws all.  A plasma cutting rig would have made short work of this.

WP_20151114_003

And this is what is left..  and even though the body is rusted away to nothing this frame  is in amazingly good condition.  If only someone made a fiberglass body that would just bolt right on..  I’m very temped to build my own body ..  for now I’ll just hang on to the chassis.

Now that the parts Sidekick is out of the shop..  I decided not to wait for space at Peter’s shop and bring the 91 Tracker home to get it running.

WP_20151114_002

Damned if it doesn’t just fit on Dave’s landscape trailer.   Quite well to..  So I need to really clean out the shop good and we will have room to work on the Tracker.

WP_20151116_001

Welcome to the my shop .. little friend.   Now to look at the reason for not starting..  Both Dave & I checked all the fuses and they are good..  but no power to the relays.  So I decided that the best way would be to completely remove all the wiring for the stupid remote start. And the way to do that is to remove the dash.. I’ve done this a few times , plus I want to check a few things out anyway.   And that steering wheel has to go..    Sooo  while I was pulling those extra wires out I noticed some ground wires we forgot to attach !

WP_20151117_001

Oh No ! could these be the cause of all the grief..  quite likely.  We’ll see once I get the dash back in..  speaking of..

WP_20151117_002

What a dusty mess..  Air hose & shop vac needed for this.   One very promising thing was that none of the screws holding the dash were rusty or stuck..  This I is a good thing about the hard top vs the soft top..  less moisture gets in.  and the interior stays nice.   A while back when I was taking things apart on the 89 parts Sidekick,  I cleaned the dash and all its bits.  So that one is going back in.. was my plan anyway.   One other thing was to compare wiring harnesses to see if things like a tachometer and the rear window defogger switch were exchangeable.  Yes they are.  Both harnesses have the wires.  I’m thinking of using the Sidekicks instrument cluster because it has a tachometer.

WP_20151117_003

The Sidekick on the left .. and the much more modest Tracker on the right .  But the Sidekick ODO has an extra 90 thousand kms !  So need to think this one through.  In the meantime I got to the cleaning of the dash area..  While doing that I noticed a black box attached to the fire wall hiding behind the ECU..  It’s plugged into the main wiring.. and it says Suzuki on it.. ??  oh well must be important..  Can’t find it on the wiring diagrams though.

WP_20151117_004

Mystery Box..   Looks like it belongs.. and it’s not part of the remote start.. so it stays.   Later I found out that this is the anti lock brake control module.  Another bonus I think !

So I’m in the middle of getting the new dash ready to install..   thinking about adding a clock , USB charge ports.. etc..  And Dave shows up and fixes the  unattached ground wires..  says to me “it will run without the dash” ? right ?  Uh ya I think so..   So I turned the key.. and we could hear the fuel pump !  Wow.  Turned the key more and boom she starts right up..

After the smoke cleared ( from oil and cleaning the motor)  I took a quick video..   Needs work on the water pump..  there is a noise coming from there..  and a coolant leak.   But !  We have a running Tracker instead of one you push !   That’s progress.  Now I need to get the dash back in.   But I must do a little pimping to the dash..

WP_20151118_001

And bring the 1991 into the 2015’s   A new 12volt plug,  a digital clock, plus a digital volt meter & 2-USB charge ports on a switch.  That’s all the tech you need these days..  for under $50.

Nov 19 2015 :

The dash is all together and in.. everything works fine..

WP_20151119_001

I now have a Trackerkick.. or is that a Sidetracker ?   We ran the motor a bit today as well..  Trying to find exactly where the coolant leak is..   I still think it’s the water pump gasket.  But the motor runs well..  The lights on the dash go out like they are suppose to..

And it was the water pump gasket. We installed a new off the shelf water pump ( cause it was cheap) and no more leak.   Backed it out of the shop.. and let it run to warm up good..  No problems.  Yahooo   So now to put some stuff together again..

WP_20151121_002

and we start with the grill & the top frame.  Notice the blue ?  that’s a piece saved from the 89. It was in better condition.  So I cleaned and painted the backside.  Still looking for a headlight..

WP_20151121_001

Here’s two of the Suzuki Alloy wheels I horse traded for..  I have five. So the spare will look good without a cover.  The plan is to remount the tires that are on the Tracker onto these rims.  Then we are styling!

The plan here is to get the Tracker road worthy enough to drive it around for a few weeks.  I really want to make sure we have fixed all the mechanical things before any body work is done.  So here’s what I need to do:   1 –  Install a tail pipe so the exhaust is going out the back , not under.   2-  I need to repair a few rust holes in some important places where road crap can get inside.   3-  The tailgate handle needs to be cleaned, painted & installed.   4 – And as soon as it’s on the road..  an oil change and the coolant replaced.

I’m trying something new to deal with the small rust holes.  These are holes that aren’t seen because they are covered or under the hood.  I clean them up and treat them with Naval Jelly.  It converts the rust and after 24 hrs hardens to a paintable surface.  Then I’m going to glue & screw a patch over the hole.  We’ll see what I think when done.

WP_20151122_003

This is the tailgate handle from the 89 parts Sidekick.  Even though the metal bits are rusted, they are still strong.   So I’m using the Naval Jelly treatment on this as well.  And yes it seams to work good..  Why rebuild the black one when this will work.

WP_20151123_001

Here in the back seat area I used the rust jelly..  and then I made patches from Galvanized Steel.  Everything is sealed up with urethane sealer.   Later I will paint this area with box liner epoxy or undercoat..  Later.

WP_20151123_002

This is one of the motor compartment patches.  On the other side is a smaller one.  When the inner wheel well is undercoated I think this will last a long time..   With holes here the tires throw water and mud into the motor compartment.. Not good !   Just about ready for the road.  Time for a new page…

Page Three ( Driving the Tracker)

The 1989 Tracker Project

Re-posted from and old document .. Sept 2007:

Because I am starting to work on a new Tracker project .. the 1991 Tracker .  I thought it would be nice to reference this old post.

Fixed tracker

Introduction:

I couldn’t say no !  The lady accepted my offer of $800 for the 1989 Tracker sitting in her snow bank.  So now I have another project for after I finish the reno’s in the house.  I had one of these before in the fall of 2000.  That one I bought from a co-worker for $3,500.  and I still had to repair some rust plus I bought a new top for it. It was so much fun to drive … cheap on gas, 4×4 and a convertible too!  I felt then that it was worth the money. Unfortunately that little Tracker came to demise in the hands of my Daughter one snowy day. There wasn’t a corner of the Tracker that wasn’t bent & twisted.  She was ok, only shaken up a little. A testament to a good roll-cage design. It was unfixable so I sold it for parts to a guy for $500.  and that was that.   I missed the little guy….

Image003

So here I’ve found another one.  And although there is some rust problems , it runs good and the top is new.  These are the things that we found with the first inspection. Please note that we haven’t pulled the wheels off to check the condition of the brakes and other driveline stuff. So this is just the obvious stuff and what I know from driving it home from Christina Lake.

Image004

  • Driver’s door is bad, it’s rusted and has a dent in it, and the interior latch & panel are broken.
  • The gas tank leaks, probably rusted through on the bottom from mud collecting on top of the skid-pan. ( later I find that it is the filter that leaks..not the tank)
  • The floor in the back is badly rusted through, and the backseat is missing. This will happen if the top had leaked. And the seat would not have been secured anymore.
  • Quite a bit of play coming from the drive shaft. U-joints are worn
  • Tailgate latch was so badly rusted that it broke off.
  • A few bits & pieces of the interior are missing, glove box latch, ashtray and the dome light.

Well we need some positives here…so

  • The motor runs good , does not burn oil and it started right up after sitting for months. There is only 175,000 km on the odo
  • All the electrical works good. Heater is good too, Battery looks new
  • The tires are fair, about half worn, they are on steel rims that have only a little surface rust. And the spare is good too.
  • Top is NEW and works good.
  • It drives good, steering was tight, and the brakes seem to be good…no pulling
Image005
Gathering the pieces:

So now I’m going to spend some money collecting up all the parts & pieces needed to fix the Tracker up to my standards.  But I’m setting a total budget of $2000 dollars ,and that includes the $800 to buy it.  So away we go to see what we can find.

The price of a new gas tank was $150, so I’m not going to fool around with an old one.. so I bought that and two new u-joints from Lordco, total $220. Later I exchanged the tank!

I phoned around to all the wreckers in the area to see who had Trackers.  A place in Enderby had two in the yard.  So I paid them a visit this weekend.  For $350 I got a complete drivers door, a matching door panel for the other side, a complete tailgate, the back seat, glove box, ashtray and a set of nice floor mats.

From E-Bay I got a shop service manual for $35, and  Keyless entry system for $40 also I splurged and found a power window kit for $200.  That’s a total of $1645 so far… I’m  getting very close to my $2000 dollars so I better wait to see if there are more mechanical issues before I go for those nice alloy rims at the wreckers.

The Ultimate Tracker:

My goal for the Tracker is to have it fixed up so that it’s impressive as well as just running good. So this is my plans and hopefully I stick to the budget:

  • Mechanically …running great.. not just good, but A-1 no unsafe stuff
  • Fix all the rust and repainted. I may keep it white but all white no black trim and that stripe has to go… My preferred choice is sunset orange and keep the black trim with all the exposed interior painted gray
  • Sound proof the body.. give it a more solid feel, quieter and not tinny
  • Undercoating , mud flaps and vent shades to keep the rust away
  • Power windows and power locks with keyless entry
  • Purple neon interior lighting. (just too cool )
Image007
The Work Begins:

Well I set up a Costco garage for a workshop, and Dave & I backed the Tracker up on my ramps to have a better look.  Sure enough the U joints are worn out, so that’s the first job.

Then I started looking at the rusty floor. It was obvious that the Tracker had been out in the rain with a leaking roof…or no roof!  Especially the left rear corner. So its back to the Auto wreaker’s  to score a floor panel.  In the mean time (upon further inspection) we realized that the gas tank had been replaced with one from a 94 tracker. And that it was the fuel filter that was leaking. So I returned the tank in exchange for two new shocks for the back and of course the new filter, some primer and stuff to equal the cost of the tank.

It’s now Aug … My reno’s and the family camping trip is over and its time to get at the Tracker again,  and get it done so we can use the carport for the winter…  Dave & I fixed the U-joints and installed new shocks and a fuel filter.  So now I’ll move the Tracker into the carport and strip it down .   Here’s a photo of the interior pan that I got from a 1991 Tracker, same auto-wrecker  This one has only a little surface rust . But it’s totally solid. Boy it’s hard to drill out the spot welds and get rid of all the layers.  But it’s worth it because this will replace the entire rear floor and wheel wells, So now to carefully cut the metal in my Tracker so as to have overlap for welding & rivets.  The new carpets and wall panels will hide all the seams.

As far as the “budget” goes …well I’ve  gone over the $2000. a bit but that includes those alloy wheels I wanted..  I also bought a new molded carpet cause the old stuff is kind of gross.

Tracker 004

Tracker 003

Today I was doing a lot of dismantling ..removing everything that’s in the way of painting the interior. I also worked on the doors. Stripping them down , cleaning and painting them. Then I put them back together with the power lock & window equipment. They are now ready for reinstalling. I’ve now done all the cutting away of the old body and ready for the new pan. The dash is out and all the wiring has been checked. I found a problem with the park light switch which I’m able to fix. It’s easy to work on these things without the dash in the way. Once the new floor pans are in I can paint the (exposed) interior metal parts. I’m going with a simple semi-gloss black. I really wanted the exterior color to be special… but the cost of my two choices ( magenta or sunburst orange) were very costly. So I settled for the stock Tracker color of Polynesian Green. It’s a bit of a compromise ,but the green looks good with black bumpers & the black roof.

Tracker 005

Dave came back from the coast with the parking brake cable that seemed hard to find.  I’ve been waiting on that cause it’s a lot easier to install from the top side before I cover it up. So now I can get back at finishing the floor pan.

Lots of urethane caulking, tons of pop-rivets & some sheet metal screws, and the Tracker has a new floor.  The whole thing fit perfectly. It takes a day for the urethane to dry so I’ll have to do some other little fiddly jobs.

Tracker 009

Tracker 007

The interior is now all painted and I’m starting the process of putting things back together.  It’s taken more than a day just to get the molded carpet installed.  But looks like new, so it’s worth it.  Small things like the door switches , those notorious little buttons down on the rocker panels.  I was lucky to get two more with the back half of the other Tracker from the wrecker.

They get corroded and stop working after many years.  And they are needed for my power locking system.

I want to get the doors on and everything sealed up before I do to much exterior body work.  This is the part I like the best.  I get to clean and fix all the little parts.  Everything has to work and look good as it goes back together.  So I’ve spent hours on all the pieces before installing them.  The result is a very new looking interior with everything the way it was . I’ve added some new improvements, like an extra power plug on the dash. And of coarse a new Sony CD stereo with good speakers.  Today was my last full day at home because I got called back to work tomorrow, so I got the dash back in and tested the lights and the dome light.  Found out the horn is working so I’ll have to figure that one out. But all the rest is good.  Now I have to cover all the openings and get at the body work.

It took me a day of fussing , filling , sanding.  But I got it pretty good.  There is a point were you say enough… It’s not a classic car..  It’s a $2,500 dollar Tracker and being too fussy is wasting time.  But hey the body was good . The rusty  spots were all gone, and it was nice and smooth all over.

Tracker

So I went and picked up the paint at Lordco today.  Primer,  Poly-green base coat and the clear coat for the top.  The whole thing cost $200 bucks a far cry from the $500 quote for the Magenta that I wanted to use…   It turned out to be enough paint to do a much bigger vehicle.

So today Sept 1st was the perfect day for painting  22 Celsius  and no breeze.  Once I got the gun adjustments all sorted out that everything went smooth.  Until I got a little generous with the clear coat and I have a few runs to buff out.  Good lighting is very critical when your spraying the clear coat. It has to be glossy but just enough not to run.   Experience would be a factor here…so I learn the hard way.   Got the runs out with 1000 grit wet sanding… and a lot of buffing.  The paint jobs not perfect… but it looks way better than the old white.. The Poly Green is really growing on me “I like it”  Looks great with the satin black bumpers.  The paint is all cured now and I was spending the day putting all the bits & pieces back on the Tracker. The top cleaned up very good and its in perfect condition, what a good thing.. I’ve now got to do a little bit of undercoating , and hook up the park brake.

Tracker 012

Last day to totally devote to work on the Tracker, its my Birthday and I’m finishing up  Most everything is back together now.  I gave up on the power lock for the tailgate, because the movement required to work the lock is far less than the throw on the actuator…I have to figure something out for that.  But at least the wires are there.

Tracker 013

Tracker 014

Because I’m on a tight budget here I’m going to paint the rims that came with the Tracker. Later when I can afford to I’ll put new tires on the alloy rims.  Speaking of budgets … I blew this one by $800 .  But I’ve got a very new looking Tracker for $2800.  By 4 pm I was driving the little guy out of the carport for the photos.  Still a few things …like mud-flaps, and the trailer hitch.  But I’ll get to that a little later.  I want to get the carport cleaned up, and the walls taken down.

Tracker 017

Sept 4th..  I put insurance on the Tracker today ..I really want to test drive it… The last time I drove it was back in March.  A few things need a look at:  The heater fan isn’t working, could be the connection.   The check Engine light is flashing the normal code…I’ll reset and see if it stops.  And I still need a horn ..but the rest is good.

I’ve been driving the Tracker for a couple of days now .. and it’s good.  I fixed quite a few little things like the fan control.  Once I took the fuse out of the “daig” slot the check engine light is out now.  Apparently if I have a problem all I do is put a fuse in that slot and the light will flash the code for whatever is wrong.  COOL.

So its road worthy for now.  I need to service things like the hubs.  I’ve ordered a horn.  But I’m going to use it now and it will take its righfull place beside the Avalanche in the carport.  It’s going to look great with the alloy wheels…  so here’s the pics of it finished:

Tracker 018


Tracker 019

Not long after finishing the Tracker.. it starting to have intermittent problems starting..  The engine control box was acting up and a replacement was hard to find.  I decided to sell the Tracker before things went really bad.   Got $3200. for it..

1991 GMC Tracker 2 dr 4×4

Page 1  First Impressions:

There is now 8 pages to this post. Here are the links:

Page 2   Page 3   Page 4  Page 5  Page 6  Page 7  Page 8  Page 9

Once again it looks like I’ve got a collection going..   Once again I’ll show you a photo of what it should look like ..

33197840009_large

JUST KIDDING !   but it could look like that..  with a 4 inch lift and some red paint !   More importantly the photo shows the removable hard top.  I like that better than the soft top..   Especially for winter.

WP_20151026_001 1


Here’s the actual one I picked up..   Needs some work..  they all do..   Now Trackers and Sidekicks come in a few different configurations..   The other two I had were convertibles with soft tops.  I like those.. but this one comes with the much desired removable hard top..  Now I think I like that better.   So we will tick a box.  Another good thing .. for me is the auto transmission..  so lets tick another box..   Oooo  power steering too..  Yes one more box.    Once I install keyless locks.. it’s perfect.  In fact if I was to order a Tracker from the factory, this is the way I would want it..  Just not Black.    Well back to the real world.. got to fix the motor first .. and patch up some rust..   A new paint job would be nice..  The 96 Siidekick will have to go bye bye..  as is or for parts..  All depends on weather ICBC will give me the regi or not..

Now I’m no stranger to fixing these.. check out this old post from 2007.  that’s 8 years ago.. but I remember it well.. and have a look at how nice it looked when I was done.  Well I want to do that again..  But I think I’ll not bother with the power windows.

1989 Tracker Project

So this time what did I get..  ?

Lets have a look..

WP_20151024_002

A winch on the front.. ok it’s only a cheapy 2000 lb one.. but hey it’s there and it works.   A trailer hitch YES.. I can use that .   Tuck tape holding in the right taillight ?  Have to see why.  Good tires.. really !  Oh and the tail gate latch worked !  I’m in shock.

WP_20151024_005

Ahh but the handle is falling off..  I bet the mounting bolt is rusted off.. I fix.

WP_20151024_004

Rusty rocker panels.. this is the good side !

WP_20151024_006

This is the drivers side..  bad..  but common.  some metal working required for this..  The door skin has come loose too.. but I’ve fixed those before..  none of this scares me..  I’m crazy..

WP_20151024_007

The interior looks OK..  just OK.. the drivers seat has rips.. that steering wheel is ??  weird..  There is wires hanging out from where the remote start was..  And I’m not a fan of those unless they are factory installed.    Most importantly no dog has chewed or drooled , or even left hair on anything.  In other words it’s normal dirt.

WP_20151024_008

Ok bonus !  There is a newer stereo.. with a key fob remote.. that doesn’t work!  But where’s the vents ?   In the parts Tracker.  I hope.   An Ash tray !  yup they still thought is was a good idea 20 years ago..  Just watch that disappear and a USB charge port in its place.

WP_20151024_009

Bonus #2..  the lowest kms on any of the Trackers I’ve seen..  206,000.   So to me this all adds up to a good Tracker to make nice again..   I found a place to get new body parts to replace the rusted and or missing bits.  If I can’t make my own.  Welding in new metal is the only way to make it right.. and last.   Once the mechanical stuff is fixed up then we’ll see what the budget allows for.   so off to Linde Auto for the motor work.

WP_20151025_002

Bonus #3  A very nice K&N washable filter.

Before it left I washed the motor down.  And some of the dried on mud.  I also removed the back door handle to see what was broken.  Sure nuf one of the mounts was gone..  So it’s strange that the mount rusted away to nothing.. and the latch is still ok.  hmmmm

WP_20151025_001

Here’s the latch..  way better condition than the one on the 96 Sidekick ?  Missing is the handle / license plate cover..  I’m rebuilding the mounts in the shop.  When the body work is being done the latch is removed as well.   On the 1989 Tracker I rebuilt  I painted the handle satin black and installed it after the body was painted.  Same with the door handles..

Tracker 016

Pretty nice eh..   I would like the same look but with a blue similar to my Polaris 400.   It looks good blue & black.

Oct 27  2015:

The start of the motor wows..

Today we rolled the 91 into the shop and checked out some things..  First thing was a compression test on the four cylinders.  They were all low.. but consistently low.   Then we removed the valve cover and checked the cam and lifters..   All is good no loose stuff.   However it seams to the trained eye that the valve timing was 180 degrees off.  That would not help the compression at all..  We then went a little deeper and removed the timing belt.  well what we found was a loose drive pulley .. The very important one on the crankshaft..  It had enough play in it to throw the timing out anyway..

WP_20151027_001

Here’s the little bugger..  If you look inside you can see that the keyway is widened.   I read on a forum that this is a common thing.. and that this bolt MUST be torqued properly.   So the hunt is on for one of these..   so far no luck.   Oh and just to be sure there are no other issues.. we ran a pressure bleed down test of the cylinders..  This test tells the truth about the valves..  It showed no problems !  yah !   so no need for a head gasket..  or a valve job..   So I ordered just a few things.  valve cover gasket, timing belt,  fan belt and new plugs.

Oct 30 2015 :

Well I got the 1989 parts sidekick home and removed the motor parts I needed to finish up the 91.   The Timing belt sprocket was in perfect condition.. and fit tightly on the 91’s crankshaft.  And the rest went good to..

WP_20151030_001

Just need to put the rad back..  and the air intake .. and we’ll see how or if the motor runs.

Oct 31  2015:

More motor wows..

So before I got too much put back together.. I decided another compression test would be a good thing to do.  Just to make sure that all the things we thought were bad..  really were.  Well the test was a surprise.  And the compression was no better.  In fact very low.   So out came the air bleed down tester for another try.   And that’s when Peter realized that he had read it wrong..   Instead of a 10 % air loss it was actually  90%  loss.  This means that it is most likely the pistons and rings that are bad.   So that is bad news for the motor.   Fortunately the parts one has a motor too..  and supposedly it ran fine..  So we took the tester to the parts Sidekick and it passed with a real 10% loss in one cylinder and 5% in the rest.  very good..  So   MOTOR SWAP !

Nov 1 2015:

This morning Dave and I pulled the bad motor from the 91 Tracker..  And then went to my shop and pulled the motor from the 89 Sidekick.

WP_20151101_001

I swear by looking at how nice it looks that it was rebuilt.  I gave it a very quick bath.. and loaded it up into the truck and took it over to the Tracker..  We had a close look at the subtle differences and just swapped everything over..  everything but the core motor.   Some things were changed in the two years..  so the 89 motor got an UPGRADE..  so it’s now a 91.. set up for the auto transmission.  We should get the re- install back in the Tracker tomorrow.

Nov 2 2015:

Today we worked half a day, and got the motor back in.  Most stuff is hooked up too.  Lots of cursing over motor mounts and hard to get at bolts..  and wire looms.

WP_20151102_002

Hard to tell from the other motor because the nice bits were used like the blue valve cover.  But believe me this one has good compression.

WP_20151102_001

Not much left on the bad motor.  I may just rebuild it.  But not yet.   The rebuild kit is about $300.   So I’ll keep the motor for now.

Nov 3 2015…  A work in progress:

Finished all the last of the “hooking up”   and right at the end of the day,  turned the key.. no fuel to motor.  !   Can’t here the pump.. There is no way of knowing just how much is wrong.. till you test it all.   So we had to give up the space for another job Peter had.. alas we pushed the poor little guy out to the healing yard..  will have to leave it there till the bay is free again.   I’ll get the wiring diagrams and do some studying.   I do suspect the wiring for the remote start..  Parts of that have been removed.. but I’ll need to put it back to factory.   This post is getting long.. so it’s time for a second page.

Page Two:


1996 Suzuki Sidekick 4 dr JX 4×4

When it was new

IT looked like this when new !

But it’s not new ..  it’s rusty , it’s had a dog living inside..  so it’s filthy.  The motor needs work.  The registration needs to be found.  What I’m I doing with it ?  Well it’s hard to pass up a bargain..  All it cost me was the trailer rental and gas to go get it.   So if I can get the registration ..  and repair the motor..  and not spend too much..  then I have a very cheap SUV.

Coming home

It looks like this now.. Loaded and coming home.

Yes It starts and runs.. drove it onto the trailer.. BUT.  The head gasket is leaking and the coolant is gone.. smokes like a diesel.   so don’t want to run the motor for more that a few moments.   This poor little guy was abandoned several years back .. most likely due to the motor.. and the Owner has passed away.   So efforts are being made to get the registration..   I won’t start work till I have that..  And I’m thinking a good winter project.  Haven’t decided how far to go with this after the motor is repaired.

WP_20151021_004

It’s just dirty !   The seats are in good shape, no rips.  In fact it’s mostly intact..  except for the missing radio.. and the rear seat belts ?  But it smells like wet dog..  so I would need to remove all the carpets and clean everything.

WP_20151021_008

Typical Suzuki rust..  all four fenders have rusty bits.. as does the rear doors and tail gate.   But the floors are still solid thanks to good under coating.. so  I can work with this..  New front fenders are easy to get..  And maybe a wrecker has good doors..

WP_20151021_005

The only body damage that’s not rust is this right rear corner. An easy fix.

The Good Stuff !

It was pointed out to me that these mid 90’s Sidekicks & Trackers  had better motors and power steering.  And that they drove better overall.   All the electrical seems to work fine.. the brakes seem to be good.. even the parking brake works.  The snow tires are like new !   The windows work..  that’s a problem with the early models.   So we got a good place to start.   Oh and as a little bonus the owners manual is in the glove box.. always nice to see that.

WP_20151021_007

Oh that dirt..  But I got in a cleaning mode today..  I really was just going to clean the motor so it would be nicer to work on.. Once I was done I got carried away.  Started cleaning the interior.

WP_20151022_004

I bit cleaner inside..  now I don’t mind sitting in the seat.   Their was a dog that liked to chew and leave hair on everything , so it’s gross.  Must have been a big dog..  cause there is dog hair on the roof too.

WP_20151022_002

And the dog was board and chewed on the gear shifter..  scratched up the panels..  drooled on everything..  Just reaffirms my thinking to never have a dog.

WP_20151022_001

Lots of Kms !

But that’s normal for this age of Suzuki..   The other thing that’s normal for these buggies is the tail gate latch handle.  They always break, because they are plastic with a metal hinge..  that rusts while you are looking at it.  This one was no surprise to be broken too.  And that bugged me cause I had to remove the door panel to open the back door from inside.  So I removed the handle .

WP_20151022_005

This is what I found..  The hinge pin rusted solid the lever broken off the handle..  Typical.   so I do what I do best and added a metal piece to reinforce the handle / lever.  And built a new mount with a new hinge..   Used the spring..  and it work like new.  Now I can open the rear door to see the dog hair better.  🙂

Oct 23 2015

Today I cleaned the rear seat and bolted it back in..   also the left rear door inside handle was in the box of parts..  I suppose they did not know how to remove the window crank so left it broken.  I removed the door panel and found out that the rod from the handle to the latch was missing.  So I made a new one and put it all back together. Good to go..   Tomorrow the Sidekick goes over to the shop where it will stay till work done on motor is finished and it’s drivable again.

Oct 24 2015:

Well all that work..  Yesterday the plan was to sell the Sidekick after registration was done and the motor fixed..  Because today I went and picked up a 1992 two door Tracker from Kamloops.   It is perfectly what I want..  just not perfect.. body wise.  But suits me more than the 4 door.   Click  HERE  to see that post.   In the mean time we wait for ICBC to reply for the registration before any other work is done. 

ICBC refused to give me the registration … So I sold the Suzuki AS IS to some guys from Kelowna…  Gone BYE BYE.


31 ft Challenger Fifth wheel

Found !
Found !

Aug 21 2015:

Love at First Sight …

Was dropping a driver off while fetching cars in Kelowna.. and I couldn’t resist checking out the trailers on the small lot.  And there was a really nice fifth wheel that caught my eye..   As soon as I stepped inside I was in love..  And in love with the price too.   So I took some photos , ( one above included)   And when I got home showed them to Mo.   She too was impressed..   Not new.. nope.. 1997 in fact..  but one owner.. and they took good care of this unit and it showed.

Two slides
Two slides

When you see it you would think it was much newer..   So we decided to go for it.. We had the cash.. and the price was low..  So Dave & I headed for Kelowna and had a closer look..  everything worked as it should..   This RV ticks all the boxes for me , Aluminum framing.. truss roof..  large storage..  bigger fridge.  good quality throughout..  Built by Damon Corp..  who builds coaches..


Big Room Slide
Big Room Slide

With a flat floor, and hide a bed,  Real nice Table too !

Oak kitchen
Oak kitchen

With lots of cupboards.. even a pantry

Real Queen Bed
Real Queen Bed

Not a RV queen..  bigger..  with an opening window at the head.  This room has a BIG closet too.

Toilet & shower
Toilet & shower

Neither is cramped..  lots of space here.   The sink is in the hall.

Mo's corner
Mo’s corner

A nice comfy recliner too !

Bedroom
Bedroom

A different view of the bedroom..  storage everywhere..

Storage
Storage

The Pass- through storage under the hall / bathroom is very large.  Won’t need the back of the truck.

Improvements:

Not that this RV is hurting.   It’s just that there are things I like.   Roof vent covers are a must in my world.  The Challenger was “challenged” in this department. So three new vent covers have been installed, this allows you to leave the vents open all the time.   Can’t figure out how for 18 years someone would have to run and close vents every time it rained..  In fact the trailer has no gadgets or extra hooks…  None.  And looking through the paper work I realized that this owner was not handy.  Everything done was by the RV dealer.. $$$  And so no extras.   I have a list of extra things ..  and those vent covers were just the start.

  • The next thing done was the HUGE 50 amp power cord that is total over kill.  Those are only needed if you have two AC ‘s or a washer / dryer.  It’s heavy and takes up a lot of space..  So we took the twist off end and put it on a spare 30 amp cord I had.
  • I bought and installed a better handle for the entrance.  We now have three steps up … and getting older..  much better than the little handle that was there..  Most new trailers have these bigger handles.
  • New Handle
    New Handle


  • A nice wireless weather station was bought and hangs on the wall by the door.. So I know how cold it is out.. before I go out..
  • The very “dated” RV stereo / cassette player had to go.
Bye Bye
Bye Bye

Replaced with a nice Pioneer CD / multimedia  stereo,  USB charging ports and a volt meter.

Much Better
Much Better

And the stereo has a remote too!  Now that is very handy..  And I can see my battery condition at a glance.   On order are more things to improve the trailer..

Things that I ordered for replacing,,,

  • Plumbing vent for the roof  ( Done)
  • New city water hook up.  ( Done)
  • New water tank filler.  ( Done )
  • New Door keeper ( Done)
  • A ball / wheel for the top of the door so it won’t hurt canopy ( Done)
  • Outside shower.  ( Done )
  • New improved hot water tank bypass ( Done )
  • New outside 110 volt plug with new cover ( Done)
  • Longer gutter spouts
  • 5 new LED lights.

One of my pet projects was to modify the TV shelf in the bedroom..  there’s no way we would ever have a tv in the bedroom.. so I removed the side panels and made a sliding door.  Using deep tinted plexi glass I had been keeping forever.

Doors for cabinet
Doors for cabinet

This means we can put stuff in here and not see it or have it fall out..  Notice the nice clock too..  I like to know just how long I’m sleeping in.

Handy to have
Handy to have

The other pet project was installing an outside shower.  I had to move the plug over to make room.. so I installed a new one of those too.  This is where we always set up a table.  So having hot & cold water here is going to be mighty handy.   The Hot water tank works on 110 power as well as gas..  so I will most likely use it more.. seeing as your paying for power anyway.

Bought a 3rd Terra Jet

This is also a 453E  like my second one..
Has a body
Has a body

But unlike the second one .. this one has the body.  And the tub is original except for the missing bottom !   Yes someone cut the bottom off intending to replace it and ..never got far.   No biggy that’s half the work done.

Not floatable
Not floatable

All the parts & pieces are in bins.. ALL  taken apart..  Again that’s half the job done !  Win Win..  So what’s missing:

  • The motor.   However I got with it a 20 hp Honda.. Yessss
  • The Clutch..   which was most likely still on the motor.
  • The seat cushion..   But I got the frame !
A Hood !
A Hood !

Now… more importantly I got some things that I did not have !  Even though the 453e I got last fall has most parts, it’s was missing :

  • The Body !  and the motor hood
  • The fuel tank
  • the seat frame
  • The cover for the chain.

I was pretty stoked to see a fuel tank.. then not so much cause it’s cracked..

Tanks Alot
Tanks Alot

Fixable ?  I’ll try.  If nothing else it’s a good template to make a steel one.   The body like everything else needs repair..   I thought I was just buying some spare parts.. but I’m thinking this is a repairable Terra Jet..

All the terra jets are stored for the time being..  future projects when the mood strikes me.

Sept 2019…   This is the one that I chose to restore..  even though the bottom of the tub was missing I would replace it anyway.  The post for  That is  HERE

Terra Jet Page 6 ( The Re-Assembly continued )

It’s the beginning of March and it feels like spring out there..  But I carry on with getting the jet together..

The Rims
The Rims

I did get the tires off the rims.. and I did order new tires..  but about these rims.. the two on the left are real Terra Jet rims..  12×12 with a 8″ off set.  The other two are different..  I’m thinking that this Jet being the first production model they hadn’t figured a few things out yet.  Like the length of the rear axle.  Let’s just say these rims compensate for that nicely.

new tires.
new tires.

It’s very hard to source the proper tires that are used on the Terra Jet.. these come as close as I can..  and they are a good price.   Should arrive in a week.  Also waiting on more chain..  I used all ten feet on the front drive.

New chain tensioner
New chain tensioner

The new drives chains are on and we made a new idler sprocket for adjustable tension.  There is new nylon in the bottom of the chain trough too. So many parts & pieces were missing from this Jet..  Having to make a lot of things from scratch…  But that is also a chance to do it better .

Mid March:

And this weekend I went and got another Terra Jet all in pieces..   So here’s the Post for that..  HERE

I think it’s more than just pieces, I’m thinking a third Terra Jet.. could be had… the important stuff is there … I may just take two of the rims & tires..  and the best two tires I have from the 400E and keep the new ones for one of the other Jets..

Got the tires all mounted on the nicely painted rims..  Tubes in the tires will keep them good..  And I put the wheels back on and pushed the Chassis out the door for a photo.

Rollin rollin rollin

YES..  getting closer to that drive..   That’s the proper Terra Jet fuel tank in the front.. needs a repair..  but that’s where it goes.

Drive System in
Drive System in

Getting closer.. If I wasn’t so lazy.. and took less breaks.. I might just have finished the jet today..  but it still needs wiring and the brake caliper installed.

Unfortunately this is as far as I got before the yard work was calling. It’s full on spring now and lots to do..  So I moved the Jet out of the shop and tucked it away.   Fully intending to get back to it in the fall.

Feb 2016…. Update:

In the fall I agreed to sell the Jet to a friend in it’s un finished condition.  To be picked up this spring..  So it was left under cover for the winter..  I had a look and it’s all good.. tires are still up and only a little surface rust on the bare steel bits.   So very soon it’s off to it’s new home..  Kinda sad I did not finish..  But I have a newer Jet that I can work on next winter.

1968 Jiger 6×6

Jiger
Jiger

Once again I could not resist a deal on something weird..  or cute.. or Yellow.  no wait my favorite color is blue.   Oh whatever it’s still cute..  it’s still got gears and chains and a motor.  I love it..  Don’t need any more projects..  This one runs.. not great but it runs.  Drove it into the back of my truck..  That beats winching or pushing  it into the truck !

It small as AATV's go
It small as AATV’s go

shorter yes… But it’s wider than 4 ft.. cause two wheels had to go over one wheel well.

  So welcome my little yellow friend to the place where old things get made new again… When I have time ..
New Home
New Home

Fact:  jigers where the first AATV’s made.  Fact:  made in Canada EH.  It is believed that these were the reason Argo’s were made..  And Argo’s are the longest production AATV.

Yes that's a piece of wood for a seat
Yes that’s a piece of wood for a seat

This little yellow guy is the last of it’s kind..  speaking of production that is.  1968.. last year for the jiger..  It’s just a tad longer than the first Jigers. (can’t imagine it shorter).. and it has a hydrostatic drive.   I’m a fan of hydrostatic stuff..   However..  this one I may not like..  as much..  Being old hydro units.. they are not as “refined” as the newer stuff..  They seam a bit “jerky”  Now this could be something else like the chains driping with oil .. yup ..  Skippity Do Da..  Or maybe the sprockets are worn..  Skippity Do Da..  Or when you break a linkage to one of the hydro units.. and are trying to drive with power to one side only..  and that side want’s the other side to help too…  Well maybe..  I guess I’ll know when I fix that.  YES I drove it about  50 ft from the truck when I noticed that the right lever was not doing anything…  Kinda drove in a big sweeping curve..  So Here’s what we have :

  • Newer 12 hp 2 cycle single motor , runs good , pull start only 🙁
  • Re Engineered ???  levers, with a twist throttle.
  • Wheels adapted to 5 bolt 8″ trailer wheels…  Yes Good
  • Good fiberglass body.. No repairs needed.  could use paint.
  • Missing seat ?   not hard to make one..
  • Key switch not hooked up.. ? I’m good with electrical.

Plus there is a few details that I could look after..   It’s one of those things you fix and use or really get into..  yes… restoring…  or maybe improving !   It will never be original again..  the T-handle control is gone.   I like the new lever set up that is there..  with a few improvements it may be great little runner..   OR maybe this is the one that gets the “Toro Treatment”  And by that I mean taking the drive system from this ……

EL TORO
EL TORO

And putting it in THIS…

EL JIGER
EL JIGER

You know the Toro Zero Turn is just a 6×6 that’s missing four wheels.  BUT..  the Toro is a proven work horse..   with sturdy bits.  The Toro goes fast.. and can change speeds and wheel direction in an instant.   Not so my little yellow friend… it protested when asked to do that..   The Toro has no hoses or cooler..or extra pump..  and the V-twin 16 hp Vanguard motor is both electric and pull start.

Power to spare
Power to spare

Power enough to run the hydros and a triple blade deck..   This is all very tempting..  The deck on the Toro is almost wore out..  I do not use this mower it was my Nephew’s  .. he has no more grass..  I have my Kubota..   He did use it for plowing snow ..but now has a blade for his Jeep..  so Toro sits … and Jiger sits..   And here’s another BUT.. I should give the Jiger a second chance..  Fix the linkage..  Clean and aline the chains.   Speaking of those chains… and those sprockets.

Chain Layout
Chain Layout

This is a diagram right out of the service manual.. and this is one side of the drive chains..   I see 4 sets of chains.. each side..  I also see one of those sets is unnecessary.  But only from my point of view.  Extra chains means extra points of failure.  I think this can be done with 3 chains and 2 less sprockets..  But it is what it is ..  and unless I’m totally changing the drive system it will stay like it is.

Update:  Feb 2016..

The jigger sat broken under a tarp for most of last year..  just too much going on..  when the chance to trade it for a broken Yamaha quad came.. I did just that..   It went back to the guy who owned it several years back..   He knows how to fix it.. In it’s place is an:

Argo 6×6


Terra Jet Page 5 ( The Re-Assembly )

We are almost finished restoring all the bits & pieces..  But enough to start putting things back together..

Frame back in
Frame back in

Back together again..  The newly painted frame goes back into the (painted a month ago) tub.   First is to get the axles , bearings and housings bolted back together.

Rear axle
Rear axle

The rear axle is in and sealed..  this is the drive gear side… Interestingly it’s adjustable for chain slack.  For the very short chain from the jack shaft.  This Terra Jet has three chains.. Something not found on 1973 and up models.. which only have one chain running between the front and rear axles.

Other Side
Other Side

This is the other side..  New bearings & seals.  The front is next.  Plus stuff like the jack shaft.

Meanwhile back to the steering:

Can’t assemble the front axles with first fixing the steering.  As talked about on page 4.   I saw a friend with a metal lathe today and made 4 new collette’s.

TJ76
New Collette

Here is one sitting where it goes on the steering tube.  Once the bolt is adjusted correctly the allen bolt will lock it in place… SLICK.   There will be a hole made and the collette will be welded in place.

Where they go
Where they go

This is how the 1/2 ” bolt will hold it all together in the outer steering cup ..  on the left is a collette test fitted..  Much better than a nut.. That flat surface is important for smooth steering.

Steering tube
Steering tube

Here above you can see the newly welded in place colletes.   Big gobs of weld.. Have to be strong.  Now isn’t that better than nuts welded on.   Time to clean up the mess and paint them..

Drive side (right)
Drive side (right)

Today we got the front hubs back on.. and the new steering bushings work great..

Left side
Left side

We also straightened out the rear  wheel hubs..  they bent a bit when we were using the puller to get them off the axle..  All better now.. I will be installing new wheel studs.   Imagine… have all the nuts on each wheel… so many things I’ve brought home have missing wheel studs or nuts..  Not happening..

Oh Oh…  I noticed a problem..  The front sprocket is not in proper alignment.

It's hiding in there
It’s hiding in there

If you look at the above photo.. you can see a bit of the front sprocket hiding in there..  and you can see that it’s too far to the right.. That means the chain will hit the welded nuts.   Oh darn !  The only way to properly fix this is to remove the front axle.   I assumed that this sprocket was in it’s proper place.  Not so.. And this may explain why there was no chain on the front drive.  It most likely broke.   So we had to take apart the front again..  Sigh.

your out !
your out !

Of approximately 3/8″ .. See that distance up to where the E-clip goes..  ya..  that’s a lot.   Tried to hammer the sprocket into place.. nope.  So off to the press and we pressed it off the axle.  Out comes the emery cloth.. and cleaned  everything good .

New set screw
New set screw

And I don’t want this to happen again.. so I drilled and tapped for a set screw.

Ready to go
Ready to go

Just need to slide the sprocket up to the E-clip.. and lock it  now.. and Then.. back together.

March 3 2015:

We got all the front axle back together ..and the steering too.

Complete front end
Complete front end

No play in the steering.. solid as can be..  It’s true rack & pinion steering..

The steering guts
The steering guts

Lots of grease on the parts..  Even did an EYE BALL alinement.   And we got the threads fixed on the rear axle and the hubs …with their new wheel studs are on..

Rear hubs..
Rear hubs..

Wee ha.. got a rolling chassis now..  if I put the wheels on…  They need the paint first..  … And this post is getting long.. time for

Page 6…  continue the re-assembly:


1994 Chevy 2500 4×4

Feb 2015:

1994 Chevy
1994 Chevy

I’m at it again…  changing vehicles.  After watching all the new ones on the lot.. come and go.. and driving the Dodge for six months.. It was nice to drive… yes..  But I’m seeing a lot of problems with all the gadgets in the new vehicles.   I’m seeing too much crap..  TPS sensors..  back-up warning sensors..  All very exspensive to fix when it starts screwing up… I’m going back to simple..  I bought this truck back in January… it was a good trade.. looked after well.. and I got it cheap.   So I just took it home.. parked it while I thought about what to do.. WELL  I’m keeping it..I’m fixing it up… and I’m going to use it !   Here’s the details about the truck:

  • 1994 Chevrolet Silverado 2500 4×4
  • Regular Cab Long box.  Seats 3
  • 350 V-8 with 4 speed auto , 4:10 gears
  • 213, 000 kms.  New Transmision
  • Features:  power windows, power locks, siding rear window, AC, Cruise, chrome bumpers & grill, box liner. towing setup.
I love to pimp out my ride !

And everything listed above is a good place to start. I’ll be adding :

  • Keyless remote locking
  • New multi media stereo with touch screen.
  • Back up camera.
  • Gull wing tool box.
  • Reworking the rack to include side rails and a removable rear rack for the kayaks.
  • Installing the fifth wheel hitch.
  • New pull out towing mirrors.

I know what your thinking… Rob your adding all those things that you said would break !  No.. not all..  and what I’m adding will be better quality.. and independent systems..  New vehicles have computers that run all those gadgets..  And to replace some of those things… the back up camera on the Dodge costs more than $300 to replace.. The very nice one I bought was $24.  The new stereo I’m getting is a Kenwood  for $250.  The remote locking system was $26.  The truck already has the power locks.. I’m just installing a box with an antenna  that will flash the lights and it has a little security light.

Remote Locks
Remote Locks

Here’s the lock system…  I have bought and installed these before..  they work good..   And these fobs are better than others I’ve seen.

Camera
Camera

And Here’s the Camera that I’ve chosen.. Color / night vision..   The housing is all metal not plastic..  and on the screen are the lines that help with the distances..   Only the price is cheap.   And !  factory back up cameras are just that.. they only work when you are in reverse..  Very annoying when you are maneuvering to hook up a trailer,  and that is what I want the camera for..  Therefore I will be having a switch on the dash to turn on the camera when I want it.

Mirrors

These are the mirrors that should be arriving any day.  Not power..  They fold away, and you just pull them out for towing…  Perfect !

It was a slow day at work so I brought the truck in for an interior wipe down.  And I took a few photos.

Window Guard
Window Guard

These photos are of the way I got the Chev..basically untouched.    That wood box has got to go..  And that mesh screen too.  I doubt I’ll be carrying things that would break the window..   I would rather have a good view.

Interior
Interior

All I’ve done is wipe it down a bit.. the carpet and seat need a good cleaning.. But that’s all.  As you can see it’s in great shape. And my favorite color for a “easy on the eye” interior…  Brown. 🙂

More Interior
More Interior

The only piece I found broken is the cover for the fuses. It’s missing a tab.  I can fix that.  or find one at the wreckers.

Door Panel
Door Panel

What no drink holder in the pocket !   you’re lucky to get any for this year..  but there is two (pull out ) on the dash,  so no worries.  Even though it looks great there is so much fixing up I could do to this truck..  The tailgate has a little bend in it..  The passenger side window is pitted from what looks like grinding too close.   The lights could use a polish..

Fender Trim
Fender Trim

And these fender skirts could use new paint..  Satin Black  of coarse.  And I would give the rims a fresh coat of paint too.  All this will be done in time.. But first it’s getting the mechanical stuff dealt with.  And once I’ve collected all my goodies I’ll set to work one day “Pimp’n”

The truck had it’s service and check up..  No problems !   Wow.  I thought for sure there would be something needed..  The steering is just me expecting it to be as nice as a new truck..  And the loud exhaust is just that … a loud after market muffler..  combined with the holes in the fire wall letting all the noise under the hood into the cab..  and Yeah.  It’s noisy.   I can fix quite a bit by sealing up those holes and adding some sound deadening in key places.

New Mirrors
New Mirrors
The last thing a bug sees

The mirrors came today and I had time to install them too.  A perfect fit and not too to hard to do..  These will be sooooo nice when towing a trailer. Remember they are manual adjust.. and you pull them out for towing… so cool and simple.  These same mirrors ( but power of coarse) are found on newer heavy duty trucks.     I’ve also picked up the new Kenwood stereo while in Kelowna ..  and I bench tested it last night.. Also  Perfect.  Just what I want.  But I’m not going to like it with the crappy factory speakers..  So I’m searching for some nice replacement ones..  I also got a smokin deal on a tool box for the back..$25.  Yup.