Jan 1 2015:
New years resolution… to finish the Terra Jet.. for now..
The frame is a very important part of the Terra Jet puzzle. Everything but the steering linkage is on the frame. With a bit of welding you could add that too. Then you could go cruising around no problem.. The tub is basically just the bottom of the body.. and the “boat” part too. It’s a very cool design overall, and has stood the test of time. I will be experimenting with a few “improvements” of my own, such as better pedals, linkage and a center floor board.

Here’s the frame up on jack stands ..with the steering wheel attached. I’m testing the seating position. Turns out a bench seat straight across will work best. I was concerned that the steering wheel would be too far away for comfort. And was considering a middle seat that was forward more. Not necessary.

Also the pedals… these are just wrong! However right foot braking will be necessary due to the narrowness of that part of the tub. So a pedal on each side of the steering shaft. But a better design, and just a bit closer to the seat. The steel plate is just there to rest my heels on. Plans do include a floor across this part of the frame.

Also turns out this is a good place for the shifter. So I need to keep it here and I want to have the choke and key switch in this location too. Now it’s time to remove the unwanted stuff and weld on new stuff.
Control Freak:
I spent hours looking through my scrap metal and thinking about how to rig a better pedal set up. I wanted them to be comfortable and the brake pedal to have good leverage. I wanted the throttle pedal to be adjustable. And both to have the leavers go down between the frame tubes. I believe I have done all that!

looks a bit complicated.. If you took away the steering shaft maybe not so. Yes ! I used an old brake pedal from a lawn tractor. Upside down from the way it would be on the tractor..

View from the other side.. you can see the adjustments I have for the throttle pedal to make it comfortable. The sheet of metal you see represents the floor and where it will come too. So that should be fine.. But they have to hook up to the things they control. So I figured I better mount the motor and the transmission and get all the linkages proper. May have to weld more bits & pieces to the frame. It’s looking like a cable would be better for the throttle.
The 340 CC motor.

Well here it is in place on the frame.. seams like a good place to work on it. The Carb is off and the covers too. The pull start and fan cover are missing. I’m planning on making new ones.. because finding those would be hard.

This is a snowmobile motor ! Air cooled , high RPM , but very simple. I hope the carb works good. Before we get carried away though we need a few tests on the motor like we did with the BAZOO. There needs to be good compression in both cylinders for the motor to run proper.. So that’s the first thing to check. And spark ! won’t run without spark.

Here’s the Tillotson carb ready for a bath and inspection. It was amazingly clean. And the motor too… I’m thinking it wasn’t very long ago that this ran. Optimism builds.
Attached to the motor is of coarse the clutch.. this is an interesting one. When I pulled the cover off I see there is these four plastic / weighted thingys.. I forget what they are called.. When the motor speeds up the weighted “Things” push the two halves together engaging the belt. Typical snowmobile stuff. But usually they are metal rollers.. Hmmm. This is very rusty and in need of lubrication.. Badly. So I hope it will work. I cleaned it the best I could and greased up the sliders. Put it back together.
Jan 12 th :

Dave came over today so we could run the motor.. We could not get it to run for more than a minute… just whatever gas was in the carb. But it fired right up… so Thinking if we had a gas tank and proper adjustment of the carb.. away it would go.. I forgot to get a video to prove it.. so take my word. But we now know that the motor will run.. I also found a throttle cable in my bike parts. So that’s one of the next things to do.
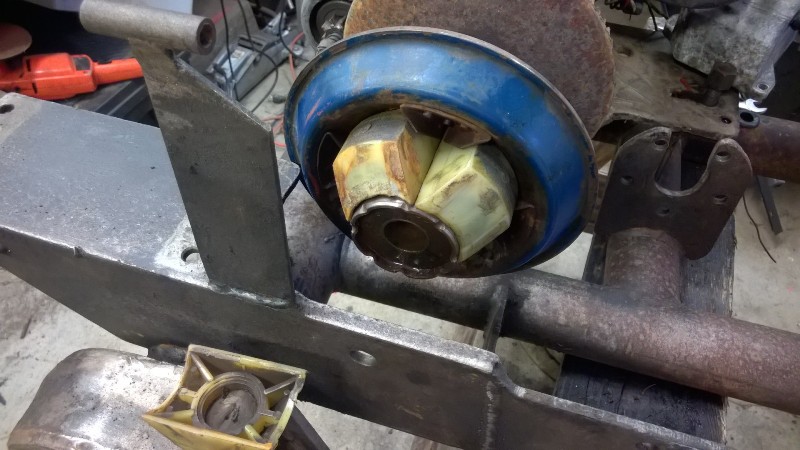
The Transmission :
Same transmission as the Bazoo.. So I’m very familiar with this.. And like the Bazoo it works fine.. But the silicone job joining the two halves is poor and leaking. So once Dave helped me get the secondary clutch disc off the shaft I was able to do a clean and Re & Re on it..

Is that clean or what.. I took my big sander to the two halves and flattened the surfaces good.. With better gasket stuff should be no more leaks. Also the end of the change lever that rides in a grove was warn a bit so I built it back up with the welder and got a better fit. These transmissions are tough.. This one is very old but works like new.

Ta Da… Ready for installing.. after I put the secondary drive back.
Long Enough…. Continued on Page 4
Here’s the other Pages:
Page 1
Page 2