Cuz that’s the way I roll ! Pun intended. I’m cleaning up the shop and the trailer so as to not have any dust. Here’s a last look at the Surfside before the primer goes on.
Time to mask the belly band and the fridge vents. Two coats of primer comin up..
The Supplies ! Couldn’t get the off white in gallons so we have four cans. While I was preparing the door for painting I noticed the two halves were coming apart..
So I mixed up some resin and clamped it tight. I hope this works. Yes it did.. all better.. And here is a video update:
The first coat of primer is on and our trailer is looking “Whitish”.
Lots of defects disappear even with just the first coat. Once it’s cured overnight, I’ll inspect for touch ups and then the second coat of primer. And when that’s cured I sand the whole trailer.
And now we are very shiny and a slight off white. Needs a scuff and the second coat. I’m thinking about a black line below the belly band.
The door looks good ! Need to paint the other side though. Well now the trailer body is all done. And looks great.
Black & white is the theme for the exterior. So I’m painting the fridge vents all black. They are cream color right now.. so need a change. I’m proposing a 2″ black band just below the belly band. To break things up a bit without getting too crazy.
Ya… That looks better. And here’s a peak at how the vent frame turned out’
That should do the trick.. I’ve got almost two inches of thickness to screw the vent to. On to the interior now, here’s the link:
And that thing is the cabinets. Technically not part of the body. But they are in the way of patching and cutting holes in the body. Also it’s way easier to paint the roof and walls. Plus dealing with the floor is also easier. So let’s get to it. Fridge first. The little guy came right out.
I’m thinking of plugging this in to see if the heater works and maybe it will cool down. Or not ! I really have no need for this 3 way fridge. It really wasn’t hard removing the cabinets. So long as you know that the fridge and the closet cabinets are glassed to the wall. My oscillating tool with a saw blade fixes that.
The flooring was already removed. so it looks gross. I need to replace some of the floor on the outside edges. And also remove the Ensolite from where it will be inside the rear under seat cabinets.
The front cabinets can keep the Ensolite finish. The corner beside the fridge cabinet will be for electrical stuff, so access is through the top hatch. But the rear seat compartments now have outside hatches.
This will be nice to have… both sides. I’ve got all the holes cut, tail lights too.
Now I have the pieces to patch the holes I don’t want. And here’s how that happens. Wait for it to cure and then take the screws out and finish glassing the patch. While waiting for that I started to remove the windows. Darn ! Someone used silicone to glue the windows in place ! And the rear window leaked anyway. Nope you must use butyl putty tape when installing things like windows.
And so since I took the windows out and have to deal with the silicone… I may as well do all the body work on the sides of the trailer. Fill, sand, fill, sand you get it.. This is the result , when the primer goes on this will look nice. The red is touch up spot filler.
Then it’s up to the roof where I need to deal with the vent. And this is what I’m up against on the roof. The damage to the gel coat is worse up here.
Good thing I bought another can of body filler. The other side is bad too. This was where the awning strip was. I will not be putting it back.
Here’s the plywood bezel for the roof vent. Why plywood ? Because it won’t crack when screwing into it. It’s also one piece. This is something I did with two of the other trailers.. for several reasons which are obvious to me. Raises up the vent, provides a good attachment , adds sturdiness to the roof. Notice the fiberglass repair on the right corner of the vent. Ya.. this will not happen again.
You can never have enough clamps ! I’ve glued the bezel to the roof with resin and fiber mat. Once that was cured I attached the inside trim with screws down from the top.
This will be painted at the same time as the interior. Now the roof is way stronger and will easily hold the extra weight of the Maxx fan. Also the maxx fans interior trim has a place to mount.
Then I started the process of glassing in the raised mounting bezel to make it a part of the roof. Once that is cured and sanded smooth it’s time to clean up and wash the trailer for the paint..
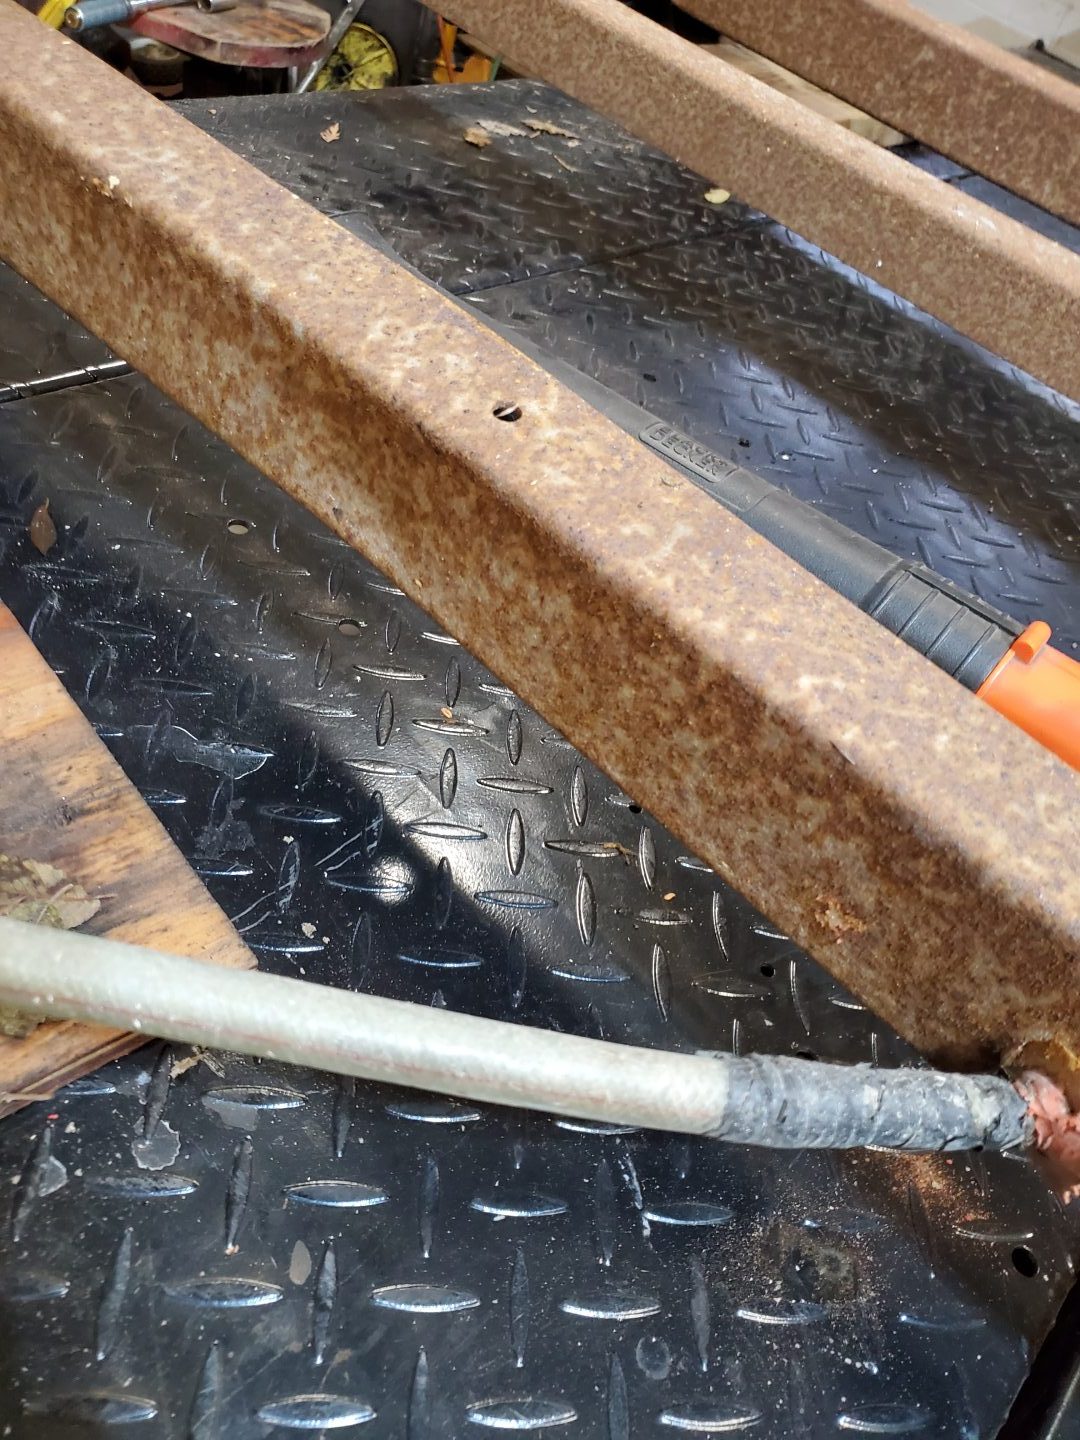
The belly of the beast is first up.. There is some cleaning and fixing under there before the frame goes back. Deciding what to do as I go.. One thing for sure is the black gravel guard on the lower front of the body. Here’s a photo example of the under side damage that needs fixing.
This is the right front looking back. You can see the curve of the frame. And the frame has rubbed through in a few places. There also visible is the holes where the propane lines went through. All of this needs fixing … and further back if you look there is a nail sticking through. I saw more of that at the rear of the trailer. Nails ! really ! When I’m done the only holes will be for the bolts holding the body to the frame. I’m really acquainted with the under side of the trailer. Still working under there and using my creeper to get around. And working from front to back.. Also while I’m mixing filler I’m fixing some small holes and gouges. Today I finished the front and sprayed the gravel guard on.
Some of this will be hiding behind the box. The amount of rock chips on the front corners was huge. Hopefully this will help. I sprayed right under the front up to first cross frame and two of the hold down bolt holes. The rest of the under side will get the precoat primer.
DONE. Repaired , holes filled, sanded and cleaned. Just one coat for now , second after the body work is done. This is more than I did for the 76 Surfside. I filled the holes but that was all.
I did paint the wheel wells too. Why not, they were handy. Yup there’s the creeper.. Rolling around under there while painting was a challenge, trying not to touch the wet paint. Next the frame goes back under.
Done ! I work alone doing this.. I used small moving dollies under the rear bumper combined with my Floor jack to move the frame under the trailer. Then I lift the frame up and put jack stands under the frame. Lower the body down one end at a time. Line up the bolt holes and there you have it.
And if the frame and body look like this … you win. Oh one more thing to mention. I put truck canopy foam tape on the top of the frame. This should help with the rubbing of the body on the frame.
Couldn’t resist placing the box on the tongue to see the fit and the look. Yup that works good.. So now that I have room on my lift table , it’s time to remove the cabinets. New post for that.
Well I’m currently working on my fourth trailer. Not a flat deck, but a small fiberglass travel trailer. They’ve all been old, forty plus years old. With varying degrees of hurt. And in need of work. Very few wood and aluminum trailers survive as well as these little guys do. Rough roads as well as mother nature are hard on wood framed trailers. I know I’ve seen them all. Moisture and wood BAD, especially when the moisture can’t escape through the exterior cladding. Which is there to keep the water out in the first place. But seals around windows and vents can leak. Some fiberglass trailers have wood framing inside, and those can be problems too if a leak happens. Bigfoot’s, Venture’s and Beachcomber’s come to mind. There may be others too. Boler’s , Scamp’s, Surfside’s and Trillium’s have a foam backed vinyl finish called “ensolite” on the roof and walls. This does not care about water.. And you can paint it when it starts looking shabby. The new Trillium trailer called an Outback uses a marine carpet and foam finish on the inside. It’s water proof too but could show stains, and you defiantly can’t paint it. I’m not sure how some of the other newer offerings are finished inside, so I can’t speak to those. Now I would like to talk about the pros and cons on the trailer’s that I have personal experience with.. Links to the posts are green.
This was my first dive into the world of fiberglass “eggs” as they are called. These are the true survivors. There is more of these out there fixed up and on the roads then the others. At least here in Canada. These were made here and we love’um. Just look at the price folks are asking for them .. They are cute, and you can tow them with most cars. Hot rob guys love them too.. they just look cool behind a classic car. So here’s my thoughts:
Pro’s : I just named some above. And there are certainly more pros than cons. Here is other good things. The cabinets are molded fiberglass too. they look great and easy to clean. Those cabinets help to support the roof by design. Those cabinets help to make the trailer very light and tow nice. Easy to work on and customize. And one thing I noted.. the floor is molded fiberglass with a plywood core.. So unless you drill holes though it and don’t protect the holes they last for ever.
Con’s : The frames.. They were built very light and need the floor to help with their strength. That would have been ok if they bolted the two together.. But they did not, wood screws were used, and they rusted. The frame would then sag in the rear.. You must build a new stronger frame and bolt it to the body. The cabinets can only be slightly modified. The door is hard to fit good.. but it can be done. And part of that is the very inadequate square tube on the hinge side to help keep the door frame in line. Also I’m not a fan of the way the body extends below the floor to be a sort of skirt.. It’s cosmetic and can be damaged easily.
Trailer number two.. These are the American made Boler. Same basic body shape. Lot’s of these down yonder.. And this one came from Arizona. And if it stayed there maybe the floor would still be good.. These had an unprotected plywood floor. So on the coast of BC it rotted out. Because the floor was only fiber glassed around the edges.. The 3/4 plywood just fell apart . I got it cheap because this was an overwhelming job for most. And I had to trailer it home 9 hrs away .
Pro’s : All the same as the Boler except for the floor.. BUT the frame is a little bit better on these.. And I was able to keep it and just do a few repairs and mods.
Con’s : That unprotected floor is not good. A new floor was needed and not easy to do. The skirt around the bottom was cracked in many places. Again the frame is poorly made. All the thin metal was rusted away.
Made in Winnipeg MB. Bigger is better ! This body is still used today by Trillium, with a few small changes. I’m not sure who was the first , but there was some legal issues. Surfside’s were made for approximately six years. Not sure about the Trillium’s. There’s no doubt to me that this is the best body design for a small light weight fiberglass trailer. It’s a foot longer and 6 inches wider than a Boler. May not sound like much, but that makes the bed longer and wider. The kitchen is bigger with more storage. These things should be in the Pro’s…
Pro’s : All those things I just mentioned.. plus the frame is stronger. The axle is bolted on and so is the body. There is a molded frame around the door to keep the opening stiff. The lower half of the body wraps under the trailer making this a true two piece body. The floor is glued to the inside and flat all the way to the front. Moisture can escape through small holes in the molded in gutters around the perimeter of the trailer. Cabinets are not bolted or riveted through the body.
Con’s : The cabinets are wood. not a big deal , and they lend themselves to modifications. The roof still needs to be supported by the cabinets.
If you want to tow…You need confidence in the frame, axle and wheels. New stuff should work for that.
How do I stress the importance of worry free towing and safety. The first thing always is start from the foundation. And because I believe this axe is old and wore out, we are ordering a new one …Not cheap but very important. So I will pull the frame out and replace the axle and modify the rear bumper…and some things on the tongue. Plus of coarse a new coat of paint.
So here we go ..
Sure is nice to do this on a concrete floor and not a gravel driveway. And look I have room for both the frame and the body. Took me about an hour to get to this stage. I was working alone and thinking carefully about each step.
I’ll take the wheels off and lift the frame up where it’s a comfortable height. Next step is to measure the axle for ordering a new one.. Interestingly the tag on the old axle is still legible. It says 1500 lb made by Ingersoll.. Called a Rub-R- Ride. Too funny. It’s now a wore out ride. New axle is ordered , and I’m sourcing a rear bumper. I now have the box for the front of the trailer.
That’s a good size, should hold all the goodies I want. Time to clean up the frame.. Plus I’m doing some of the body too. Here’s the latest Video..
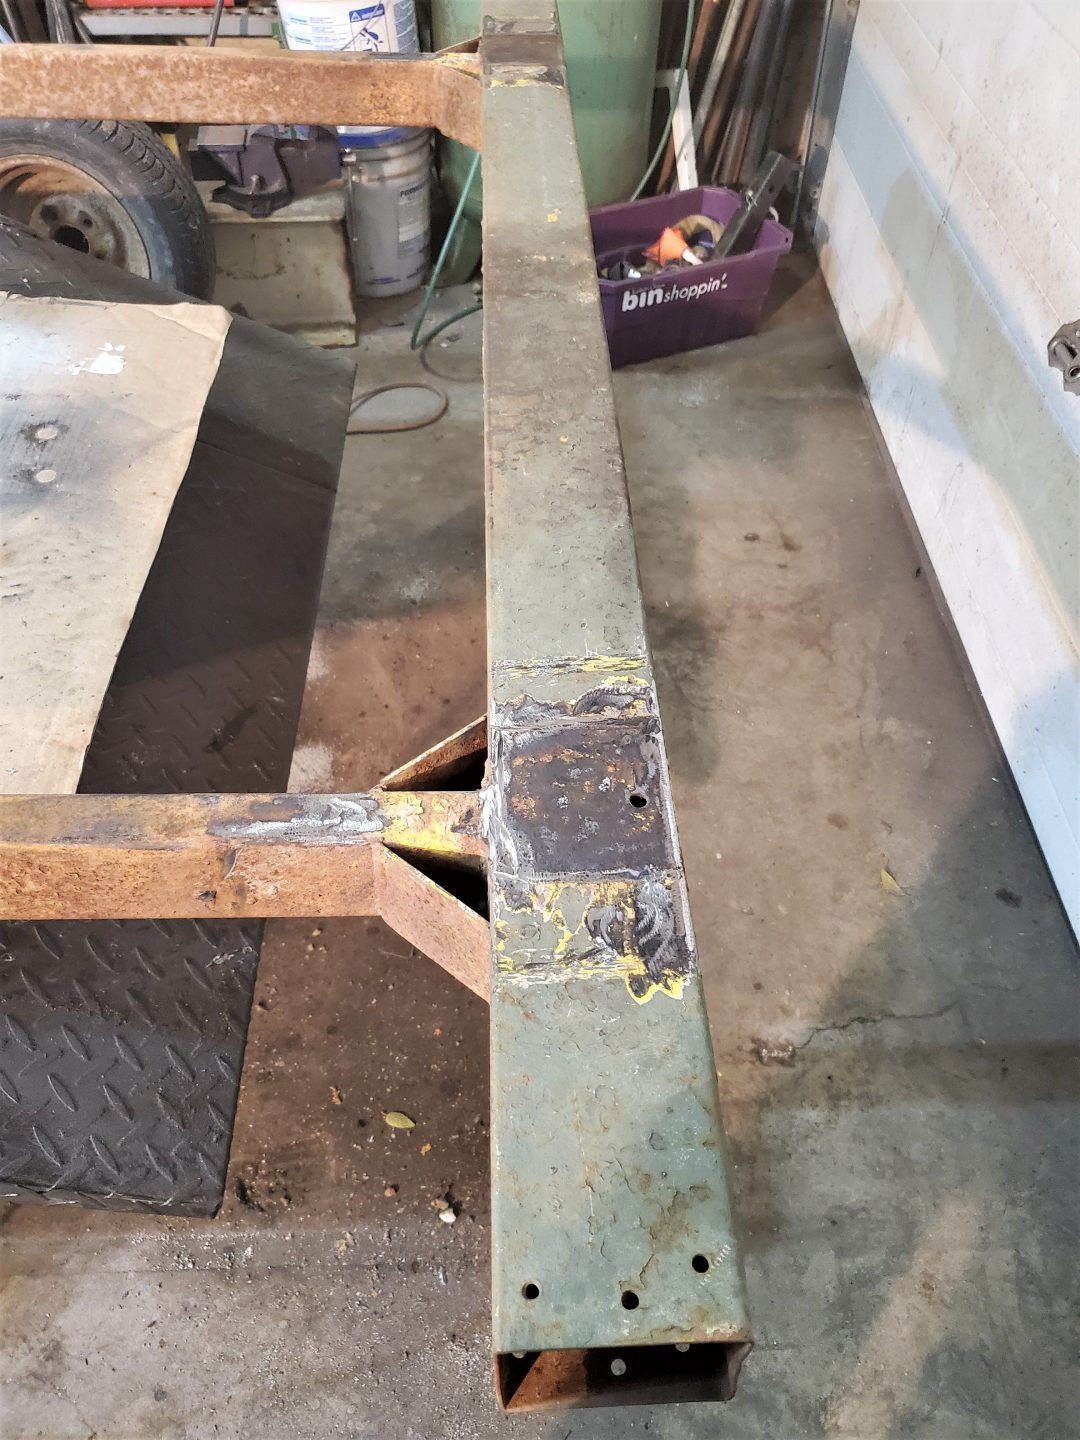
Picking up the axle tomorrow. Just need a rear bumper and I have all the bits for the frame. Removing the old hitch was not fun.. Welded very good. Hopefully I can do as well.. I will be bolting it on as extra precaution.. I like a good back up.
It’s here ! new custom made axle. adjustable ride height, EZE lube bearings and new E brakes. I also got a six foot piece of square tube for the bumper. Now I have every thing needed to finish the frame. A good place to start is to paint the new axle. It was just bare steel and would rust quickly.
Next up the coupler / hitch… whatever you want to call it. I’m bolting it and welding it .. That should be double good. The one big nut you see will also hold the safety chain.
I got the new rear bumper tacked in place, with extra braces to keep things straight
I’ll finish up the welds tomorrow.
It’s tomorrow ! I finished up the dirty work and cleaned up everything. Got the bottom of the frame painted. And once it’s good and dry I flip it and finish up the top side.
The axle will go on too. Flipped the frame over, and finished up the last of the welding. And now with a fresh coat of paint it’s looking good.
All the modifications are done. Once the paint is cured good I’ll get the axle bolted back in place. It’s great that I could use that coupler I had stashed in a box of hitches and stuff.
A newer safety chain is installed now, and the bolts are ready for the new jack. That tray could hold a propane tank, Or the battery. I just need room for my 7 way junction box.
The 3 x 3 bumper turned out good.. even closed in the ends. This is thicker metal than the rest of the frame… so it should hold the spare tire without any problems. Possibility survive a bump or two.
I even made a new License plate holder. And an update video.
One thing this video shows is the new axle installed and the brake wires routed to the front. It’s always the best part when you are putting things back together. Once the wheels and the jack are back on the frame is ready to go back under the trailer.
Just a quick photo of the cleaned up tires. I believe these are only a year old. No Cracking , No Air loss, and they are radial. good to go!
Also a quick photo of the new jack installed. I like these because the handle folds out of the way. Now it’s time for work on the body.. First there’s some work to do to the under side. That will be in a new post
OK let’s start off with this video… Warning it’s longer then my usual video’s.
I talk too much ! But there is a lot of info in there … bound to answer some questions. Musta worked cause I got a lot of views. Helped me think too. I’ve got a good idea where to start. But first let’s have a look at some things that are interesting and some need work. These are now my photos..
The tongue: I almost never like the way this part is set up. To start with there’s a rock guard ! And it doesn’t work very good. The front of the trailer is covered with dings. So this has got to go . I’ll just cut the ends off, the middle part will help hold the tongue box. My plan is to gravel guard the front of the trailer, plus I will be installing a tongue box here for a diesel heater (more on that later). Also could use a bit more tongue weight so the batteries will find room here too. The 2 inch hitch is loose on the ball, to be expected after 47 years. I found a new one in my stash …with a new jack too.
This will increase the safety of towing.
Door Hinges: These are different from the 76 ones but are still stainless steel other wise they would be rusty like the screws. Lower one has a loose pin. I’ve ordered the same ones I used on the 76 again. The door does work good, but I’ll still change out these and the screws. Oh ya.. look at this below…
A Bargman door latch ! Yes the highly sought after door latch.. No key but that’s an easy fix. And this one works great and looks great..SCORE !! ( update… I found a key that works !!)
Look the factory tag ! This is a clear indication that the gel coat is original. Another indication is…
The decals on the lower part of the trailer are all there. some are looking rough so you know they are 47 years old. I have the vinyl and the CIRCUT to make new decals.. Oddly they’re are no decals on the upper half of the trailer ?
Good thing because the top of the trailer is showing signs of the 47 years for sure. There is a few places like this that will need to be fixed. That means a new paint job. So the work begins with a much needed bath ( because I got it dirty) after removing the lights ( Don’t need them clean). Other little bits , and what’s left of the propane lines. Plus anything else that stops the frame from parting ways with the body.
Like these four bolts ! Hey wait a sec.. There should be six holding the body to the frame. Double checked and I did not see any more. It’s quite clean under the trailer, and these are good bolts. So someone has been here before. Well we will fix that when I put things back together. But this is still a take-apart stage.. And I’m tossing as I go..
This is what I think of old , brittle lights.. Not on my trailer.. LEDs all the way. Here’s an update on the progress.
Need to buy some timbers to hold up the body so I can pull the frame out. And when that’s done I’ll start a new page for the FRAME..
OH ya I’m gunna do it again.. bought another small fiberglass trailer.. another Surfside.
Ok here’s your typical Tripple E Surfside trailer photo from the big wide web.
Yup that’s nice.. But here’s What I found for sale (and now own).. Followed me home. And got dirty.
Hey wait a minute ! That’s not my usual fixer upper ?
Well that’s cause I paid more for it..But not too too much.. When I was looking there were no collapsing to the ground trailers… Or everything painted green ones out there. All gone ! So I have to settle for “better” stuff. I know…it’s a change I will just have to put up with.. And this brings up the dilemma of ..what to work on and what to leave alone. Sigh.. Oh well we’ll get to that. I’m hoping to swap the boat for the Surfside in the garage , let it thaw out and get down to answering that.
OK how bout a few photos taken by the fella who sold it to me. I haven’t had time to take my own yet !
The Exterior of the trailer is in great condition.. Nothing broken or missing.. No obvious damage. But I’ve only spent about 30 min walking around looking things over. So I’m sure to find stuff that’s not right.
All the lights are there intact, but the wiring for them needs a look. He already had the tow lights installed. So rather than fiddle around it was just plug those in to get the trailer back home. The roof vent ,the fridge and furnace vents are good. All those ports for water and power still work. BTW those are hub caps on the 13 ” wheels. I like them ..but they could use new paint.
What’s the inside like ? Well the best way to describe it is ” 90% there but modified” Newer good cushions ! Faded denim curtains. However no table, no sink, no water system at all! Also missing : the stove, The12 volt wiring and no 12 volt lights ! The furnace is gone too, which I’m happy about that.
What is there ? Well the oldest little fridge I’ve seen yet. It would be a shock if it worked ! The cabinets are still good. I say that loosely because there are some modifications that won’t work for me. But it’s better than not having the cabinets !
Not sure what’s going on here? Some kind of storage. Interesting light fixture ! It’s the only light. And the final photo I’ll show you…
The closet ! It’s great and the builder’s tag is still inside.
I’m not going to miss the stuff that isn’t there. someone just saved me the trouble of tossing it . But the stuff that IS there will save me a lot of work. And in some cases ( like the cushions) a lot of money. They cost about $1500. to have made. Once I park it in the garage and let it thaw out.. We will take inventory of things and more details. Plus some videos. More on ..
The floor is done the walls are done.. Time to build some new cabinets. Today I bought the plywood .. some very nice Birch. 1/4 ” for the sides, 1/2 ” for the shelves, doors and to make drawers. The framing will be made from 1×6 , ripped on the table saw. This is typical RV cabinet construction.. with the exception of me using 1/4 ” instead of 1/8 ” paneling. Still light weight but stronger. Closet first then work my way clockwise around the trailer.
Today I built the front of the closet… and seeing how it fits. Very good. Next the sides and that’s where it gets interesting. Curves to fit the wall. Next to the fridge cabinet this one is tricky. Lucky I kept the old walls to help with that.
Here’s one side done so far. This side has the wires inside the wall. The closet will be finished both in and out. That will also be needed for the overhead cabinets and shelves. They too will be hollow to allow for wiring and lights. New Video….
The closet is the guinea pig for the construction , painting and the gimp rubber trim. So lets talk “GIMP”. Or better yet show you..
Funny name for old school rubber trim. I like the look! Finishes off the joint nicely. I found a source and bought lots of white and brown. I’ll use the white where the cabinets meet the walls & celing. And the brown where they meet the floor.. like baseboard.. but “GIMP”. Just staple it on .. cuts with scissors.
Well the closet is painted ..gimped and installed. Lino on the bottom and the porch light switch installed. On to the rear upper cabinet. This time I made a pattern for the where the front fits to the roof. Nailed it !
Once again the wires are hidden in the hollow of the floor of the cabinet. I’m not putting doors on these , so I routed the opening smooth. I’m going to try stain on the front . If I don’t like how it looks I’ll paint it. But I would like to break up the amount of white.
And here’s the finished overhead at the back the the trailer. Lights installed. Fits great.. And next is the 8 ” wide shelf that ties the closet to the rear overhead.
And there will be one of these on the other side once the kitchen takes shape. Lot’s of places to stash things. Next is the seat for the closet side of the trailer..
This turned out good. 1/2 ” birch will be the seat, with access lid for under neath. I’m thinking the fridge cabinet will need to be next.. because the others fit to it.
Here I have it located in the proper place. The openings are all correct too. Starting from the bottom we have , a cubby, then the furnace, a nice large drawer, the fridge and another cubby at the top. I’m working on the sides… and they have to fit the wall.
Delivery Notice !
My new fridge arrived today.. It came from Ontario. 12 volt compressor fridge. No propane.
Nice quality fridge. Small… only 2.5 cu ft. These are becoming more common in RV’s . Low draw on the battery and auto shut off if the voltage gets too low.. Waaay different than the old 3 way fridges.
And the windows are a part of that cause they need the wood framing on the inside. So I can work on several things here. One of the first things I did was power wash the windows. They were filthy.. way better to work on clean stuff. Too bad the green paint didn’t come off with the dirt. Sigh ! So lets talk devotion.. These are Jalousie (louvered) windows. 46 years old.. And hurting for some love.. The opening mechanisms are mostly wore out. and the seals are either dried up , cracked or missing. SOOOO I have spent some money and ordered new openers and all the seals. AND I’m taking them all apart because that is how you clean the green paint off.
With a wire wheel and sanding block too. It’s going to take two days for each of the four windows. However… they will be shiny new and working perfectly. Here’s a video…
Video is mostly about the window work.. It’s going well but tedious. I’ll be waiting a few days for the order to get here. And can’t assemble the windows till then. But there are other things to do if I finish the windows before the parts arrive. One of the most important part of these windows is the actuator ..or cranky thingy.
Here’s the two from the rear window which has separate sets of panes and a left and a right actuators. The other three windows are all right hand actuators. I ordered four new ones… not remembering the fifth one ( left hand). Good thing it still works good. So far I’ve only found one broken .. I’m interested to see how a new one works.
Hey check out the factory correct “Surf Side” in the same location too. The palm trees are my little touch. I just couldn’t resist applying one.. Now that the paint is fully cured. I finally got all the windows cleaned and even the missing glass replaced. Today the new seals arrived !
50 ft … I hope it’s enough. Still waiting for the actuators .. then I can assemble the windows. In the mean time I got some 1×6 boards , Some of which will become the new inside window frames. Real wood not plywood like the rotten ones I tossed. These will be painted with the walls & ceiling. They will also provide attach points for overhead cabinets and window dressing.
A bunch of this will become framing for cabinets too. The Boler had molded fiberglass cabinets … the Scamp had the same but I did not install them.. This will be very different and challenge my wood working skills. The actuators ( cranky thingy’s) have arrived so I spent the day re assembling the four windows.
Can you tell which ones are new ? There is a difference for sure.. Smoother and tight. Now all the windows are back together cleaned fixed , new seals, new cranky things.
Just imagine… Windows that work , don’t leak and not silicon-ed shut. No missing glass too ! Now for the inside frames.
Got myself a biscuit joiner.. And dusted off the table saw. Here’s the large rear window frame glued and curing. These are good enough to stain and varnish….but that’s not happening. They will be painted with the ceiling and walls.
So I primed them with good primer.. backside too! The factory plywood ones were toast from moisture getting behind and de-laminating the plywood. Now comes the work inside. Got to clean the Ensolite on the walls and ceiling. Plus remove the unnecessary bits. Here’s a video I made today…
I tried a sample of paint on some scraps.. plus the acrylic caulking just to see how good it all works. Nice. So I’ve spent some time repairing the Ensolite. And now I have the first coat on.. It will take two coats to get an even look.
Sure brightens up the interior. Repairs done to the walls and ceiling look great. I used a silk (semi gloss) acrylic floor paint.. pure white, two coats. The walls are now washable. And yes you see windows !
This is a mile stone… with the windows back in. One inch vinyl trim insert covers the screws nicely. Things are moving along.
Today I made a wiring harness for the running lights. Properly color coded … actually using a 25 ft trailer 4 pin harness and adding a backup light wire.
Yes loom too.. Tested and working. Then I got real ambitious and cut the holes for …and mounted the six LED tail lights. And the side marker lights too.
This is different … most of these trailers have regular trailer lights.. I just gotta be different! Now I got to figure out where the license plate goes. The bumper I guess..
Another milestone …. The lino is done (floor) So now I move on to the cabinets… And a new page.
Has all that filling and sanding paid off.. You bet.. The first coat of primer is the tell all.
And sure enough I missed a few details. Just a few holes I forgot. But now’s the time to fix them. You wouldn’t even notice them if I didn’t point them out.. But we can’t have that.. I was especially interested in the left front repairs. Not bad ..
I’m not the best body work guy by any means.. But this is not an expensive classic car ether. At least a 90% improvement. I have run out of primer.. so off to Kelowna for more. Today the little goobers are fixed and so the second coat of primer will be even better. And I’ll use grey so I don’t miss any spots. The door however is good with the one coat … So I painted the finish (off white) on the inside. Looks awesome !
Hard to really see in just a photo.. But it’s very shiny new looking. New Video…
Can’t go to get the primer for a few days.. So a wee lull in the action. However I am using the time wisely. I will be replacing the graphics on the trailer. I send the files to a sign maker for a quote. But have not heard back. Then I remembered I have a Cricut ! I can make my own. It took a while to get programs that would convert the files… but I did it !
Oh did I say I have large rolls of 3M sign vinyl… Yes but don’t ask… long story. The cricut can do small things only, and that’s fine. I wanted to shrink the size anyway. I could not find the font used in the triple E logo.. So there was a bit of a compromise. Hope I don’t get called out on the one. UPDATE: The fella that supplied me with the “Surf Side” logo made me the proper “Triple E ” logo.. So I’m legit again. Got my primer yesterday..
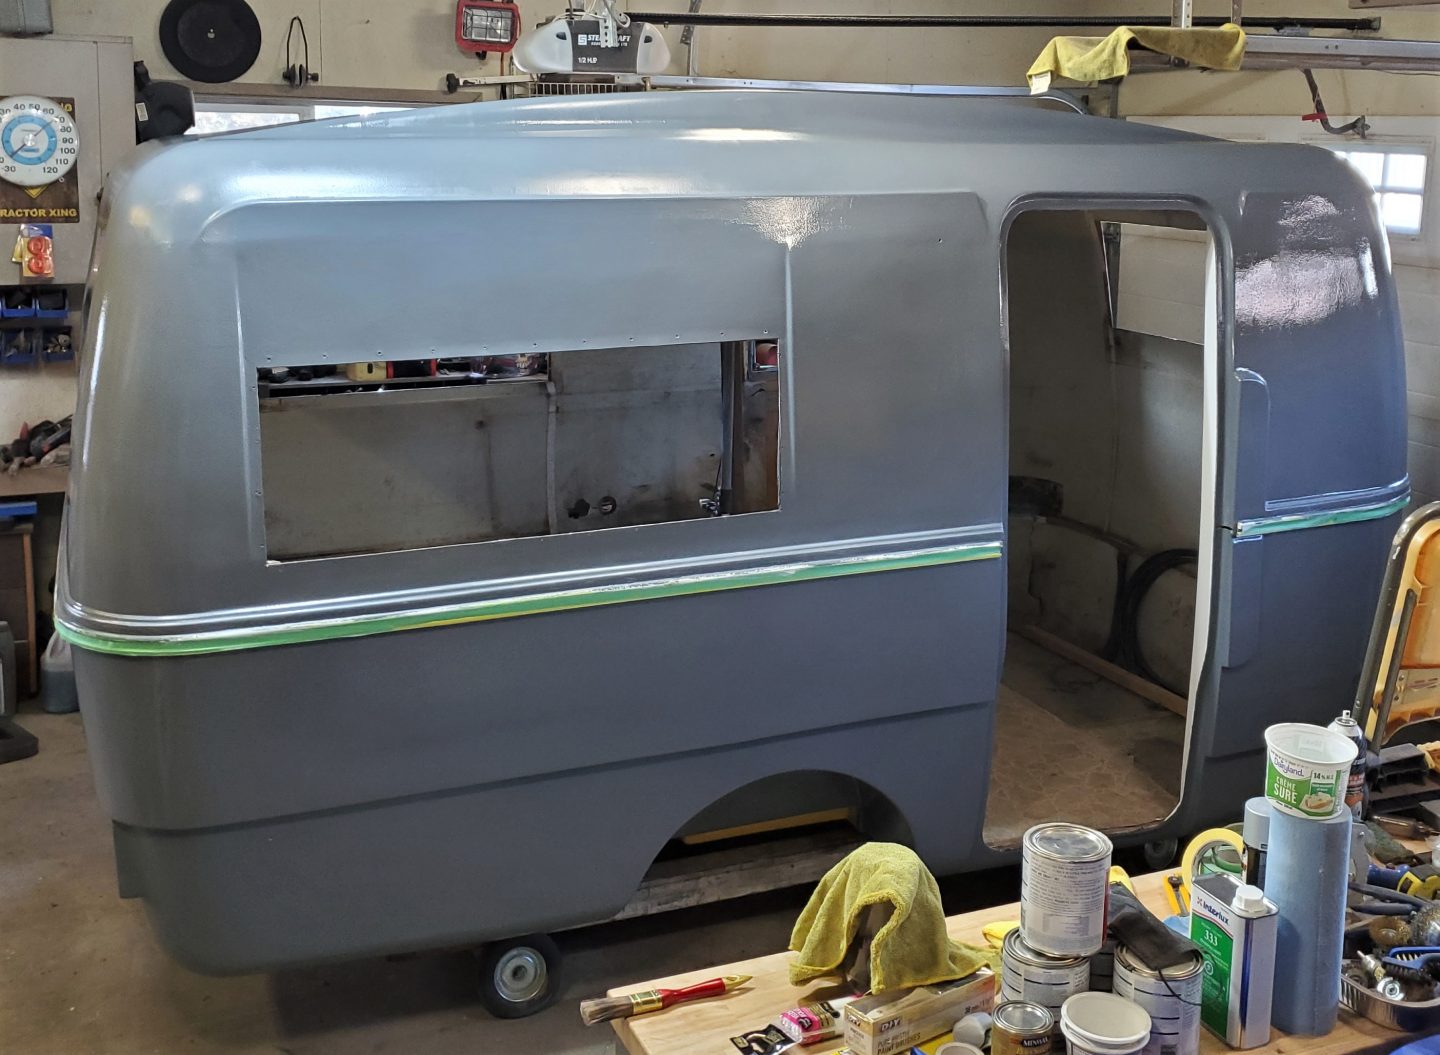
And now we have a gray trailer. would have been nice to have white primer. But you take what you can get. I cleaned the store out of the off white and the primer.
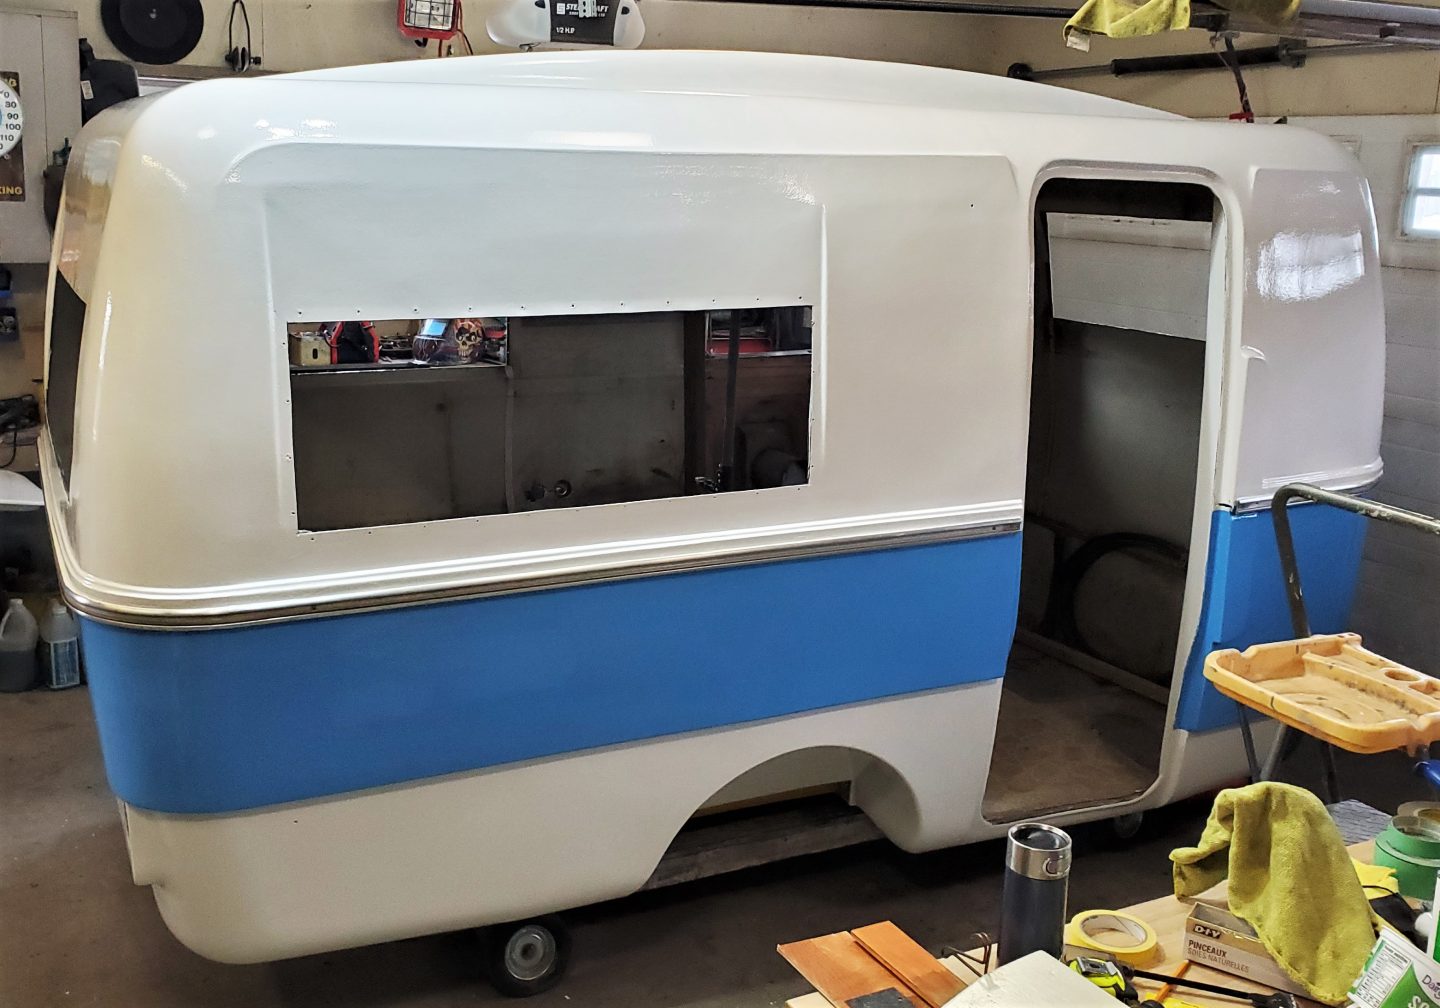
And now we are back to the white.. Actually the off white finish coat. You can see the band in the middle that will be blue. By New Years The exterior will be done.
Another day … another coat of paint. The second coat (and final) of off white is on. I used the brush tipping method to get the smoothest and run free finish. Roller and a dry brush. I also really wanted to see what the blue would look like..
And here it is ! Yes it will grow on me.. needs black pin stripe border I’m thinking. Wife likes it…says it goes with the beachy theme. Or boat theme.. Ya it works. so lets do this to the trailer..
Ya it’s fine.. So getting close to done. The door was painted at the same time.
I added the black line because I thought it was good to continue the rub rail look. The Bargman door latch was rebuilt and keys made so back it goes.. And that small dot up top is a peek hole with a wide angle view. It was there and works great so back it goes too. Rock guard is next. I’m still waiting for the taillights But the exterior painting is DONE ! so a new page is in order.
The bottom half of the trailer is where most of the bad stuff is. Makes sense I suppose.
Some schooling and some thoughts:
The Surf Side is very different than a Boler. Not just the over all shape but that it’s just two molded pieces instead of three. Boler’s and their cousins Scamp’s have floors that are formed separate from the bottom half ..then glassed into place. Even the wheel wells are made separate then glassed in. This is ok.. They are still strong. However this gives them a “skirt” hanging below the floor. This skirt is easily damaged. I know I’ve had to repair them on both the boler and the Scamp.
Here you can see some of the repairs done to the skirt of the Scamp. Not so on the Surf Side …the body just curves under, and so does the painting. And so it seems to me that the NEW fiberglass Escape trailers are copying something from 45 years ago.. They call it a “pontoon” or low spot molded into the bottom half. This “pontoon” is under the cabinets and the floor stops short of going out to the body.. Thus allowing any moisture to go there. And yes there is drain holes under these. Here’s a better way for me to show what I mean…
This also could be a cross section for the NEW Escape trailer. Things that make you go HMMM . But it’s a good design why not use it.. And I would choose this over the Boler skirted underside. Well better get back to the job at hand. I started at the door and working my way clockwise around to the bad stuff.. Bad stuff is the two front corners.
Here’s the rear of the trailer all prepped, Yes I didn’t totally sand the Triple E logo off. I’m hoping to be able to see it enough to apply the new graphics over the old.
Jack the Knife !
This is where the real work starts. A very messy patch job. At least it’s not silicone.. Out comes the big sander ! Well I guess they tried to fix it…but I wish they didn’t. Would have been easier for me … When I see lower corner damage I presume it’s from lack of trailer backing skills. Or they tried to drive around a stump ? Take a guess.
Wow it’s bad ! And thin in spots so I have to be careful. I’m going to skim coat this with filler.. And maybe an extra layer of resin & mat inside. I’ll need another can of body filler for sure.
Oh ya.. over 7 applications of filler to get the curves right, and that was just the top half. I knew this was going to be the most work.. But it’s turning out great.
Parts & Pieces:
Let’s take a small break from sanding and filling.. I’ve been collecting lots of stuff for this project.. like new stove , door seals, plumbing bits and electrical bits. One of the “not new” but reconditioned things is the factory door latch.. it works great but the keys were lost sometime ago and judging from the multiple holes …many hasps for padlocks were installed.
Well for thirty backs ( possibly the same price as all those locks and hardware) I had new keys made. There is three screws holding the latch on the door.. Just too easy I guess. One of the things I ordered thinking it’s easier to replace than take the paint off.. The drip cap over the door.
There’s no way I want this on the trailer.. It’s too long and it looks like someone formed it with a hammer ! I’m cleaning the paint off the top one..
The final prep work.. Say goodbye to the green !
All patching is done.. all sanding is done.. And the masking too. Plus I used an automotive product from Pro-Form , a paint-able rubber flex sealer ( off white) to fill the gap where I removed the silicone on top of the aluminum rub rail ( band around center of trailer ) I also used this product around the fridge and furnace vents.
Now for a good cleaning of the shop and the trailer. We’ll start a new page for the painting.. Bye Bye Green !
Starting work on the the body. & removing the interior stuff. Goal is to have just a shell.
The first thing was to get it to fit into the shop. We had to remove the roof vent .. and then it just fit under the door.
And we are in.. Now the fun part ! Removing everything.. Yup all of it. except the roof vent … that’s done. I guess the body will take two posts because there is a lot involved in just getting to the re – finishing part.
Along the way you find treasures like the factory power center. This could be fixed up, modernized and used again.
And this little water pump.. I did not know they made these. If it works great I’ll use it.. Otherwise it’s a hand pump. And so I continue the purge of the interior.
Still fighting with the furnace.. it’s rusted and wont come apart. The only nasty is the wiring.. It’s a mess, except for the running lights. That seems to be intact.
That’s no big deal.. I was expecting this. Everyone makes a mess outa the wiring. Still have the closet to pull out.. and that darn furnace too. Then it will be time to work on the outside.. Thought I’d try a window to see how hard it will be to remove it.. Rusty screws are the biggest problem. But it came out easy.
The other problem ( which I can fix) is the sag in the roof.. I jacked it up a good 3 inches. That’s what happens when you remove the support ( like the fridge cabinet) and there is a snow load. There needs to be something holding up the roof. Still fighting with the furnace ! The exhaust pipe rusts bad and won’t let go. but I got the exterior all stripped.
Now I’m scrapping years of silicone. Wandering from job to job.. Mostly getting ready to repair the holes and re do the bad fixn. I placed some orders for supplies and dug through my RV stashes for things I’ll need. Plus I cleaned up the wires. Here’s the latest video..
Started work on the sanding and filling. And the door and parts of the roof are first.
The holes are all gone on the door. I’ve sanded more of the green paint from the door because of some scratches (Dog comes to mind). Mostly I will leave the green paint on the body. Rule #203 “If it’s a lot of work to take it off then it’s good enough to leave on”. It’s some tough paint. Stripper barely removes it. The “Pre-Coat” primer doesn’t bother it.. so we just sand it smooth and work with that. And I’m taking my time.. But still making progress.
At this point I have sanded and patched the top half of the trailer. Now the only hole in the roof is the vent. The big patches are on the lower half. I’ve mulled over what to do with the rub rail. And I’m going to take the time to remove all the paint ….back to aluminum and from the black vinyl insert too. The green will be only a memory. And here’s a sample of the result..
Way better than just painting the whole thing black.
This post page is getting too long so time for a second part for the body repairs. Cuz there’s lot’s more to do…
Before I start work on the trailer I went about how to get the registration.. No luck.. Of coarse I did not get the registration with a free trailer nor did I expect too. And preliminary searching shows BC registration could not be found anyway. I could pay to have a deeper search, which could also show nothing. but would give me the paper work to get registration in my name. OR just fix it up and get U-build registration.. easy to do if you are replacing lots of parts. but I’ll deal with that later. Check these out.
New radial proper trailer tires
Ordered these on line … a sale . Grab em while you can.. New wheels and tires is on the need list. There is no spare so one of the ugly ones will work.
Time to separate the body and the frame: Here you can see I’ve lifted the whole trailer enough to remove the wheels. Then I got under and removed the propane lines and cut the six bolts holding the body to the frame. They were rusted bad. Then we lift the body up off the frame… then drop the frame to the ground ( no wheels) and pull it out the front. The body then gets lowered on to my trailer dolly. Wheels back on and the frame goes on the lift.
Body on dolly .. Hope it fits through my door later.
The frame is now in the shop. Isn’t the lift great.. Don’t have to get down on the floor.
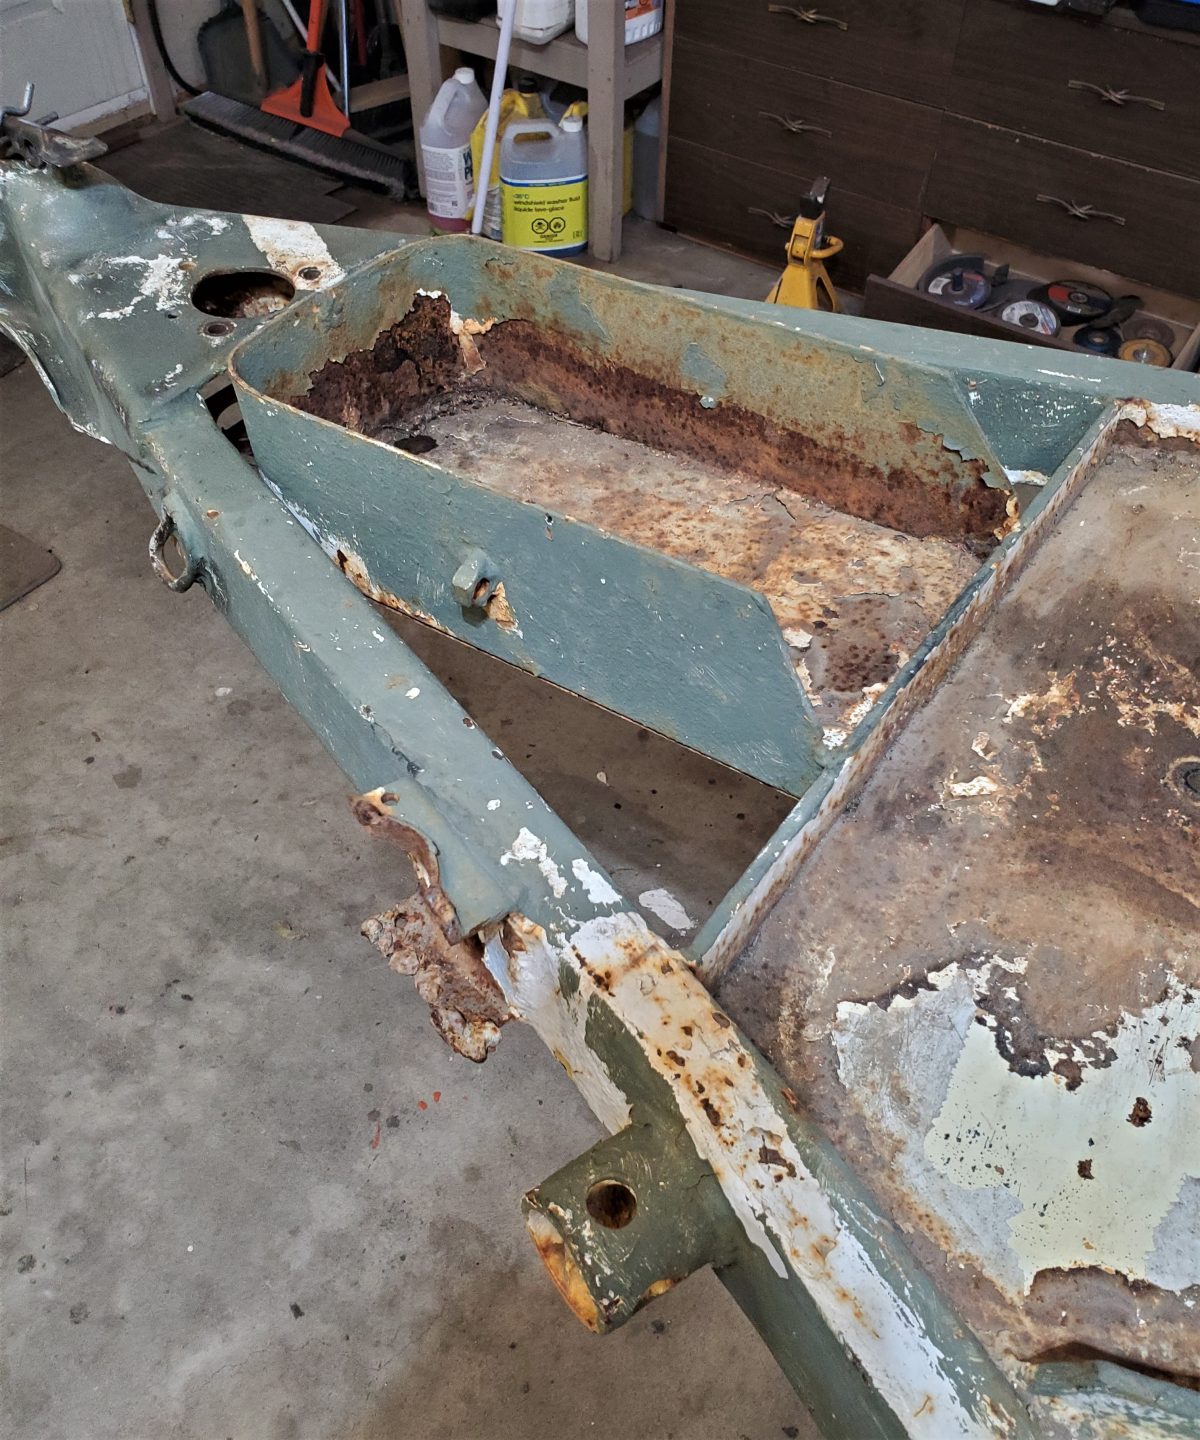
The initial inspection shows no issues..none. except a dent in the front cross member.
Not a big deal.. There is only some modifications that I want. And a good paint job. Oh and rebuild the brakes and hubs. First is the rear bumper and the appendages on it. The stabilizer jacks are bent, frozen and mounted upside down ?
And those braces ! Yuk ! Out comes the cut off wheel for this mess. Those are 2″ receiver tubes.. strange. I’ll be sure to save those.
Better ! I do get why they mounted the jacks up behind the bumper.. Protection ! Anything mounted under the bumper could get wiped out .. it’s low to the ground. Now to fix up the tongue up front.
Just a few things to fix here.. Those jack mounts will have to go. And the battery box too. I’ll make a new holder going across for the battery.
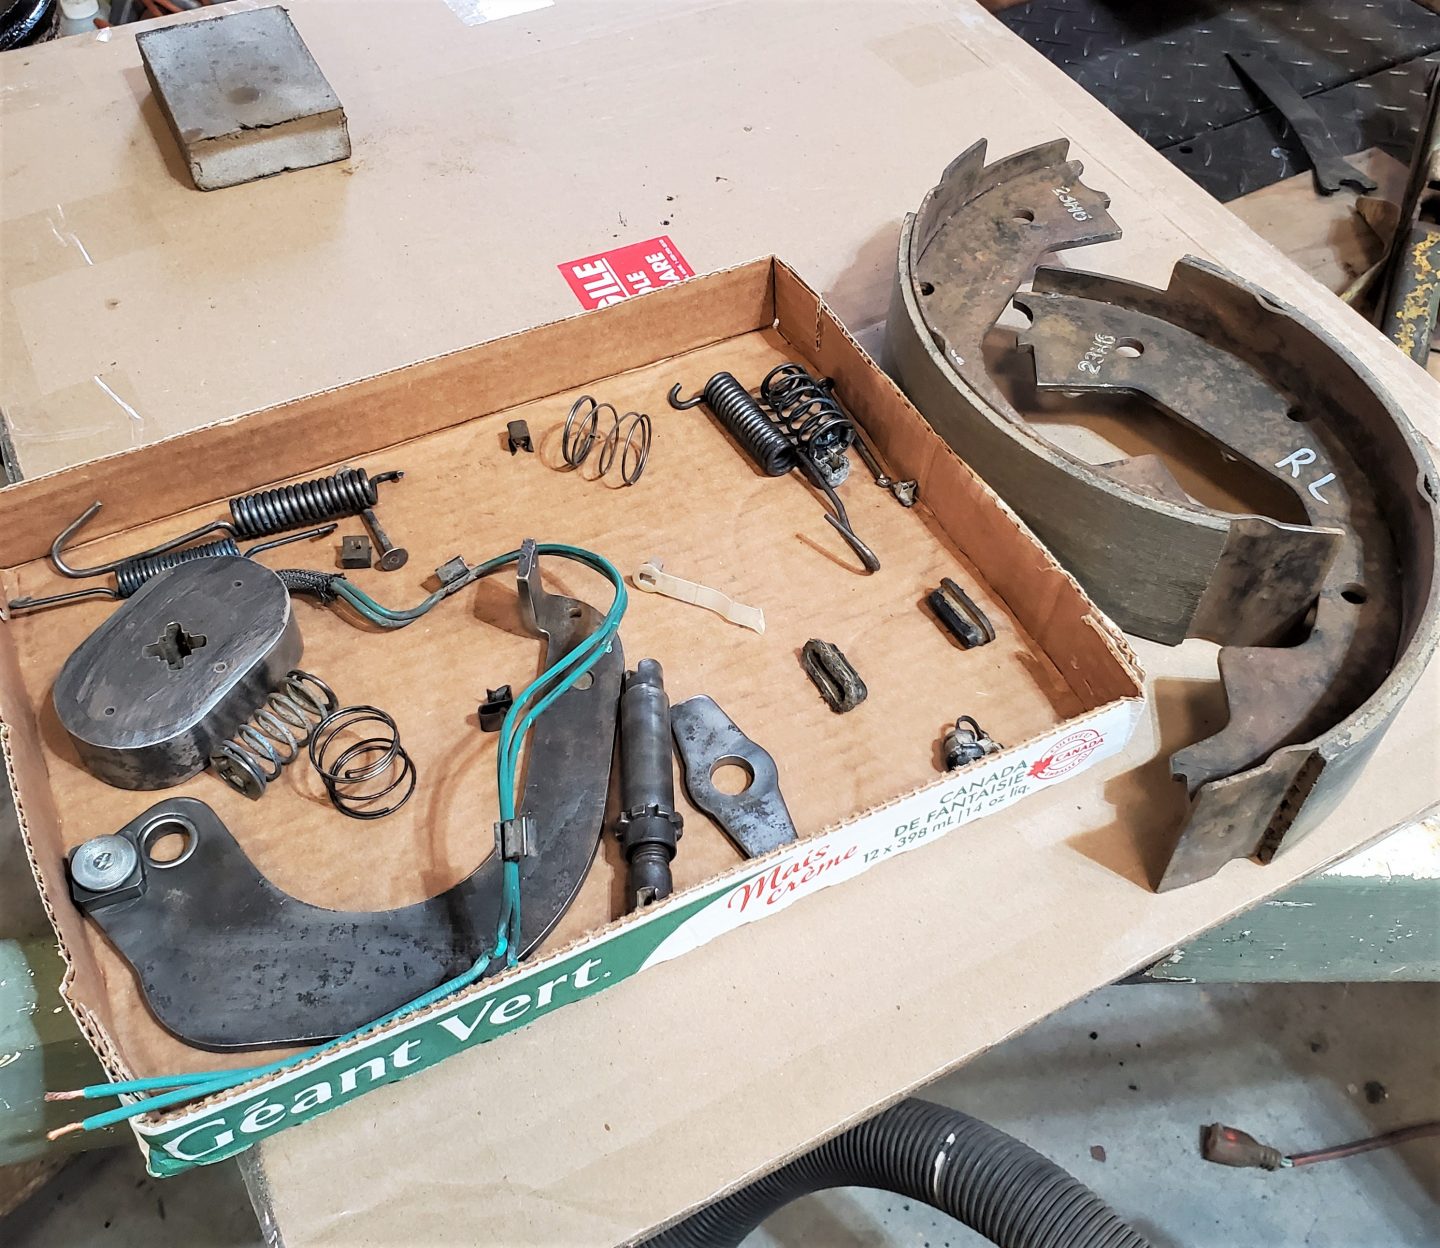
All cleaned up.. Ready for new stuff. But first I focus my attention on the wheel hubs and the brakes. Even though they work I know there is rusty parts and a needed inspection of the bearings. I’ve done this many times… even have the brake removal tools. Sure enough the brake adjusters are seized and dirt, rust and even spider webs in the drums.
So every thing gets the royal treatment.. and some get paint too.
Like the backing plates , the drums and ….
The axles. I’m having trouble believing these axles are 46 years old. The ten inch brakes indicate to me that this is a 3500 lb axle. It’s pretty beefy for a light weight axle. And it just bolts on so could be easy to change out. Set aside the painted stuff to do some welding.
New battery tray, and a place to mount my wiring junction box. I also moved a couple of hooks from under the frame for a handy place to hang the safety chains when not in use. The paint is dry on the wheel parts.. so I resembled the brakes.
They worked ok before but now should work better.. I set them aside while I clean and paint the frame. Easier to handle the frame without the added weight of the drums.
Here’s the frame flipped over.. I always paint the underside first.
Another view. We’ll let this cure for a few days. Remember I removed the bad stabilizer jacks .. I really want to have the stabilizers. They are important for these trailers because they are so light. If you go to the rear of the trailer inside it will tip up if not hooked up. So I had a newer pair.
These tabs allow the jacks to be removed very easily. I also plated the bumper ends. Won’t need the sewer hose storage and don’t want them full of crap.
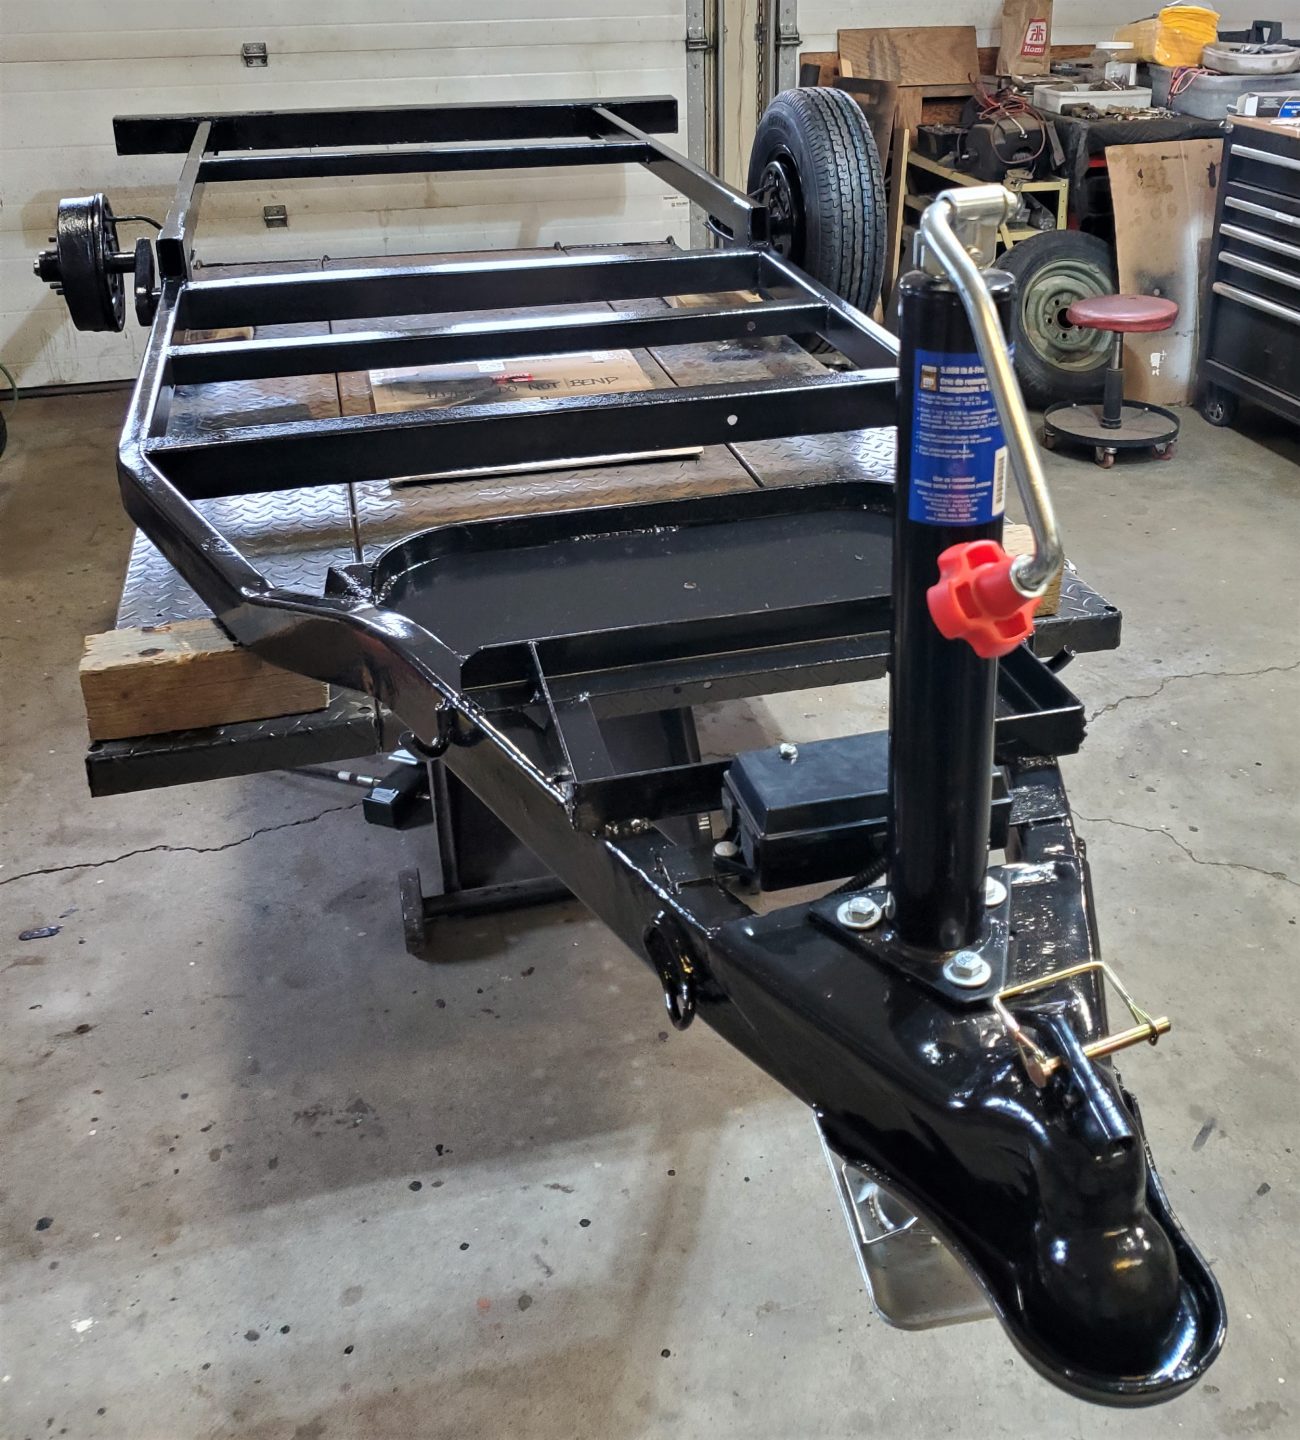
Well back over and finished the paint. No more ugly green on this part of the trailer. Instead it’s shiny black.
Today was finishing up the frame. I ran the brake wires through the frame to the front. Nice, tidy and protected. And they terminate at the 7 pin junction box.
Did not have to drill holes in the frame … just came out the front of the tube. I love these boxes.. for $8.99 they are great, easy to connect the wiring and weather proof too. Gets a bit crowded when all the different wires come together.
New jack installed .. 5000 lb over kill , but I like these and they go on sale for $25. And it’s nice how the handle folds out of the way.
That’s it for the frame.. Brakes adjusted.. bearings greased… time for the next page.. Total invested so far is under $400. Mostly those fancy new wheels.
I would love to get working on this trailer.. But the John Deere 1420 is in the shop and we are still fighting with it… Oh well but I did remove the broken lower hinge on the door. Sorta fixed it and back on. Not sure if you can get these or not. But it turns out it’s not special like the Boler / Scamp door hinges. A good stainless marine hinge will work.. may even be better. So I’ll order those.
Let’s talk about the Trailer :
Was like this two tone factory paint
Looking up the history of the Surf-Side, and using the build sheet info.. it’s determined that this is a 1976 trailer. Built in Winnapeg Manitoba. The model is a TM14. The GVW is 1650 lbs. Making this trailer very light. There is the same torsion suspension as a Boler. The frame looks a bit stronger and rises up at the tongue giving a better 14 inch hitch height. Also the tongue is narrower and a longer reach making it less likely to be damaged by “jack knifing”. As you can see below.
hitch
However seems someone found a different way to do damage to the left front corner ?
Owwwie
Fortunately it’s fiberglass and the body work is easy …and doesn’t have to look like this butcher job ! While we are talking fixes.. The roof has sagged down .. Most likely snow load.. and made worse by the missing kitchen cabinets. Just like the Boler those cabinets help support the roof. So that will be fixed when I build new cabinets. Aside from removing the green paint the windows need repairing too. Now more will show up I’m sure, but those are the obvious ones.
Further Inspections:
These look like Factory Tail lights
And too bad these are broken.. But I want LED lights.. so new ones for sure. Notice the back-up lights. Ya this trailer has brakes too and the plug WAS a 7 pin.. (missing) But the wiring is still there. A bit overkill for an under 2000 lb trailer.. But I will keep it this way.
Under the rear
And here’s a look under the trailer.. Looking toward the rear. This is cool ! the bottom is molded as part of the bottom half … One big happy tub. No skirt hanging down like the Boler. This is so much like the new trailers are built.. Casita’s and Escape’s. Needs a bit more framing I’m thinking.
The axle
This view shows the drop in the floor where the dinette ends and the standing area starts. Interesting.. Looks like the torsion arms are trailing and up. And the brake drums are visible.
Looking toward the front
So much for brakes ! The wires are hanging down and dragging on the ground. Propane lines are seen here too. Not a fan of holes in the floor but this is probably best . All of this tells me that gutting the trailer and even replacing the floor would be very easy.
After restoring two small fiberglass trailers the Boler and the Scamp I had enough and was glad to see both gone. But I changed my mind when this one was offered to me for free.. Yes free. What can i say …I’m a sucker for an ugly trailer.. And more if it’s fiberglass. Starting from $0 is as good as it gets. Now as usual I’ll show you a photo from the web of a nice one…
NOT FREE !
Nice eh… It’s what it should look like… But then it would not be free, would it ? Nope a free one looks like this…
FREE !
Oh ya someone got some free green paint and no sense of when to stop. Unless your lazy and did not have a ladder …then the roof gets left the old color. Like it did.. Sad.
Some body work needed
Today I towed it home. Which makes it better in some respects. Neither the Boler or the Scamp could be towed home they had to be loaded on a flat deck for that trip.. This time I did not even have to put air in the tires.. But lets share the story.. or what I know anyway.
It’s presumed this trailer was given to one of our street folks. Whom had someone park it for them up one of our forest roads. CO tells them they can’t do that and have to move.. So they make a deal to park in my friends RV park… But they don’t pay the rent .. and after a few months sneak away at night. This trailer sits there locked up and waiting for them to return for the stuff they have horded in side.. Nope months go by and they are gone .. The RV park is sold and the new owners want it gone.. Who ya gonna call ! Rob. Now I’m going to say the above story plays out everywhere. The bleeding hearts say these folks need help , community support and a place to live.. sure so long as it’s free and there are no rules. And what’s up with all the stuff ! Just wait till I start going though the STUFF in side the trailer … God only knows where it came from ?
The shit show
What is the first thing to do ? YA find the floor.. Some of the stuff is good .. Here’s hoping the fridge works.. but I’ll not hold my breath. I need to find a tag or plate with info about the year or Vin number.
Found It !
Both the floor and the Vin number. Today cleaned out the whole trailer Filled my utility trailer for a dump run.
Inside the closet door.
This was one of the things I was looking for.. The factory build sheet.
This was the other thing… The floor. Found a few treasures, Too much to list. But most is off to the dump. The trailer is now empty. Ya got all the proper cushions.. But they are 40 years old. Aside from a filth the trailer is in good condition. Missing the kitchen though.. BUT all the cabinets are wood and can be modified or built to whatever you want. I have sinks , stoves and another small fridge . And several bins of RV parts..
So I’m going to tarp it till I get to working on it . And then I’ll start a Page 2


 Wait for it to cure and then take the screws out and finish glassing the patch. While waiting for that I started to remove the windows. Darn ! Someone used silicone to glue the windows in place ! And the rear window leaked anyway. Nope you must use butyl putty tape when installing things like windows.