Category Archives: Other Projects

Stuff that does not fit any catagory

70’s Terra Jet 453E page2

March 2017:

Rebuilding the TUB

I have a great way of dealing with the bulge of the chain run that plagues the underside of all Terra Jets.   In the case of this one it hangs a further two inches below the bottom at the rear axle.  And that makes it vulnerable to hitting rocks …  and therefore making a hole …that lets the water in !   Can’t have that.  Nope..  And I don’t want to be repairing that after I have gone to this much trouble.  My solution:

Add the two inches right across the back..  and cap it with 1/8 ” plate steel.  Ha ! take that rock !   This also makes a good sump for the bilge pump,  and changes the curve at the rear..  ( stern )

This is just the test fit..  but I’ll be welding these new 3/16 ” thick sides to the frame.

Done..  Also have to think ahead to what will be needed and easier to install now.. like the brake holder.  Two small pieces to stiffen the 1/8 bottom plate too..  and a quick paint job on the underside..  Next…

I tacked the 1/8 th plate into place..  so I could flip the tub over.   and weld up some of the holes..

There was lots of those holes..  It’s a good thing the tub won’t have to win any beauty contests.  But I’m wanting it strong and leak proof not pretty.  Things have to work with the other parts though..  Like the body needs to seal to the top of the tub.

So I’m rebuilding parts like these front corners.  I will test fit the body too..  And other considerations like the fuel tank , the seat and the battery holder.   They all need good mounting .

This is the tank from an Argo..  It’s nice and flat..  but still two inches higher then where the seat was..  Is a higher seat a problem ?  will have to think on this one.  In the mean time I cut the welds ( they were bad anyway) on the seat supports.   I want them bolted through the tub …no welds.  With this setup the tank will be hidden under the seat..  Once things are going together I’ll test out seat locations.

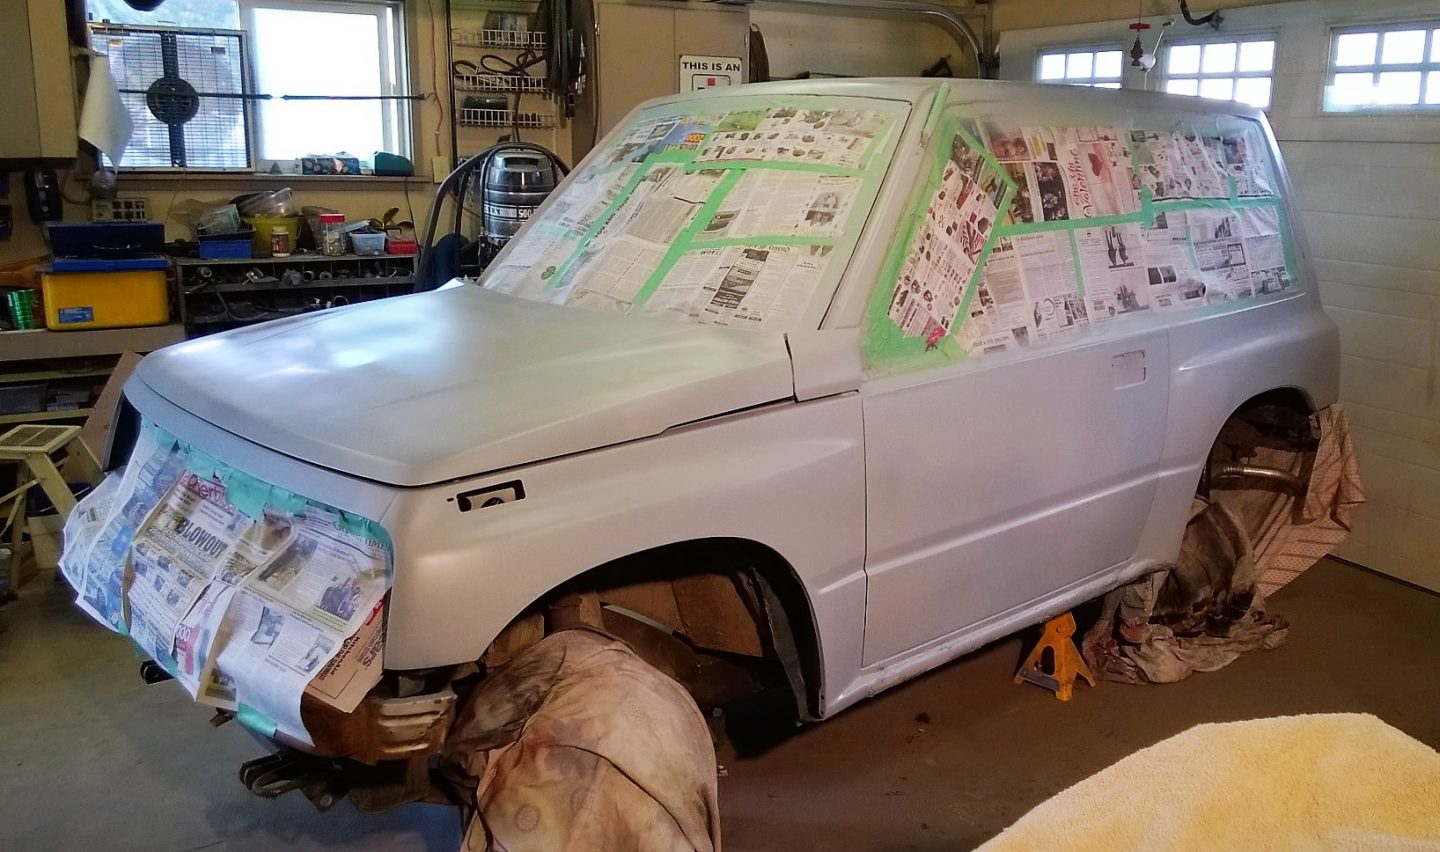
I brought the body in for a test fit..  and to see how things line up.  I’m going to build a winch mount on the front bumper ..and need to know how far back it can go..  And also the sides need to fit in the running boards..   Got it figured out.   Almost all holes are filled in the tub.  Just two more big patches..  and the bottom can go on.

One down.. one to go.  This was a big flap cut into the front ..  Not the tidiest welding.. but strong..   Time to get the bottom done.  lots of careful welding to do.

Well that was NOT easy..  We used straps and blocks to get the bend in the bottom..   That 18 Ga sheet will not bend easy.  The small transition piece had to be heated and hammered into submission.   But it’s done except the curved piece for the back…  I’m thinking a press will be of help there.  And here’s a new short video .. part 2:

I’m taking a few days off to heal up my eye.. got something in there and was finding it hard to see detail..

Back at it..  and I got all the welding done on the tub.

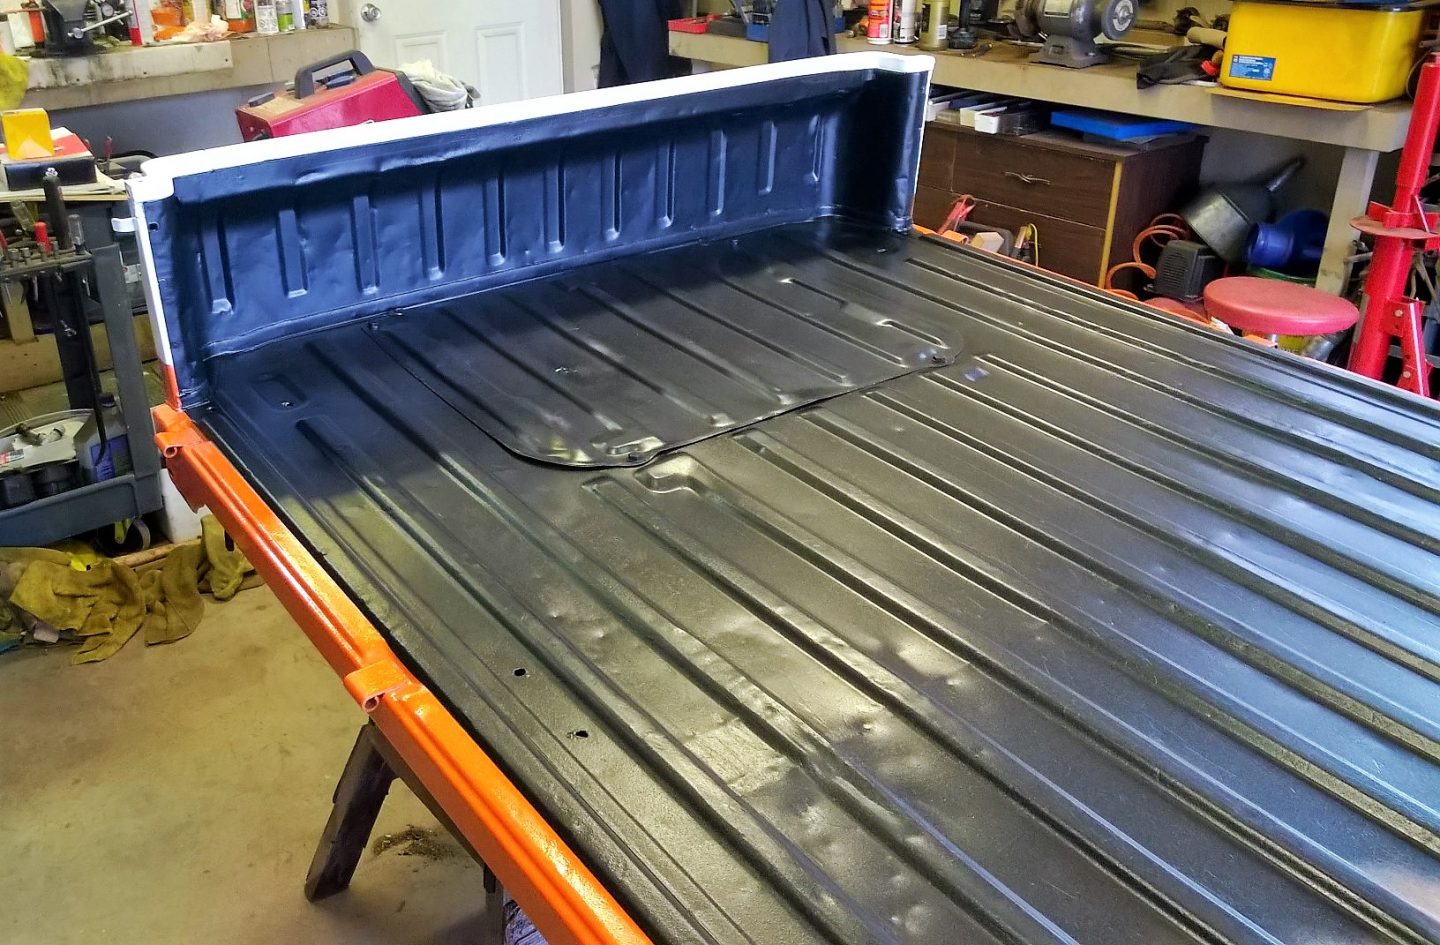
Here we go..  the rear is done.. even have a new drain plug.  The next step is applying the box liner finish..   And it’s time to start another page..

Continued on  Page 3 

Or back to  Page 1 


70’s Terra Jet 453E page1

Going to build a Keeper :

This is #2.. of the 3 Terra Jets I had.  # 1 was sold over a year ago..  Number 2  & 1 came together as a deal..

Bringing them home..

Number 2 is the one up front on the trailer..   And other than missing it’s body.. it’s very complete and almost in working condition..  ( if the motor ran ).

It would have looked like this one above.. except it was blue.  However it looked like the one below when I rescued it.

There was shreds of the body still clinging to the tub.  Just the head lights left !  I always figured this was the good one of the three..  it rolls , shifts and steers.  And it has the better driveline.   The third Terra Jet  that I picked up from a different person gives me a body for this one.. a great running Honda 20 hp motor, and a lot of good parts.   # 2  here has been sitting in the wings waiting ( two years) for it’s TIME.   Now is the time..   so lets get going:

The first step is always…  bring the project into the shop ..   It’s not quite spring yet .. so I have a bit of time before all the spring stuff happens.. and then I would be too busy to do this project.  I want to note here that I intend to use the best of the two Jets I have..   Whether it be the tubs , transmissions..  or any of the parts.   TJ number two is a 1976 model, with a few extra features that are nice to have.   The third TJ is a 1973, with the body, lots of good parts,  and a good tub / frame with the bottom cut out.

Let’s Start:

But where to begin..  I pulled the wheels off..  and put the TJ up on stands.  Then I got down and had a good look under the TJ..   well I found five cracks and holes..  and the underside looks like it was in WW II ..   So we could be looking at a new bottom, and I’ve done that before..    looks like the frame is welded into this one too..  So..  I need to compare this tub to the one outside #3 TJ..  the bottom is already cut out.. And it’s all in pieces.  This is what number three looks like..

And the tub looks better…  But I still have to take the 76 apart.. I need the transmission no mater which tub I use.   And taking things apart  on something old and rusty is never easy.

The rear axle is the most fun!  It is through the transmission with a long key..  and after all these years ..refuses to let go.  We did get the hubs off with a torch, a puller and a lot of banging.  And so far all the aluminum bearing holders are in great shape.    Now I’ve seen others doing this and cracking the transmission case…  so I’m trying a different way..   by pushing on the transmission final drive where the axle passes through.

I’m using a pipe that slides over the axle and presses on the transmission.  And using the axle nut / washer to pull the axle out.  This is proving to be very difficult.  Finally I had enough and took a big hammer to the axle..  and it came out.  All is good..  So we removed the steering and the front axles … and flipped the tub over to see EXACTLY how bad things were.

VERY BAD..   There was two fiberglass patches.. and a few places where I could just poke a hole with my finger..   Plus it’s bent up bad..  So I’m thinking the tub from the 73 jet is looking better and better…  And the fact that it’s all apart and the bottom cut out is a time saver.  looking like I will have a Frankenstein Terra Jet..   73 and 76 parts.  and Honda power.. new bottom..   yahoo.  Here’s a quick video with a look at the better tub..

Transmission :

I took the time last night to clean the grime off the transmission we just removed.  It had a bit of oil showing on the dipstick.  Also functioned as it should.. So I figured all is good.  Well maybe not !

Once cleaned I discovered that it had been welded to repair some cracks.  so the big question here is dose it leak ?  I will finish cleaning it good and fill the oil up and see.    It’s now 3/4 full of oil..  and no leaks..  The axle seals look like new..  and lots of form-a-gasket was used.   so I’m not taking it apart..  It’s good.  On to other stuff…

The Tub:

I finished stripping all important stuff from the 76 tub.  Even cut the frame out..  And it all got dragged outside.   The tub from the 73 TJ got brought in and flipped over..  And its’ great..

Someone even painted the bottom of the frame !   BONUS !  Plus the metal is in way better condition..   A few patches are needed..

Which you can see in the above photo..  They did not know how to remove the steering and the chain tensioner..  so they cut holes !  Geeze..  oh well I can fix those..  it’s just more welding..

And time for a new page .. Rebuilding the tub

PAGE 2

1999 Craftsman GT3000 Tractor Page 2

The Re-assembly / Restore:

If you are here and you didn’t read the first page..   then do that first..    PAGE ONE:

dscn2567-235132042

Let’s keep this photo of a nice one to see how I do..   I will be re-painting the body.. and I’m using what I have on hand.. .and that is the Civic Red that I painted the Suzuki Sidekick last winter.

WP_20160519_002

So it’s a change of color..  a color that Sears would not have used.. but I don’t care..   I like this color.   Anyway..  back to the task at hand..

wp_20161213_002

That means starting with the things that need repairing..  like the steering.   Here’s the steering all fixed with new bushings, greased and painted… good to go.   Hey it’s a start!  And other than the mower deck ..it’s the only thing that really did need a fix.  I took the frame to the car wash and gave it a bath..  It’s now sanded and cleaned and ready for paint.  Going to be nice working on a clean frame.

wp_20161214_002

Well that’s done.. But I don’t want to start messing with it till it’s had a few days to cure good.

Well I’ve painted most of the parts..  and the frame has had a few days to cure good.  In the mean time I’ve been cleaning and draining (all over the floor)  the transaxle.

wp_20161217_001

It’s now back in place.. I need to find a filter to fit, and then refill the oil.  This transaxle has a separate pump from the drive..  and a spin – on filter too.  It’s twice the size of a normal lawn tractor.  The plan here is to get as much back together while upside down.

Jan 2017:

Well I finally got some ambition and I am getting back to this tractor.  Trying to remember how things went together..  And realizing that spring is just around the corner.. I have other important stuff that will need the shop..  and I will need this tractor come spring.

I flipped the frame back right side up..  I’m slowly filling the transaxle with oil..   and the steering is back in.. and working soooo nice.  I have no idea how much oil goes in to the transaxle..  so I’ll just keep filling till it comes out the breather..  Found a new filter.. turns out to be the same one used on the motors.

Got more done today…  motor is in,  the trans is working good..

and a lot of things are fixed and adjusted good..   Next the dash … wiring … and the fuel tank..

April 10 2017:

Finally got back to this tractor..   and a good thing cause the grass is growing..  and the plan is for this to be my main mower.

When I parked it over to one side of the shop.. this is what it looked like.  Rolling with the wiring mostly done..   In the last few days I had time to finish up all the “putting” back together.  Today it looks like this…

All the best parts from the two GT 3000’s . And that included some of the green painted body parts that were is great condition..  So no need for a paint job.  New seat.   Motor serviced.. and today we started it up for the first time in a while..  It runs great..   took it for a spin in the yard and WOW.  !  All the work on the steering paid off…  and this is a pleasure to drive.   The concerns with the transmission are gone..   We are calling it “Big Green Meanie”  It is much bigger than most lawn tractors.   Next the deck needs to be all rebuilt..

April 24 th  2017:

It’s taken a lot of time to get the deck set up with new belts and the one new arbor.  Lining things up..  figuring out which spring goes where.  It was messed up when I got it..  so I needed to get it right again.  There is very close tolerances for the two belts.  The first try I got the wrong size belt from the motor …and it was rubbing on the metal.  Last night I got a shorter belt and that solved all the problems.   Also I had to make a whole new wiring harness.   All the safety circuits were giving me problems ..  So I took everything away except the clutch & PTO interlock for starting.  So yes you could get of the seat while the mower is engaged..   but would you !  if the PTO is just a simple button !  And using the parking brake is a must ..unless you want the tractor to wander off on it’s own.  Just like all the new cars these days ..  they presume you are stupid and should not be allowed to operate a machine.

So here we are..   ready for duty.   and hoping it does ok this summer.

2003 Rally 200 QUAD

bombardier-rally-200

This is a photo from the web..  Same yellow Rally..  just all together.

IMG_0368

This is the one I bought.  The foot well was taken of to better access the motor.   A bunch of other bits are in a box too.  But it’s all there, and this was a running quad before the valve decided to say hello to the piston.  Tires are worn .  .. but holding air.   The plastics are great, the seat has some stitching coming apart on one side.   Everything else seams to be in fine shape.  So I’m thinking it’s worth fixing the motor..

2003  vs 2005

Bombardier made the Rally 200 for a few years only.  Designed as an entry level quad with some big quad features.   Water cooled 4 stroke Rotax motor,  hydraulic disc brakes.  CVT drive .  These are good stuff to have.  2003 was the first year, and the design was pretty cool for then.   Instead of racks they molded in trays front and back.  I like that.. but they quickly went back to racks the next year ?   also the 2003 has a manual disc brake on the transmission .. and the 2005 has a hydraulic disc on the rear axle.   Some little changes like moving the key and indicator lights up on a handle bar pod.   Later I will take some photos of the two side by side..

WP_20160828_001

It’s later !  Here’s the two together.  See the wheel size.   Which changes the height a bit.   The racks make the red one look much taller.

WP_20160828_002

So there are no plans for this quad YET..   I parked it and covered it in a safe place for now…

February 26 2017:

It’s seams impossible to find the top motor parts to repair the motor..  They just don’t make that size motor anymore and no one has even a used motor..  It is said that these are a weak motor and easily drop a valve.  SO I have another plan.

1994 Yamaha Timber Wolf 250 4×4

This sad quad has been hanging out in the yard waiting to see if it’s worth fixing..   And there is one big question ?  Does the motor run ?

So we dragged in into the shop..  I removed all the wheels , plastics and racks.  Today I’ll clean the carb,  check the wiring and see if we have at least a motor..

Well it runs.. but not well enough to go through all the work to transplant the motor.   so back to trying to get the motor parts.

2005 Bombardier Rally 200 Quad

Well this came up for sale ..  at what I’m going to say was a very good price..  Seems not to much interest because it’s a two wheel drive Quad.  WP_20160818_001

So what !  It runs great..  Has NO damage .  Aside from 4 wheel drive .. it has all the good stuff.  4 stroke 200 cc water cooled motor. CVT drive.  three hydraulic disc brakes.  newish tires.  Above is the photo in my yard before I even cleaned it..   It’s not perfect.. there are things to do.  The battery needed to be charged.. the racks need new paint.  and they have by-passed the starter solenoid with a big button ?  So I’m going to take a few days and go over the Rally and adjust … fix …  and add a few goodies.

WP_20160820_001

Into the shop and start removing bits and pieces..  So far I’ve got a list of things that need fixing and things that bug me.  And one thing that I did not see at first..  :

  • The front brake reservoir window is missing.  Therefore no fluid .. no front brakes !
  • That hokey start button..  it’s wired directly to the starter, bypassing the solenoid.  Why ?
  • The foam air filter is shot..  I’ll make a new one.
  • The front clip on the seat is loose.  You can lift the seat there.
  • Battery could be bad..
  • The chain needs to be adjusted.
  • The rear wheels ..  they have been mounted backwards to make the wheels wider ?  not needed…  Kids !

It’s not that big considering the price we paid.  The first thing I did was cosmetic.. I removed the racks .. sanded them and welded a hook on each end.

WP_20160820_003

WP_20160820_004

There’s no plans to put a winch on this quad.  And the paint was all scratched of the front and back bars.. so I installed these hooks to use for pulling on.

WP_20160820_006

Then the four pieces got a new gray paint job.   I removed even more parts from the Rally so I can get to some of the cleaning and wiring.  Because first on my mind was the hard wired start button.  I needed to know what was wrong with the factory start button.  So I took it apart and found a broken solder connection. Simple fix.   Meanwhile I’ve had the battery on charge .. three times and it tests out just on the verge of bad..  so a new battery was bought.. something we thought was going to happen anyway.  Ok a little “pimpin”  while things are apart.

WP_20160820_008

What to do with that hole where the start button was ?  A horn button of coarse..  And why not a power plug too.  !

WP_20160820_005

Routing the wires is easy when this much of the quad was apart.

WP_20160820_007

And lets not forget the all important LED running light.

I’ve got the quad all back together now..  Replaced the window in the brake reservoir,  Found out the chain has been adjusted to the limit.. so maybe a new chain.   The rear wheels have to stay as they are ..  the rims are not the original ones.. so the offset is too much inward if you turn them around.   New battery installed.  New foam air filter.  I even replaced the gas line.  I don’t like those clear hoses.  It’s running good.

WP_20160822_001

And Mo is liking the new ride..  just the right fit for her..   Remember the chain had a lot of play.. I bought a new chain.. made it the proper size and it fits perfect ..  with the adjustment set back.  So it will be easy to take up any slack.   We now have a 100% working quad.   Time to take it out for a run..

While I was looking for parts for the 2005 Rally, I came across a 2003 Rally being sold very cheap.   The motor had a broken valve which also wrecked the piston.   It looks fixable.. so I bought it and brought it home… See the new post   HERE.

two-quads

Sept 28 2016… and we finally got to take out the two quads.. mostly to see if Mo likes this as a activity..   we had NO troubles.. BUT she feels that this is not her “thing”…  so she want’s to sell it ..  no need for two..

Small Tilt Deck Trailer

Aug 2016:

Realizing that ramps were not working good for lawn tractors.. I needed a small tilt deck trailer that could be towed by the Carry.

WP_20160806_001

I bought this off a fella for $100.  a few months back.  It’s an old tent trailer frame.  Which does not tilt,  the tongue is a little bent, but the wheels and springs are like new..

WP_20160806_002

And it has new lights !  BUT it’s seven feet wide..  I want the trailer to be only five feet wide.  So time for some mods.

WP_20160809_001

Here’s the frame after removing the wood.  There is jack stands on all four corners.. Some are bent up, but all of them haft to go.  I can use the bits I cut off to make the frame a bit stronger.   I need the rear to be tapered and slim so it comes close to the ground when tilted.  So I’m cutting off the rear bumper.  The main frame is four feet wide. The wheels are another eight inches on both sides.  So I will need narrow fenders..  and the lights will have to move forward so they don’t hit the ground.

Cut Cut Cut .. Weld Weld Weld…

I plan as I go.  And so far it looks good.. I fear I’m adding more weight with all the extra metal..   But I don’t want a flimsy trailer.

WP_20160811_001

I moved the axle to the top of the springs..  and that lowered the trailer by 4 or 5 inches.  Now I’m concerned that the deck will hit the wheels..  Once I flip it back over I will see.

WP_20160811_002

This took awhile to figure out..  and a few trips to the metal stash to find the right bits.  But I got it.. very “over built ” tilt system for the hitch tongue.  Then I flipped the trailer back on it’s wheels and could see two things..   The wheels are close to the deck..  So maybe small shallow fenders?  And the deck is just a touch heavier on the front so it won’t stay in the tilt position.   I was thinking of all kinds of ways to fix this..  adding weight to the rear.. no..   Finally I thought to tighten the hinge bolt  !  Now it stays wherever you put it.

WP_20160811_005

Here’s a view of the hinge.  I purposely located it forward of the axle so the deck would drop down..  DUH.. the real hinge point is the wheels.   So with the bolt tight things work fine.

WP_20160811_006

Here’s the right side up view of my pin and pocket for the tongue.  Very sturdy..   There’s a few more things to do before the deck wood goes back on..  Like these…

WP_20160811_004

Tail light holders !   And a mount for the hand winch…

WP_20160813_001

Yes a hand winch will sit atop this platform.  Keep it simple and light ..   I’ve got the tongue all fixed up with a spare tire mount a hoop for the safety chain..   And I used the best jack stand  and welded it on the bottom of the tongue ..  CAUSE I CAN.

WP_20160813_003

Looks like this now..  The jack stand is adjustable for height and folds up to the tongue.  The wiring is done too.

WP_20160813_002

So now we have lights..   Oh and here’s what the winch looks like.

WP_20160813_005

Just needs bolts and the strap… simple.   So I’m ready for the plywood to go back on..

WP_20160814_001

It’s a perfect 5 ft x 8 ft.  and I had enough of the plywood .  I also mounted the tie down rails that were in the box of the Carry.   So it’s all done !

WP_20160814_003

It’s sits level hooked up to the little truck.  Good

WP_20160814_005

And tilts nicely to the ground with only a 3/4 ” lip

WP_20160814_004

A winch for the dead tractors & spare.. We are styln…  I have the registration now and a new plate.


1989 Suzuki Carry mini truck Page 5

Aug 2016:

The Extra Stuff:

That makes the little guy mine..  OR.. Rob’s creative corner..  where I “pimp” my ride.  I’ve already done some “pimpin”  like the keyless locks, the new stereo.  But.. I’ve got all the supplies to build a covered canopy for the back.  Also I’ve got a new winch, the wiring and the metal for building a plug-in winch / bush bar.

WP_20160717_001

Here’s is some of the stuff for the winch set up.  The winch will be mounted to a hitch extension.  This allows for a snow plow to still be plugged in..  or whatever ?  This winch could be used on any vehicle with a 2 ” receiver.  It will be operated by wireless remote, and just needs power.

WP_20160718_002

And this is what I’ve come up with.  looks a bit strange, but it’s designed to ….  1 – not hide the front license plate.   2- not sick out from the truck any further that necessary.  3- bush bar side extensions are plug-in and can be removed.   The roller fair head mounts to the front, and of coarse you can still plug in a hitch.

Aug 2016:

Well I’ve put about 100 or more kms on the little bugger..  and there is a tiny oil leak .. I think from the oil filter..  Everything was on hold while we had our Camping / family reunion..  And the Carry was there..

WP_20160724_001 1

But not pulling the fifth wheel..   Before I get back to finishing the Carry up..  I need my little trailer built so I can fetch tractors with the Carry..   So I’m pausing to do that …      Tilt Trailer Bolg

So I’m in no hurry to do those extras like the winch..  I’m using the truck every day for work..  I’ve done a new oil change and that fixed the little leak.  Checked the timing , the hoses.. everything is good.  And it’s running good too.   This weekend my little truck will be in the car show at the City Park..

wp_20160821_001

Here it is..  no prizes..  However someone saw it that wanted to buy it from me..  And a month later I have sold my little truck to a very happy guy.   So on Sept  27 th 2016 I watched it drive away.. Going to miss it for sure.. was really handy.  But time to move on..

1989 Suzuki Carry mini truck Page 4

Work on the BOX:

Time to improve the box…

WP_20160703_002

Well here it is..  with the tie – down rails removed.  First thing.. weld the many holes up.

Color Scheme:

On the first page I had a mock-up of what I would like to see.. Since then I worked on the plan a bit more.  And of coarse the frame ended up black.  But I still would like some gray too.  So the head rack, hitches, winch mount and stake pockets will be grey.  The bottom of the truck will be Orange as planed.   Like this….

Carry Orange

The plan is to build a removable winch for the front that incorporates a bush guard.  It could be moved to the rear as well if needed there.  The winch will be wireless remote.  Better get back to working on the box..

WP_20160705_002

Using a combination of Por 15 and undercoating, I sealed up the underside.  In the photo you can see I have primed the parts that get the orange paint.

WP_20160705_003

And this is the first coat of orange.  I will flip the bed over to second coat.  The weather was not cooperating ,  It was cool and the paint took forever to cure.  so it’s an overnight job now.   also the paint is very thin for covering..  even after 4 coats you can see through it.  Very frustrating.

WP_20160706_001

So I fought with the paint..  wasted a bunch..  got a fifth coat on there.. but it’s not smooth..  I said enough and will leave it like this..  It’s a truck..  I like the color of this Orange..  so I’ll buy more and carry on.

WP_20160707_001

I’m using spray on box liner that comes in a spray can..  it’s great stuff, and I can do the job quickly.  I did run out with only a small patch left to go..  GRRR.   Off to get another can.

WP_20160710_001

With the bed of the box done.. we got busy and put it back on the truck.  The wiring was all improved and a new trailer harness was installed.  I’ve drove it around a bit and it seams the smoke has cleared.  Once the rings and other bits get seated in this should be the case.  I still hate the orange paint job on the side of the bed.  I’m switching over to good old enamel paint.  And I’m taking the time to brush it on carefully.  Same for the orange.. I had a quart mixed to a bit lighter orange, and that’s what is going on the truck… by brush… carefully..

WP_20160713_001

Here’s the tailgate with the first coat of orange.  The white is done, three coats.  I have also taken most of the dents out..  so it’s looking good.   I’m thinking a black pin stripe dividing the orange and white.

Ok the box sides are done the stake sides are done..

WP_20160714_005

The black pin stripe on the line between orange & white looks great.  The spare tire is back in the proper place.  Both batteries are hooked up.  Still some little things to do..  but it’s useable now.

WP_20160714_006

In fact there goes two bags of garbage…  I can hardly wait to get going on the canopy.. But first there is more details.

WP_20160716_001

The rear trailer hitch has been reworked. Lowered so the spare can be accessed,  painted grey and mounted with heavier metal.  Six bolts instead of Four.  There’s my handy bumper / step plugged back in.  Today I also got the aluminum plate cut and mounted to the tailgate.

WP_20160716_002

Nice eh !  easier to load and unload over the tailgate now.

At this point the truck is done..  drives… got it’s bits and pieces back..  So everything now is fluff.. just stuff I would like to do but not really necessary.   Like:  tarp canopy,  winch,  I plan to finish the orange paint  next month.  I’m starting to build the winch mount..  We will CARRY on..  to a new page for this “extra”  stuff.

PAGE 5


1989 Suzuki Carry mini truck Page 3

Motor Install & Frame Paint:

Well not quite the same as the other projects.   I have the good paint for the frame..  And it’s black.  yup decided to keep it simple..  If I was to change to grey I would have to do a lot more painting.  And the black undercoating that is all over could be a problem.   As for the box..  need to fix the dents , paint the bottom orange,  paint box liner inside,  install stake pockets.   I have also purchased new rims and tires for my little friend..

WP_20160614_001

With a new motor and these..   we will be stylin.

Update on Motor:

So as it turns out it’s not easy getting parts for the motor in this truck.  Apparently several of the internal parts were changed over the years …so..  the pistons I have take a longer connecting rod,  narrow rings and a pressed in pin.  The ring set that came with the truck are the wider / newer type.  So I ordered a new set of pistons that the rings fit..  BUT  the rods I have won’t work with the new pistons.  Solution !   Get my old pistons machined to fit the new rings.  And that only took an hour and $30.  Wow !  Now it’s going back together..   So a new plan is to get the motor ready for install .. then do the frame.  and today we got quite far.

WP_20160618_002

Here’s the motor so far..  Still more bits to go on..  but it coming together quickly.

June 26 2016:

It really is time to get this truck back on the road.. So I’ve backed it into the shop and I’ve removed the fuel tank …getting ready for painting the frame.  I’m using Por15 paint..  it’s the best at sealing the rust.  Plus it’s a hard finish..

WP_20160627_001

Here’s just the first coat.  And with that I concentrated on the rusty parts.  The important thing is to get the motor & trans back in.

WP_20160626_001

Here’s the new battery box for the right side.  This will hold another tractor battery and give me extra power for the winch.  I’m installing a tube across the frame after the trans is back to hold the cables.  No more attaching them to the underside of the box.

WP_20160628_003

All painted now..  with the new wheels on the back.  And the fuel tank back home , ( with four bolts instead of three).   Ready for the motor…   and the motor….

WP_20160628_001

Is ready for the truck..  Tomorrows job !  The transmission is back on and most things ready..

The motor is in and running !  Ya hoo.  Took a bit of fussing with the timing to get it running , but it’s all good now.  Will it smoke ?  Will it leak ?  we will see.  Here’s a new video..

Now there’s a few vent lines to hook up and some electrical stuff to do.

Electrical Stuff:

I had to remove the dash… which was a good thing..  Not only easier to get the wiring proper.. but the nut had come off the washer nozzle and very hard to reach.  So that is fixed.  I’ve installed a new stereo, a switch for the running lights , and new 12 volt power outlet..  and my favorite “keyless” locking.

WP_20160703_001

I still need the find speakers that will work.  I’m thinking motorcycle / ATV speakers would be a good choice.  Because the space in the cab is tight..  And I decided not to put them on the door.  So they have to be found.  But for now everything is back in working order..  We even improved the battery hook -up wires.  And better ground.   So the box is next…  New page for that…  Here PAGE 4


1989 Suzuki Carry mini truck Page 2

Motor Work:

Now that the motor is out and in the work stand..  time to talk about that..

WP_20160528_005

Wow that’s a huge motor !  And.. it was very easy to pull the motor out the rear.. onto a piece of plywood..  once you remember to disconnect all the hoses.   In fact it was faster than I thought.. Took longer to get it mounted to the work stand.   And so I did a lot of careful removing of the bits..

WP_20160528_007

Here’s a short Video on the progress…

So the motor sat there on the stand for a week… maybe a bit longer..  Seems I’m busier than I want to be..

June 7 th  2016:

Finally got at the motor..  Dave came and in a few hours we had nothing but a naked engine block.   Everything is laid out carefully on a table.   It’s sure hard to tell there is anything wrong with the motor..  The cylinders are perfect.  All we did was a quick honing to take the shine off.   Dave’s gone away for the week, so the plan is when he comes back I will have all the parts clean and painted.. ready for re-assembly.  All new gaskets / seals/ rings and main bearings.   The top of the motor was done so not touching that.

WP_20160607_001

As you can see I’ve cleaned and painted the block.   Yup Orange.  !  That’s part of the color theme for the truck.

WP_20160608_001

Here’s my table full of goodies..  And …

WP_20160608_002

Here’s the new & improved oil pan..  Grey.. once again following the color scheme.  A lot of cleaning , polishing and painting.. but look at the bits & pieces !

WP_20160611_001

As before the whole motor block is orange.  The exhaust is completely painted with extreme high heat silver ( better than rust) . I decided not to paint the transmission..  It’s aluminum.. but I did paint the rusty steel parts.  I am ready for re- assembly on Monday.

Monday June 13 2016:

We got the crank back in with the new bearings and seals..  But when we were changing the rings we ran into problems.  The new rings do not fit the pistons. !  So I did some phoning and will have to wait now for genuine Suzuki rings to come.  So The motor will have to wait once more ..  But if I’ve gone this far I only want it done properly.   I’ll switch gears on the truck and fix up the frame  and box.

New page for that work…   Page 3

1989 Suzuki Carry mini truck

Poor man’s side by side.. Work Truck..  4×4..

1989 Carry

Soo..  I actually bought this little truck for my business.  I’m doing a lot of running around picking up repairs and getting parts..  Using my big truck with the BIG motor is costing quite a bit.   so now I can buzz all over the valley for cheap.  The little truck has business insurance on it.  On the first day of having it I went out and picked up a lawn tractor for repairs.

suzuki carry

Look at that..  actually fits with a bit of room to spare..  but shows how small the truck is..  Both Dave & I with the tractor.. no problem.   so for the business Perfect !

Side by Side ?

Ya.. It can be.  This little truck has a 550cc motor with a low geared 4 speed manual transmission.  4×4 with hi / low range,  diff lock,  auto hubs.  It’s lifted two inches.  Has 12 inch wheels like my quad..  but they are skinny..  The whole truck is only 54 inches wide..  Narrower than some of the side by’s in our club.  So fitting on a trail.. no problem.   Now here’s the bonus ! cab heater !  licensed for the street !  Rain is no problem..  No one wants to steal it daily..  Yes that’s a problem with ATV’s.

Poor Man’s ?

Ya..  With side by’s costing 14 grand and up..  and even a used one is more than $6000.   This little truck is a bargain.   These are quickly catching on with the hunters..  because they carry more.  It’s fun to drive too.. and does not need a trailer to pack it home.

About This Truck:

The odometer shows 24700 , but there is no sixth digit. And since no one drives these much on the highway, we will presume the worst would be 124,700 kms.  That makes sense due to the motor needing new rings.  The motor is a three cylinder 550 cc  Suzuki  ( not a motorcycle engine)  but similar to what was in the Sprints and Swifts.  These little motors rev very high to produce the power needed..  So the rings tend to be the first thing to wear out.  The motor uses a carburetor and simple points ignition.  NO electronics ! not even a warning buzzer for seat belts or key left in the ignition.  Very simple to work on..  I would say the only complex parts are the tons of vacuum hoses from the carburetor and the relays / solenoids that activate the differential lock and front hub lock.  YES push button hub lock..  don’t have to get out and turn in the hubs.  And it all works perfectly.

WP_20160505_003

The interior is in perfect condition..  Just the way it came from the factory.  I will change out the “mono” AM radio for a better “stereo” and two speakers instead of the one.  I’m going to change the cigarette lighter out for a proper power point plug.  Also I’ve added LED day time running lights to the front with a switch on the dash.  Not much room in the cab.. so have to be careful what I add..  cup holders would be nice..  but I haven’t found a place yet.   As far as the body goes.. there is very little rust..  nothing like the rust holes in a Sidekick..  or any of the north American models.  These seem to be better steel.  Just a bit of surface rust that rubs off..  Not bad for something 26 years old.   I have a few dents to take out too..   So away we go….

A bit of Fixing :

I had some spare time ..and I wanted to polish the doors and box sides before I put decals on.  But I got a bit carried away and did some touch up painting too.  Just to get rid of the rust.

May 24 2016:

Time for a Motor Makeover:

I’ve been driving around for a few weeks now.. I love it.. fun to drive.. And it runs great.   I’m getting used to the right hand drive.   But It smokes  ! a lot.  and I don’t want to plaster my name all over a smoking truck..  So now that the shop is free.  and clean..  Time to fix the motor.

WP_20160523_001

There are two ways to get the motor out of the truck..  Fastest is to use a hoist and drop the hole shabang out the bottom.   The other is to remove the box, and remove the transmission and slide the motor out the back.   Since I have no hoist in my shop…  I’ll remove the box.

WP_20160523_002

And that is just what I did..  Look at how easy it is to get at stuff..  Plus I want to clean the dirt and the rusty bits while I can..  even throw some paint on the frame.

WP_20160523_003

Even though the truck is simple compared to newer vehicles.. there is a rats nest of lines to deal with..   Next step is to give this mess a bath.. And some short videos too.

I’m not the fastest mechanic by any means..  so I expect the truck to be out of commission for a least two weeks.  I have other things to do.

May 27 2016:

All the bits are here now.  The new 13″ alloy rims, the gasket set for the motor.  The power keyless locking system, The stereo too.  So I’m not waiting for anything..   Right now the transmission is out on the floor.. and the motor is coming out in a day or so.  I’ve also been thinking about some painting.  My logo will be on the truck..  and I would like to improve the look.  And be unique !  So I’ve come up the idea of following the Kubota color scheme.  Orange and grey.   I’m leaving the cab mostly white..  But I’m painting the frame and it’s parts grey.  Then running an orange stripe down the side .. which includes the lower part of the box.  Here’s a mock up of the idea.

Carry Color5

I haven’t drawn the frame in the picture .. but it’s the general idea.  I also included some wood side boards.  I would like to do that too.  So add to all this the nice new rims.. and we are stylin !

I’m thinking the motor work should be on a new page.

PAGE 2 Motor Work:


Lawn Tractor Fix’n

Mowers 001

As a part of my new business I’m doing Lawn tractor repairs & servicing.   It’s full on spring now so I had to kick the Sidekick out of the shop and make some money.  The photo above is from back in 2008 when I still had quite the collection.  The second one from the right is my 2003 Craftsman DLT3000.  I bought it new when we signed the papers for this home.  Knowing I would have a lot of grass to cut.  I chose that tractor carefully for it’s features.   The bagging system on it came along in 2006.  And started my whole fixing up tractors thing.  Because to get the bagger for $100 I had to take the broken tractor that it was attached to.  Dave and I fixed that tractor and sold it for $300.  That started the ball rolling.

Craftsman12-2

This was the first… and then there was a steady parade of mowers..  too many to count that went through the shop.

Well a few years back I sold off or gave away most of the collection of un-finished ones..  I still have two.  And as you can see from my other posts I’m into lots of different stuff now.  but the tractors are back.. One good one…  I retired the 2003 Craftsman back in 2010.. and passed it on to my Brother.   He used it till the deck was not working anymore..  and he has now passed it back.  I had to replace a bunch of parts on the deck and service the motor.. and it’s back in action.

WP_20160414_002

Here it is with a new seat and all fixed up..  I removed the snow blade mount from the front..  and cleaned it up..  cuts grass like new.  I really love this tractor ..  I chose it for the features..  like foot pedal hydrostatic drive. deluxe deck with all the rollers for anti-scalping.  22 hp V-twin motor.  Gets the job done without even slowing down.  They don’t make them as good as this one anymore.

Currently in the shop is a very sad 2007 Craftsman YT 4500.   I’m restoring it for a customer.  Not near as durable as the 2003 DLT.  This one was used and abused.

WP_20160411_001

Check out the seat.. and the Flintstone bumper..  oh what a mess.  At first I passed this by.. cause they wanted too much for it.  But then they came back to earth and I bought it for the right price.   The 21 hp V-Twin runs good.. so there’s a big thing.   and the hydrostatic drive is good too..  so the bones are good..  The deck is hurting for a rebuild.  So I’ve got new arbors, a belt and blades.   The weak part of these years was the lower dash tower.  It holds the steering up.. and the thin metal is not good for that stress.  I’ve fixed these before so I know what to do.

WP_20160413_002

The only way to fix these  Tractors good is to take it apart.  It’s easier to clean and replace the drive belt, adjust the brake,  service the transmission…  etc..  But I leave the motor on.. no need to go that far.

WP_20160416_001

Well it’s looking a bit different now.  A bit of polish on the body,  and a clean motor.  As I put things back..  I’m fixing the boo boo’s.  One of those is the mounting holes on the lower dash cowl.

WP_20160416_002

well they are just not there any more.. gone.  and someone’s solution was to use big washers!  Like I said before this is a weakness of these newer tractors.  I have fixed this before.

WP_20160416_003

And there you go.. new and improved.  Wider flange = more stable.  Thicker metal = less chance of breaking.   This is half of what it takes to fix the loosy goosy steering.  The other part is….

WP_20160417_001

This plate that mounts under the dash.  It has a bushing to hold the steering shaft ..  a PLASTIC  bushing  ( seen on the left) .  Ya that’ll work good !  for a few years if your lucky.  I made up this METAL bushing & plate to hold it.  It’s 3 ” long and can be greased.  Here’s a video explaining.

It’s all back together now..  The steering turned out very sturdy..

Lawn tractor

I even got the new rubber foot pads on..   The seat is not finished , can’t decide on which cover..  And of coarse the deck is still a work in progress..

Craftsman YS4500

But it’s running great..  and I took it for a spin around the yard.. stopping for a photo…  So while I work magic on the mower deck..  I put out the call for broken lawn tractors..  and got lot’s of response. Too much.. so I had to pick and choose.  This is what I now have for free.

  • A mid 2000’s Craftsman 15 hp Hydrostatic , 42 ”  ( good cond.)
  • A 42 ” deck..  same as the above tractor..  ( good cond. )
  • A bagging setup for the Craftsman.
  • A 2004 Craftsman Mid Engine rider 13 hp Automatic, 30 ” cut..  Rear dump bagger.. ( Motor seized. )
  • A 6 hp Honda push mower ..  ( broken drive)  GOOD MOTOR.

And that’s enough..  The two Craftsman can be restored..

Craftsman mid engine mower

This is the mid engine mower. Deck is off.. but it’s a single blade 30″.  It’s a cool design too.  Just pull the lever to dump the grass.. no need to get off the mower..  Needs a motor transplant and the tires resealed.. then it’s good to go.

WP_20160424_002

Here’s the other Craftsman . this is also hydrostatic.  And has a good deck..   Not sure what it will need.

2007 Craftsman

Here’s the finished 2007 Craftsman , Cuts great , runs great..  ready for it’s new home.

2019:   Not doing this anymore..


1990 Suzuki Tin Top Page 5

Painting the Exterior…   RED !

Back to the first page.   Back to page 4

WP_20160328_001

All Primed and ready for the color.  I had trouble getting the color I wanted.  So I settled for a Honda Civic color ..  interestingly a slight orangey kind of red..  very different.  Lots of pearl in this red.. so I’m hoping I like it.

WP_20160330_001

So far I do !   Have to wait 30 min and then the clear coat..

WP_20160330_002

This is where I realize I’m not a good painter..  In my lust for laying the clear on .. I got a few runs !  Damit.. !  On the second coat.  So Hopefully they will polish out..

WP_20160330_004

This color is going to look different… in different light.  looks orange here..  after I turned off the halogen work lights.   Going to be interesting to see it outside.

WP_20160330_003

Anyway It’s looks good with the black trim.  You would have to take apart stuff to know it was once white.

May 10 2016:

The Suzuki got kicked out of the shop for a month while the lawn tractor repairs were happening..  And now I have sold the blue Tracker.. and have potential buyers for this one too.. So !  Finally got the Suzuki back in the shop.

WP_20160510_001

Welcome back..  time to Get R Done.   I’ve transferred the insurance from the sold Tracker to this guy..  so once we are on the road I can get a new window.   and I’m determined to keep the momentum up on the finishing.  I’ve now got the exterior all back together.

WP_20160515_001

Bumpers, grill, rocker panels and mud flaps on done.   And the mirrors too.  So now I’m moving to the interior.  The power locks are first..  The carpets and the rear door panel all done now to..  I’ve been working on the dash.

WP_20160515_002

Had to wire in the locking system.. and install the new muti-media stereo.  The ash tray is going back.  Only a USB port and a 12 volt power plug.  I’m keeping it simple.

May 19 th 2016:

I’ve been busy..  Got most of the interior back in..  and the locks working good…  just the door panels and the seats to go..   When I tested the electrical I found that none of the rear lights work..  Then I remembered I skipped over the broken wire behind the left tail light..  sure enough the connector was in bad shape..  So I rewired that and all is good..   Here’s a new video..

All Done !

I really put in a full day and got all the rest of the Sidekick finished up.  All that’s left is to take it to Kelowna and get a new windshield.

WP_20160519_002

WP_20160519_006

Looks good runs good.. time to sell it..   and move on..


1990 Suzuki Tin Top Page 4

Painting the interior:   Black !

Back one page.   Back to the first page.

Half way through March now..  Still waiting for the power locks to show up.. but I can carry on with the interior.  Big job changing the all white to all black.  Well not all..  but lots.  what’s not covered with a panel or trim.

WP_20160315_002

Needs a second coat but you get the idea..  I don’t want any white showing..

WP_20160315_003

Here you see the black panel that surrounds the door and windows..  I like this accent, it justifies the black interior.  Again once this paint is cured the doors go back on and the side windows too..  I now have the power locks to install in the doors..  I can put the headliner back as well..

WP_20160322_002

Here’s the headliner back where it belongs…  All clean and the two little rips repaired.  And it smells better too..  I found mouse poop up behind the liner and yucky batting for sound proofing..  All good now.

WP_20160322_001

I have tinted the rear windows and they are also back where they go..   The plan here is to seal out the dust and make it easier to mask off the windows.   There is still lots to do inside .. but it’s time to get to the last of the body work and get the Zook painted.

March 23 2016:    Exterior fixing.

Today I got busy and installed the rear door gasket, and the door sill moldings.   Then set to work on the fenders.  The new left side fender went on without a hitch.. fits great… no more binding on the door.

WP_20160323_001

It’s always a pleasure working with new parts that FIT !   The right side fender however was a bit of a challenge.  There was too much gap on the lower part of the door.  I made the bolt holes a bit more oval.. and got that gap to a reasonable one.  Banged out some dents and it fit good..  The hood did not fit good.  So I removed it and made some adjustments to the hinges..  Fixed the hood prop too..  I can now move on to the yucky stuff.

Turned out not too bad.  In two days I had all the bodywork done..  I’m not being fussy with the rocker panels because they are covered with the plastic trim.  And the rest was easy too.   Talk about color change !

WP_20160325_001

I decided to paint the yuckyness inside the fuel filler.  Normally I would have used the black here…  But I had some red spray paint… so it may not be a perfect match to the red I have mixed for the body… but I can live with a little difference.   I saw a nice yellow Tracker for sale .  Nice until you open the door and the original light blue color was everywhere.  Not Cool !  One more video before painting

Time for a new page..   Painting    Page 5

1977 Argo 6×6

Jigger’s , Bazoo’s and Argo’s… oh my !

What do they all have in common ?  SIX  wheels .  YES.. but they also FLOAT !

WP_20160301_002

Honest hon… it followed me home… no matter how fast we drove..  it was still there !   But seriously it was planned.  I traded one of the Terra Jets for this Argo 6×6.   The 1970 Terra Jet  that  I did not get totally finished last year.   Too many Jets not enough 6×6’s.  The Jigger is gone now..   So room to fill..   We’ll see.  Now that I have one ..I thought I better understand these ..  And the more I understand the more I like them.

WP_20160301_006

Facts :   Argo is a Canadian company started in the sixties.  still here in Ontario, still making them…  still has a dealer network !   They make six wheeled and eight wheeled versions.  A new one starts at $14 grand..   The body is made of thick poly plastic like a kayak.  They are tough..  they float and go anywhere.   These are favored by hunters all over..  There’s room for two adults and two kids..  or a lot of gear.

WP_20160301_003

I really like the controls ..  easier than the Bazoo or the Jigger..  Steering is simply done by pulling back on the lever that’s in the direction you want to turn.  Go straight  is just the thumb throttle..  like my quad.  You can see the gear selector in the photo.. Reverse, Neutral and two forward speeds..   What’s not to like about that..  The tires are looking a bit worn out..  but this one came with seven newer tires so no worries there.

WP_20160301_005

An extra rim too..  Not sure how I’m going to change out 8 inch tires .. All the tire changers I have access to won’t go that small.

WP_20160301_007

Anyway it found it’s way into the shop.  I figured since I was waiting on the door locks for the Sidekick … I would take a few days and sort out the few things that prevented me from just going for a drive.  As you can see in this photo the first thing  is the missing wheel.   I had to order the proper wheel nuts , then I’ll put that wheel back on.. It’s flat but that will do for now..  Here’s a video I made….

Most of the stuff I talked about in the video is done.. I never found a carb kit for that carb.. but there was enough good parts and a new carb to get things working..  The motor runs good..  So here’s a new video ….

Still in need of a new choke control.. Then the motor cover can stay on..   Soon I’ll have to give it the boot from the shop so I can carry on with the Sidekick project.   So what to do. ?

WP_20160305_001

If I’m to use it I would want to address a few things..   To take this on an ATV ride  may not be the best thing.. It’s slower than all the Quads so they would be waiting for you to catch up.   Plus Argos have no suspension so my old body would protest a long day of only the tires and seat to absorb the bumps.   However the seat is soft and if the tires are inflated properly it’s not bad.   If a ride is to a small fishing lake..  then the Argo carries on where the Quad guys stand on the shore watching.. That’s cool.   But in order for me to consider going on a long ride I would want to fix a few things..  Now that we have looked it over, and used it  here’s my list.

  • New motor..  I have a 15 hp OHV new still in the box. comes with a new key start to replace the old mower key switch. Not that the Tecumseh is worn out.. but it’s old , can’t get parts and the charging is questionable.
  • Replace any worn out bearings and axle seals
  • Replace the chain tension idlers
  • Fix the filler tube for the fuel tank
  • Replace the throttle cable. ( it’s a bit short)
  • Replace the choke cable. ( it’s crap)
  • Re-route the muffler out the side. (it’s in the wheel well now)
  • And of coarse install the new tires on re-painted rims.

Most of that work would require removing the top deck from the Argo.. no big deal.. but it’s the way to do it..  Big job… and cost for parts.  On the up side… I would have a perfect Argo.

For now I’ll put it in storage:

2019:  I did sell the Argo shortly after this post..  SOLD